Tools
An image editor, a video editor for Reels and TikTok and eight PDF tools running in your browser, plus the Image anonymizer and YouTube downloader.
Watch the video
Tools gathers what works on a file you already have instead of making a new one: eight PDF tools, the Image editor, the Video editor, Shorts autopilot, the Image anonymizer and the YouTube downloader.
In the Studio pillar of the left menu, the tools sit right under Assets Library, each as a group of its own:
| Group | Entries |
|---|---|
| Image Editor | Image editor |
| Video Editor | Video editor, Shorts autopilot |
| The eight PDF tools, one entry each, from Edit PDF on | |
| Tools | Image anonymizer, YouTube downloader |
Assets Library itself keeps Assets and Shorts autopilot. Each entry opens its tool straight away, and the menu follows the PDF tool you’re on.
Find a tool
Every tool is in the dark band at the top of the page. At its foot, two folder tabs sort them, each with the number of tools it holds:
- PDF: Edit PDF, Merge PDF, Split PDF, Organize PDF, Rotate PDF, Extract PDF, Crop PDF and Compress PDF.
- Pictures and videos: the Image editor, the Video editor, Shorts autopilot, the Image anonymizer and the YouTube downloader.
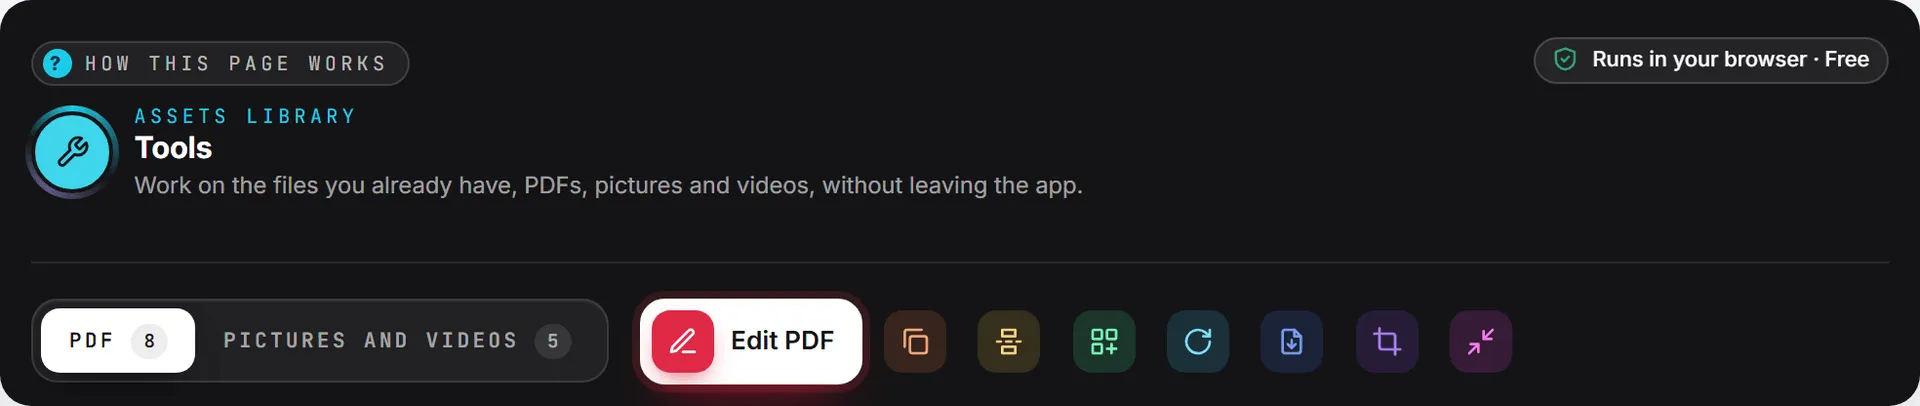
Click a folder tab to open its tools next to it, as a row of tabs. Each tool shows only its icon, except the one on view, which shows its name too; point at a tool to see its name. When a page opens, the folder that holds the tool on view is the open one. With the keyboard, the left and right arrow keys move from one folder tab to the other.
The eight PDF tools share one page, so moving from one to another keeps the document you have open. With no tool named, the page opens on Edit PDF. The Image editor, the Video editor, Shorts autopilot, the Image anonymizer and the YouTube downloader each have a page of their own. How this page works, in the band, opens a short help note, and the Runs in your browser · Free tag shows on every tool except Shorts autopilot and the YouTube downloader.
A PDF already in the library can go straight in. In the Assets Library, open the Actions menu of a PDF and click Open in PDF Tools: the page opens with that document loaded.
Who can use them
| Tool | Who sees it | What else it takes |
|---|---|---|
| The eight PDF tools | Everyone in the organization, whatever their role | Saving a result into the library takes the editor role or above. A viewer can still download it. |
| Image editor | Everyone who opens the Assets Library, whatever their role | Saving the result into the library takes credits in the wallet, like any upload. Downloading it takes nothing. |
| Video editor | Everyone who opens the Assets Library, whatever their role | Saving the video into the library takes credits in the wallet, like any upload, and the fast captions and the voiceovers, music and sound effects made in the Sound panel are billed. Downloading it takes nothing. |
| Shorts autopilot | Everyone who opens the Assets Library, whatever their role | Fast listening, picking the moments and framing them are billed, and each saved short counts toward storage. See Shorts autopilot. |
| Image anonymizer | Your organization uses Brand Content, and your role has the view right on Content: Image | Nothing: the picture never leaves your browser. |
| YouTube downloader | Your organization uses Brand Content, and your role has the view right on Content: Video | The editor role or above, with the create right on Content: Video |
The Image anonymizer and the YouTube downloader lived in Brand Content until September 27, 2026. They kept the rights they had there, but they no longer belong to a brand: the brand you have picked, and whether its Image or Video parts are switched on, makes no difference. Old links to their Brand Content pages open the new ones. A tool you may not use is left out of the band, and its folder counts one tool less; ask an administrator if you need it. See roles and rights.
How the PDF tools work
Every PDF tool follows the same three steps, which the page lists before a document is open: Open a PDF, Set what to do and Keep the result.
Note: The document is read and changed inside your browser. It’s never sent anywhere to be processed, and the tools use no credits. Opening a PDF from the Assets Library counts as a download, billed as data transfer like any other; see Storage costs.
Open a PDF
- In the Your PDF card, drop a PDF on the box, or click it to choose one from your computer.
- Or click From the Assets Library, pick one of your organization’s PDFs and click Use this file.
- The card now shows the document’s name, its number of pages and its size. Open another and From the Assets Library swap it for another document.
The tool then shows the pages with its own settings, and the button that runs it.
A PDF protected by a password can’t be opened. The page says “This PDF is protected by a password. Remove the protection in the program that made it, then open it again.” A damaged file gets “This file could not be read as a PDF. It may be damaged or not a PDF at all.”
Keep the result
Each run ends on a result card, Your PDF is ready, with a line of facts about what was done: pages turned, pages kept, size before and after.
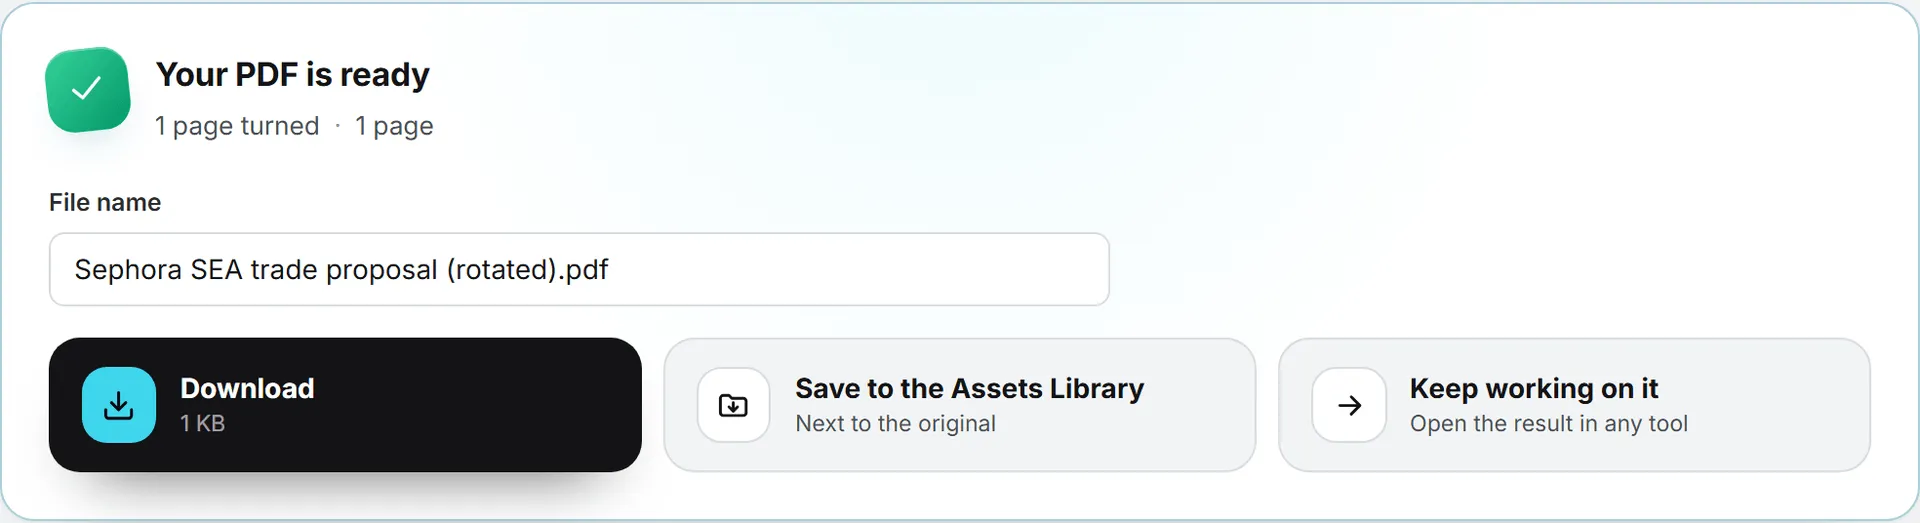
| Choice | What it does |
|---|---|
| File name | The name the file gets. It’s the original’s name with what was done added in parentheses, such as Proposal (rotated).pdf; change it before you download or save. |
| Download | Saves the PDF to your computer. |
| Save to the Assets Library | Adds the PDF to the library as a new asset: Next to the original when the document came from the library, At the top of the library otherwise. When it’s done, the card says Saved. with a link to Open the Assets Library. |
| Keep working on it | Opens the result as the document of the tools, so you can go on with another tool without downloading in between. |
A saved result is an upload like any other: it counts toward the organization’s storage from the next day. See Storage costs.
When a run makes several files (Split PDF, or Extract PDF with one file per page), the card lists each file with its own Download button, and offers Download all as a ZIP and Save all to the Assets Library. Several files can’t be carried into another tool.
Change a setting after a run and the result card goes away: run the tool again to get the new file.
Edit PDF
Edit PDF writes on the pages: text anywhere, a line drawn by hand, a white box over what shouldn’t be seen, a highlight, or a picture such as a logo or a scanned signature.
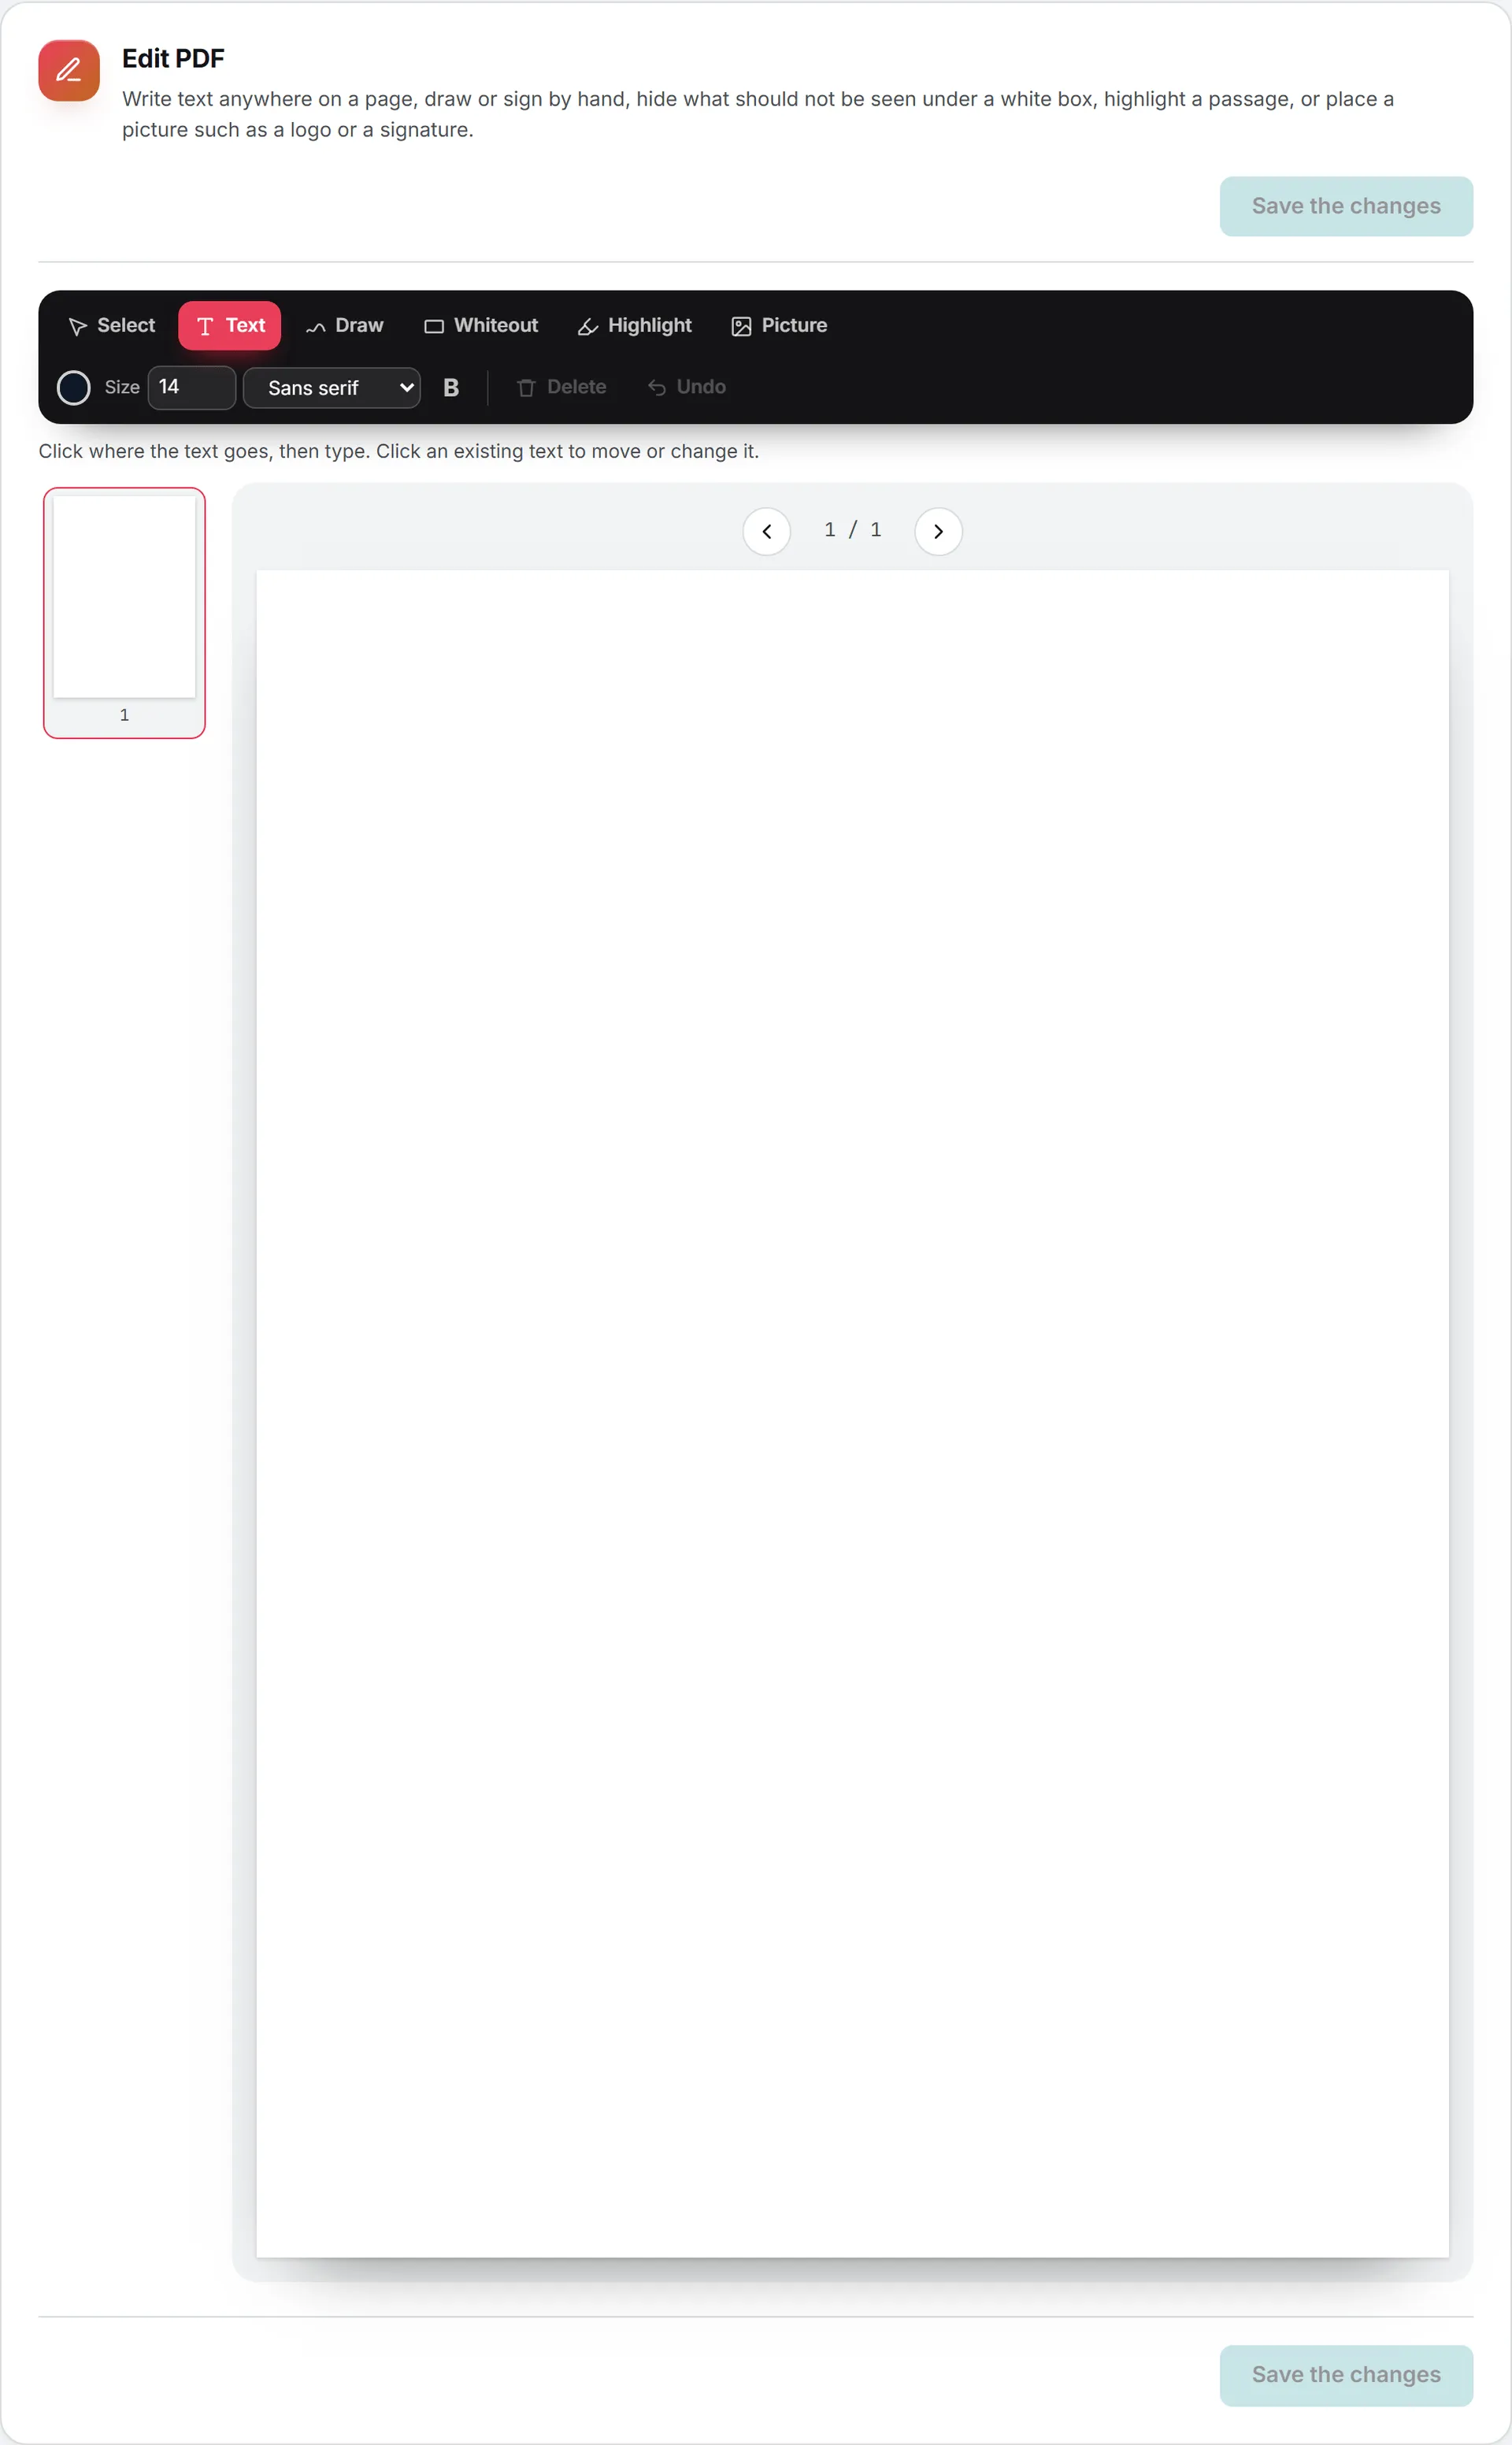
Pick a tool in the bar above the page, then work on the page itself. The strip on the left moves from page to page, and each page shows how many marks it holds.
| Tool | How to use it |
|---|---|
| Text | Click where the text goes, then type. Set the Size (6 to 96 points), the font (Sans serif, Serif or Monospace), bold with B, and the Colour. Click an existing text to move or change it. |
| Draw | Hold the mouse button down and draw: a signature, a tick, an arrow. Line sets the width. |
| Whiteout | Drag a box over what should disappear: it’s covered in white. |
| Highlight | Drag over a passage to highlight it in yellow. |
| Picture | Choose a PNG, JPG, WebP or GIF. It lands in the middle of the page; drag it into place and drag its corner to resize it. It keeps its proportions. |
| Select | Click a mark to select it, drag it to move it, drag its corner to resize it. |
A click with Whiteout or Highlight instead of a drag places a box of a standard size. Delete (or the Delete key) removes the selected mark, Esc lets go of it, and Undo removes the last mark you made. The button under the page counts your marks, Save 3 changes for example, and writes them into a new file. If you leave the page with marks not yet saved, your browser asks first.
Important: Whiteout covers, it doesn’t erase. The text under the white box stays in the file, where it can still be selected, copied or found by a search. Don’t use it to remove confidential information.
Text in the Latin alphabet is written as real text, so it can be selected and searched. Characters the standard PDF fonts don’t have, such as Chinese or emoji, are written as a picture of the text instead: they look the same but can’t be selected.
Merge PDF
Merge PDF puts several PDFs, and pictures if you like, into one document.
- In The files to merge, drop several files at once, or click to choose them: PDFs and pictures (JPG, PNG, WebP). Or click From the Assets Library, pick the files and click Use these files.
- Set the order: drag a row, or use its arrows. The cross removes a file.
- Click Merge 3 files (the number follows your list). You need at least two files; until then the page says “Add at least two files.”
Each picture becomes one page, the size of the picture. If a PDF was open when you picked Merge PDF, it’s already first in the list. A merged file is saved next to the first file taken from the library. After a merge, Keep working on it opens the result in Organize PDF and makes the tool tabs of the band flash, in case you want another tool.
Split PDF
Split PDF cuts a document into several files. Pick how:
| Choice | What you get |
|---|---|
| Every page | One file per page. |
| Every few pages | Files of the same length, set in Pages per file. The last one takes what’s left. |
| Where I click | A new file starts at each pair of scissors you click between two pages. Click again to join them back. |
| By ranges | One file per range typed in One file per range, such as 1-3, 4-9, 10-, in the order typed. A page can go into several files. |
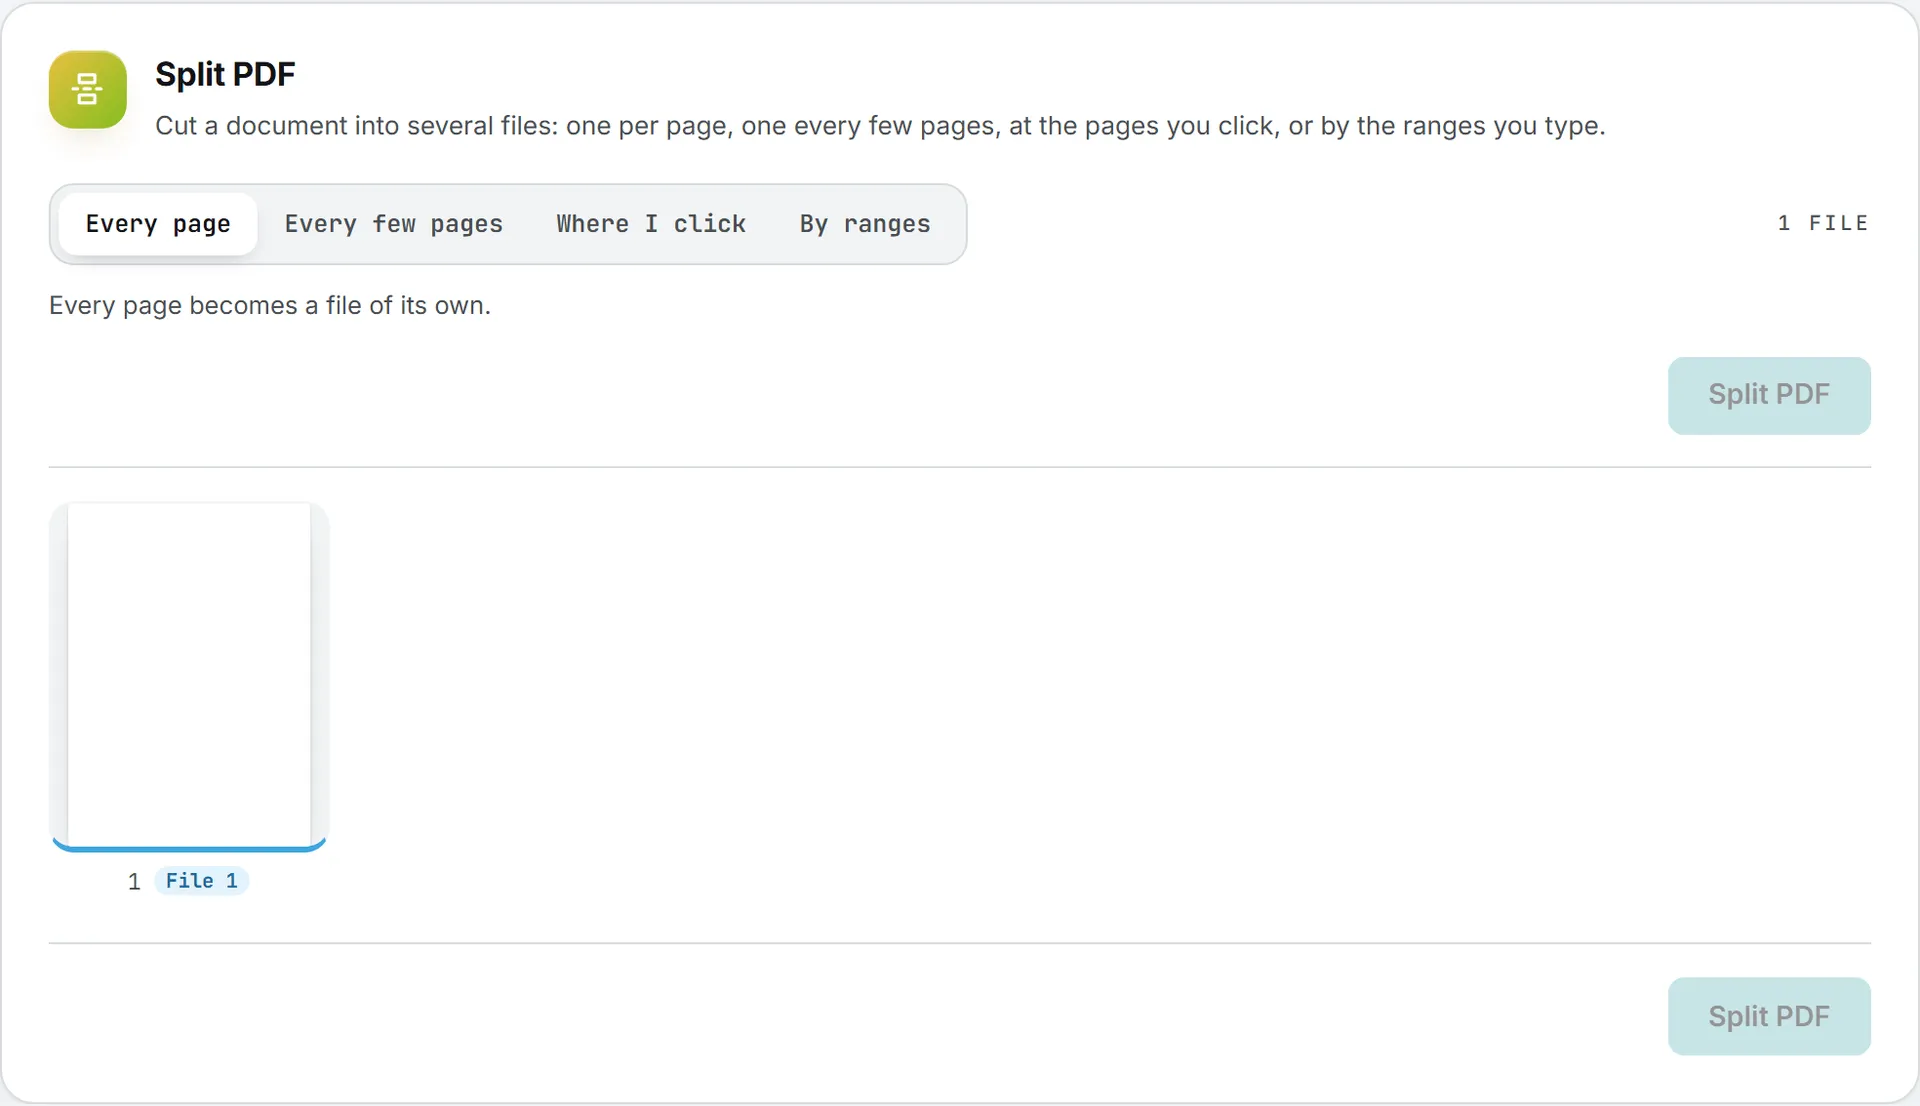
Under each page, a label such as File 2 says which file it goes into, and the button reads Split into 4 files. Clicking a pair of scissors in any other mode switches to Where I click, starting from the cuts on screen.
Organize PDF
Organize PDF changes the pages themselves: their order, which ones stay, and blank pages.
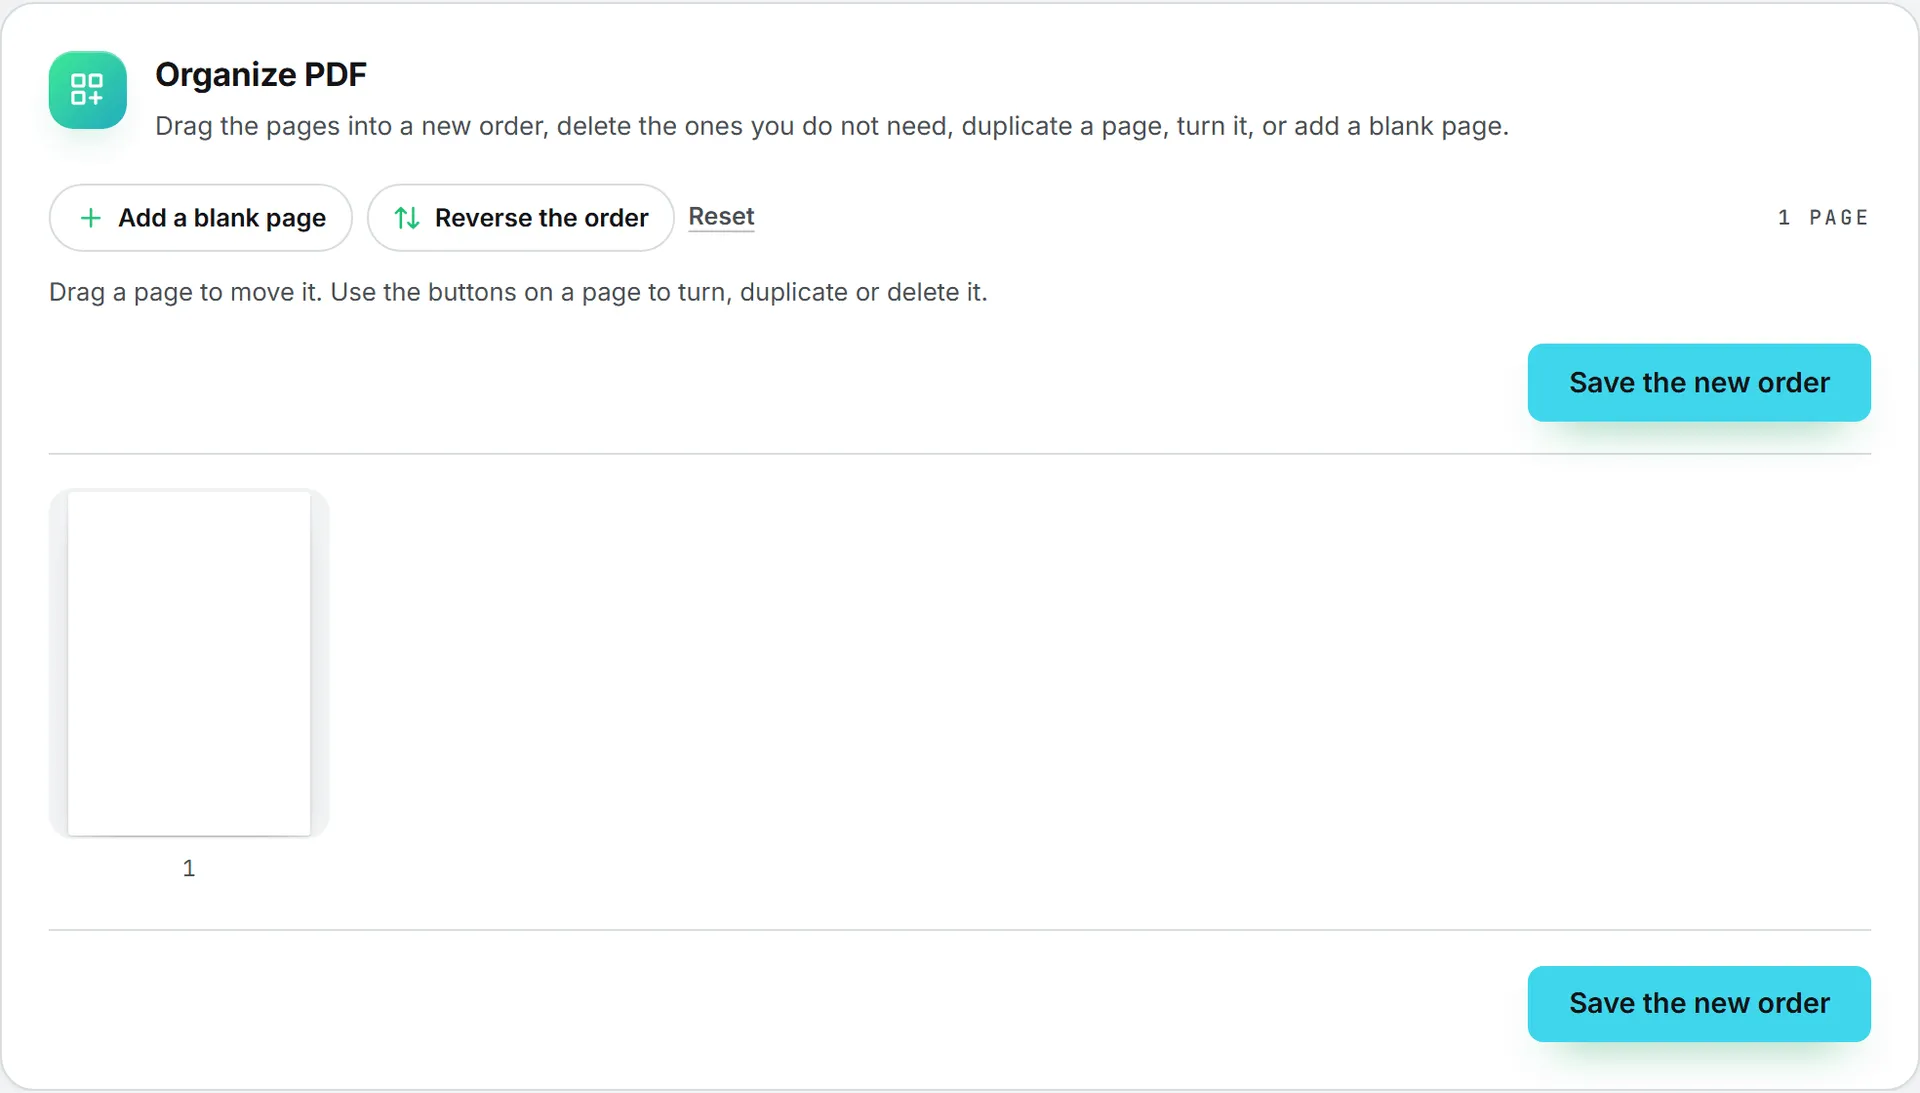
- Drag a page to move it, or use the arrows on its tile.
- The other buttons on a tile turn the page, duplicate it or delete it.
- Add a blank page adds one at the end; drag it where it belongs.
- Reverse the order turns the document back to front, and Reset puts every page back as it was.
A page that moved shows its original number next to its new one, and the count above the pages says how many were deleted. Click Save the new order to get the file. At least one page has to stay (“Keep at least one page.”).
Rotate PDF
Rotate PDF turns pages a quarter or a half turn. Bookmarks, links and forms stay as they were.
- Click the pages to turn, or none to turn them all. Select all, Select none and Reset help.
- Click Turn left, Turn right or Half turn. Each page also has its own turn buttons.
- Click the button under the pages, which counts them: Rotate 3 pages, for example.
Extract PDF
Extract PDF keeps only the pages you pick, as a new document.
- Click the pages to keep, or type their numbers in Pages to extract, such as
1-3, 5, 8-. A range that ends with a hyphen runs to the last page. All, Odd, Even and None pick in one click. - Choose One PDF or One file per page.
- Click Extract 4 pages (or Extract 4 files).
A number past the end of the document is refused with a sentence that names it, and the last page number.
Crop PDF
Crop PDF cuts the margins away.
- Drag the frame over the page, or its handles, to keep what’s inside. Or type the Top margin, Right margin, Bottom margin and Left margin to cut, in millimetres.
- Under Apply to, choose Every page or This page only. The arrows above the page move to the page you want.
- Click Crop every page (or Crop page 3).
Reset the frame starts over. On every page, the frame is applied in proportion to each page’s size, so pages of different sizes lose the same share.
Note: Cropping changes what shows on screen and on paper. What sits outside the frame isn’t deleted from the file.
Compress PDF
Compress PDF makes a file lighter to send by re-encoding the pictures inside it, which is where the weight of most heavy PDFs sits: scans, photos, screenshots. Text, drawings, links and bookmarks stay exactly as they were, and the text stays sharp and selectable.
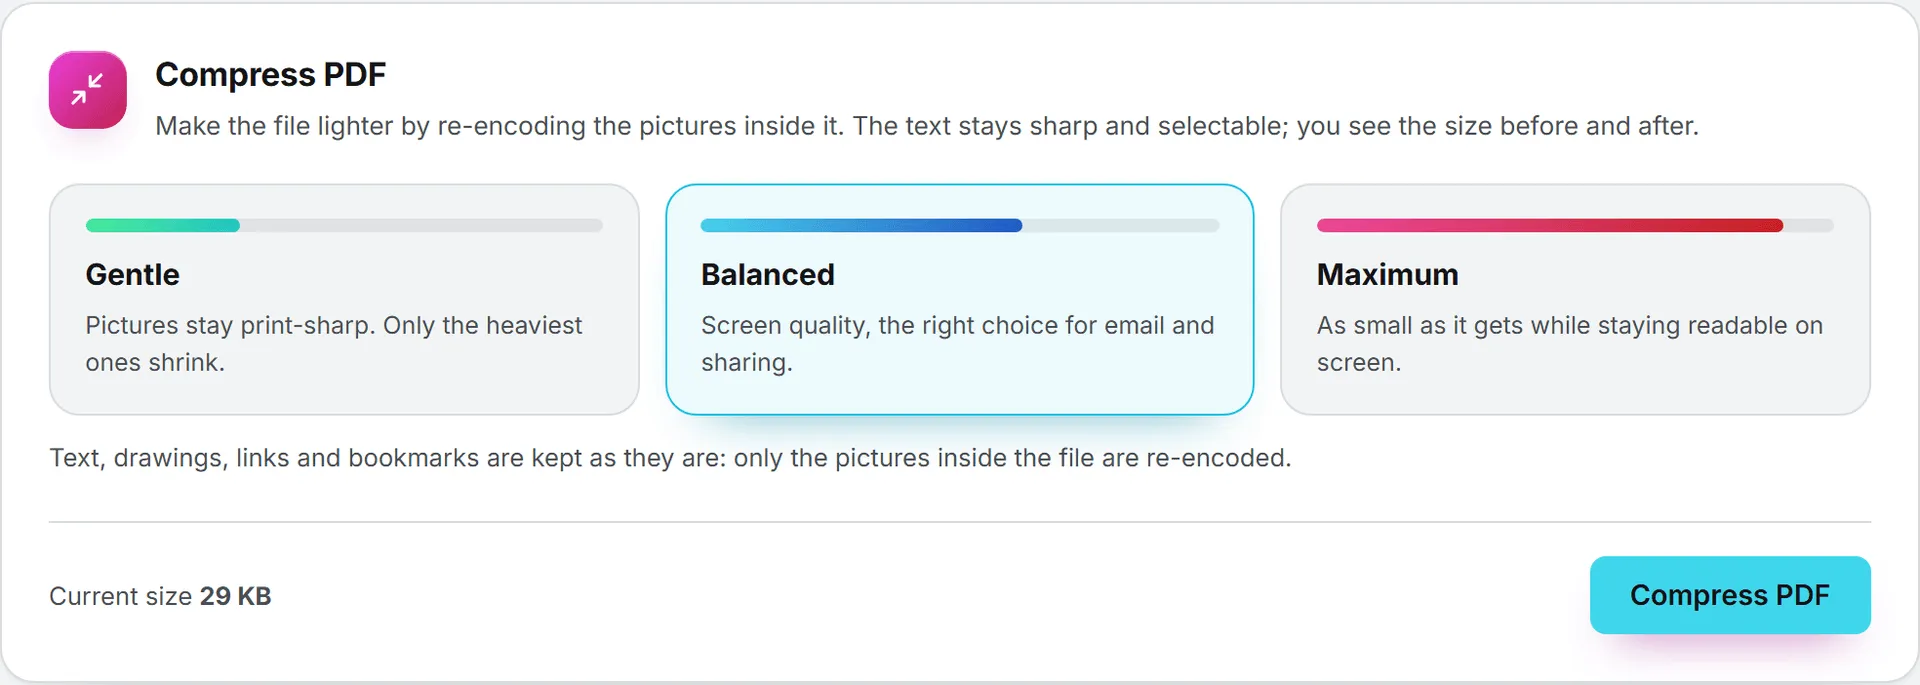
| Level | What it does |
|---|---|
| Gentle | Pictures stay print-sharp. Only the heaviest ones shrink. |
| Balanced | Screen quality, the right choice for email and sharing. |
| Maximum | As small as it gets while staying readable on screen. |
The Current size shows next to the button. While it runs, the bar counts the pictures re-encoded. The result card gives the size before and after, how much lighter the file is, and how many pictures were re-encoded. A new copy replaces a picture only when it’s clearly smaller, and a few kinds of pictures, such as those in print colors, are left as they are.
If the file can’t get lighter, the card says “This file is already as light as it gets at this level.” A file with no pictures, such as a text-only document, gains nothing: the card says “It holds no pictures to re-encode.”
Image editor
The Image editor gets a picture ready without leaving the app: frame it for X, Instagram or LinkedIn, crop it, fix the light and colors, write a caption on it, point at something with an arrow, place your logo in a corner. It works on a copy, so the original never changes.
Note: The picture is edited inside your browser. Nothing is sent anywhere until you choose to save it, and the editor uses no credits. Opening a picture from the Assets Library in the editor isn’t billed as a download.
Open a picture
- Click Image Editor in the left menu. It’s also a tab of the Pictures and videos folder, in the band of the other tools.
- Drop a picture on the box, or click it to choose one from your computer. JPG, PNG, WebP, GIF and AVIF files all open.
- Or click From the Assets Library and pick one of your organization’s pictures.
The editor then fills the screen. A picture larger than 4096 pixels on its long side is worked on at 4096 pixels, and the Save panel says so. SVG, HEIC and TIFF files can’t be opened.
You’ll rarely need this page, because the editor opens from wherever a picture already is:
| From | How |
|---|---|
| The Assets Library | Edit image in the Actions menu of a picture, or Edit at the top of the full-size view |
| The Image generation page | Edit under a finished render, or at the top of its full-size view |
| A social post | The pencil on one of the post’s pictures. On an X, Instagram or LinkedIn post, the editor opens on the Social panel, set to that network. |
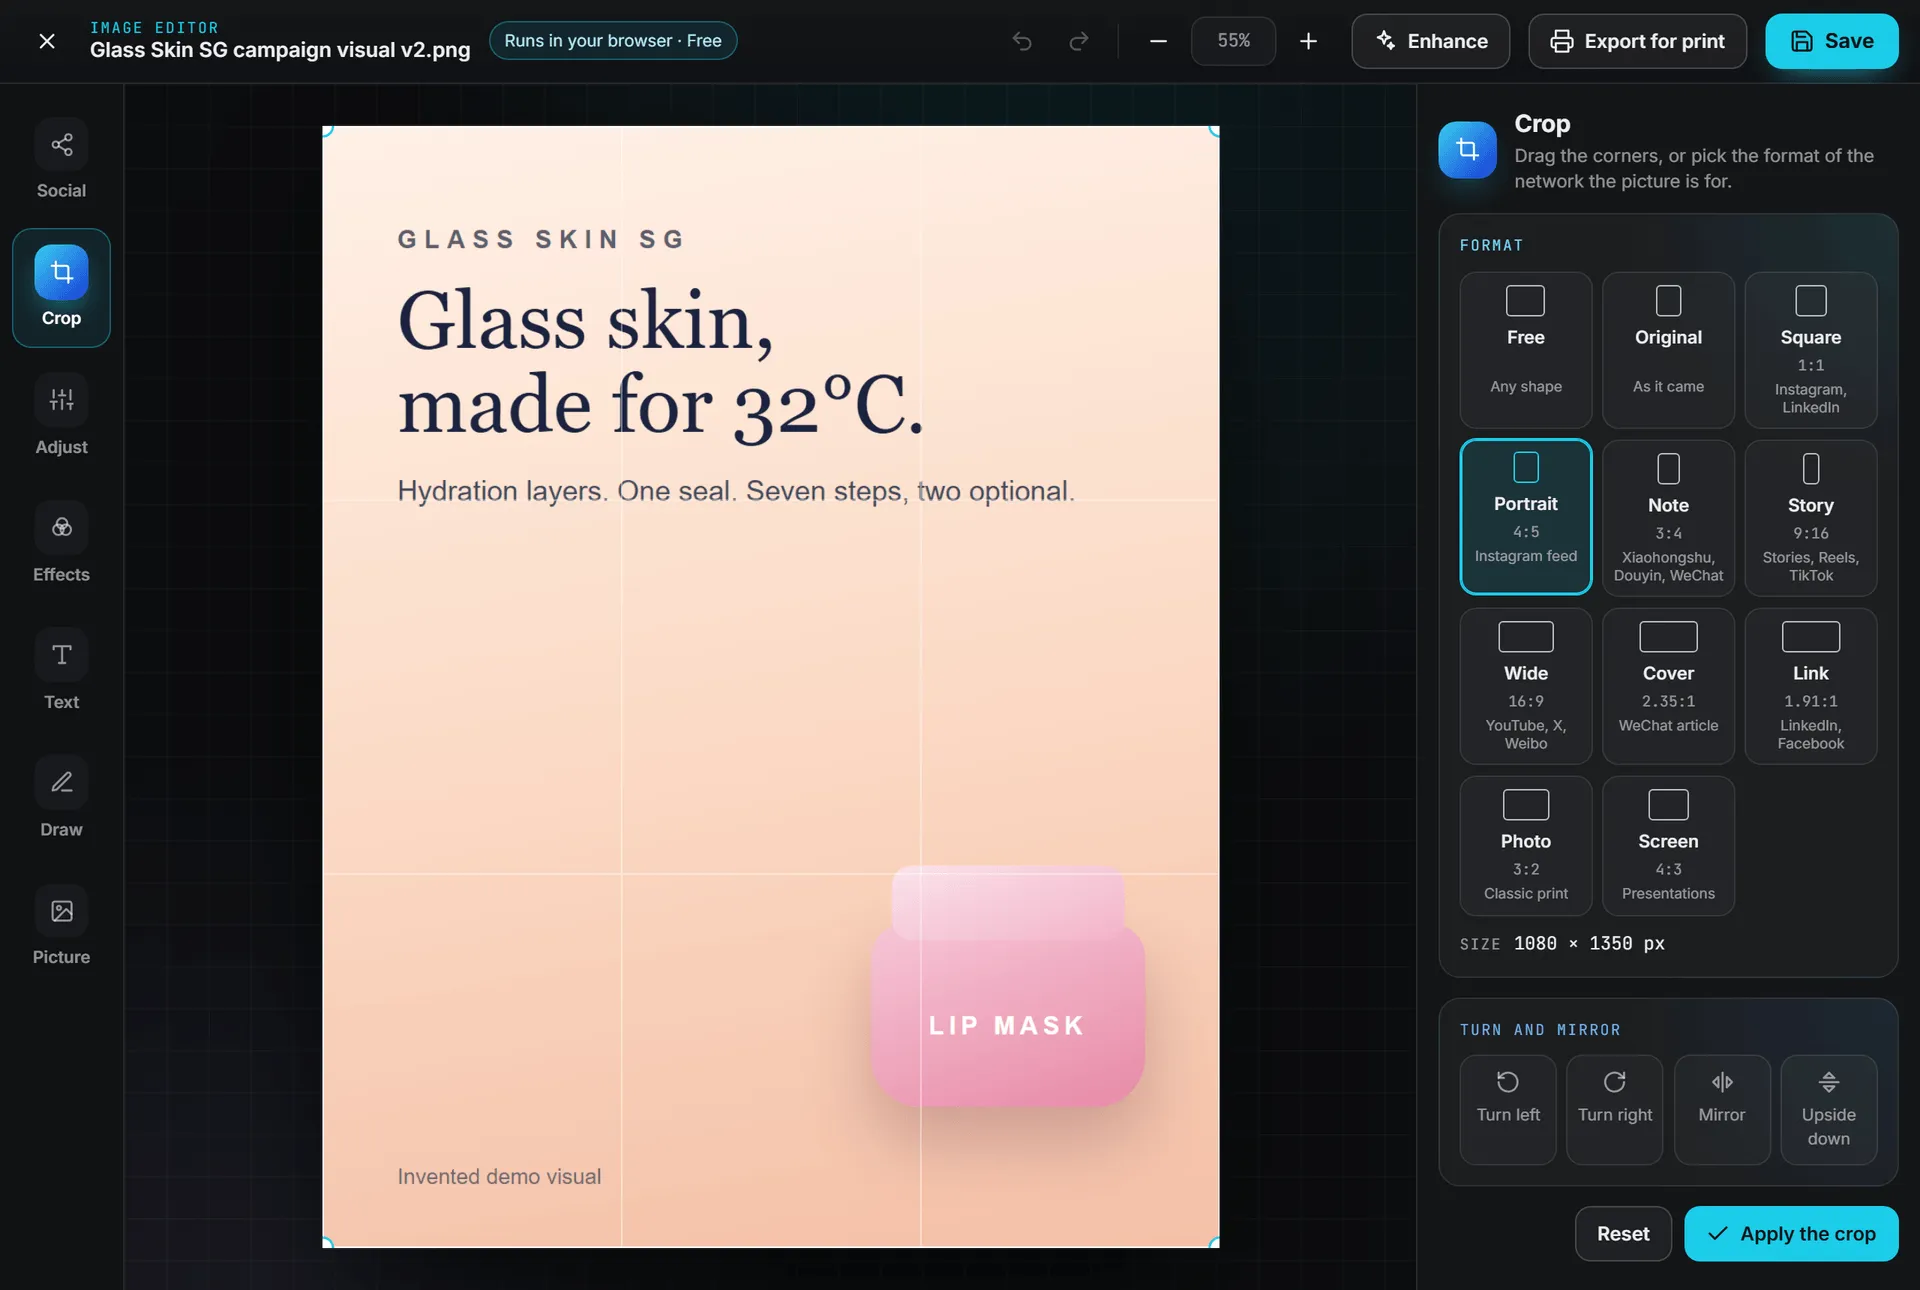
The seven panels
The column on the left holds seven panels. Click one to open its settings on the right. The editor opens on Crop, or on Social when you come from a post.
| Panel | What it does |
|---|---|
| Social | Frames the picture for a place on X, Instagram or LinkedIn, at the pixels that network wants. See Frame a picture for a network below. |
| Crop | Drag the corners of the frame, or pick a format: Free, Original, Square (1:1), Portrait (4:5), Story (9:16), Wide (16:9), Link (1.91:1), Photo (3:2) or Screen (4:3). Each one names the networks it suits. Turn left, Turn right, Mirror and Upside down turn or flip the picture. Click Apply the crop to cut it, or Reset to start over. |
| Adjust | Sliders for Brightness, Contrast, Saturation, Vibrance, Warmth, Hue, Sharpness and Blur. Reset all puts them back to zero. |
| Effects | One look over the adjustments, each shown on a small preview of your picture: Original, Mono, Noir, Sepia, Vintage, Kodachrome, Technicolor, Polaroid or Brownie. |
| Text | Add text puts a caption on the picture. Set its font, size, color, bold, italic, underline and alignment, plus a Highlight behind the words, a Dark outline or a Soft shadow. |
| Draw | Pen, Highlighter, Arrow, Straight line, Box and Circle, with their Line color, Thickness and Opacity. A box or a circle can also take a Fill. Select goes back to moving things. |
| Picture | Puts a logo or any other picture over yours, From your computer (a PNG with transparency works best for a logo) or From the Assets Library. Set its Opacity, then click one of the nine squares of Place it to send it to a corner, an edge or the middle. |
Cropping and turning change the picture itself, and whatever sits on top of it follows. Everything you add stays a separate piece until you save: click a caption, an arrow or a logo to move it, resize it or change its style. A small bar in the panel then duplicates it, brings it forward, sends it backward or deletes it. When your brand’s guidelines hold colors, they join the color swatches, marked with a dot.
Undo and Redo, at the top of the screen, go back and forth over up to 60 steps. The zoom buttons beside them enlarge or shrink the picture, and the percentage between them fits it back to the window.
The keyboard helps too. Ctrl + Z undoes, Ctrl + Shift + Z or Ctrl + Y redoes, Ctrl + D duplicates the selected piece, Delete removes it and the arrow keys nudge it (hold Shift for bigger steps). Enter applies the crop (on the Social panel, the format), and Ctrl + S opens the Save panel. On a Mac, use Cmd instead of Ctrl.
Frame a picture for a network
The Social panel knows the shapes, the pixels and the files X, Instagram, LinkedIn, WeChat, Xiaohongshu, Douyin and Weibo want, and what each network’s own buttons cover.
- Pick the network at the top: Instagram, X, LinkedIn, WeChat, Xiaohongshu, Douyin or Weibo.
- Under Where it goes, pick the placement. Each card gives its size in pixels and what it’s for, and Best marks the post shape the network recommends.
- Under Frame it, choose Crop to fill and drag the box over the part to keep, or Fit it whole to keep all of the picture: the space around it is filled with a Blurred picture or a plain color.
- Click Apply the format. The picture takes the placement’s shape.
- Click Save for Instagram (the button names the network) to go on to the Save panel, set for that network.
| Network | Placements |
|---|---|
| Feed portrait (1080 × 1350), Square (1080 × 1080), Landscape (1080 × 566), Grid portrait (1080 × 1440), Story and Reel cover (1080 × 1920), Profile photo (320 × 320) | |
| X | Post, wide (1600 × 900), Post, square (1080 × 1080), Post, portrait (1080 × 1440), One of two (1120 × 1280), Header photo (1500 × 500), Profile photo (400 × 400), Link card (1200 × 628) |
| Post, portrait (1080 × 1350), Post, square (1200 × 1200), Post, landscape (1200 × 627), Profile banner (1584 × 396), Page cover (1512 × 256), Profile photo (400 × 400) | |
| Image post (1080 × 1440), Article cover (900 × 383, with the 1:1 thumbnail WeChat crops from it), Article thumbnail (900 × 900), Channels cover (1080 × 1440) | |
| Xiaohongshu | Note, portrait (1080 × 1440), Note, square (1080 × 1080), Note, landscape (1440 × 1080) |
| Douyin | Picture post (1080 × 1440), Full screen (1080 × 1920, with the zones Douyin covers), Cover, upright (1080 × 1440), Cover, across (1440 × 1080) |
| Post, square (1080 × 1080), Post, portrait (1080 × 1440), Post, landscape (1920 × 1080), Headline article cover (1000 × 562, with the band the feed keeps) |
Grid portrait (3:4) is taken by the Instagram app only. Published from Intelligence, it gets white bands, and the checks say so.
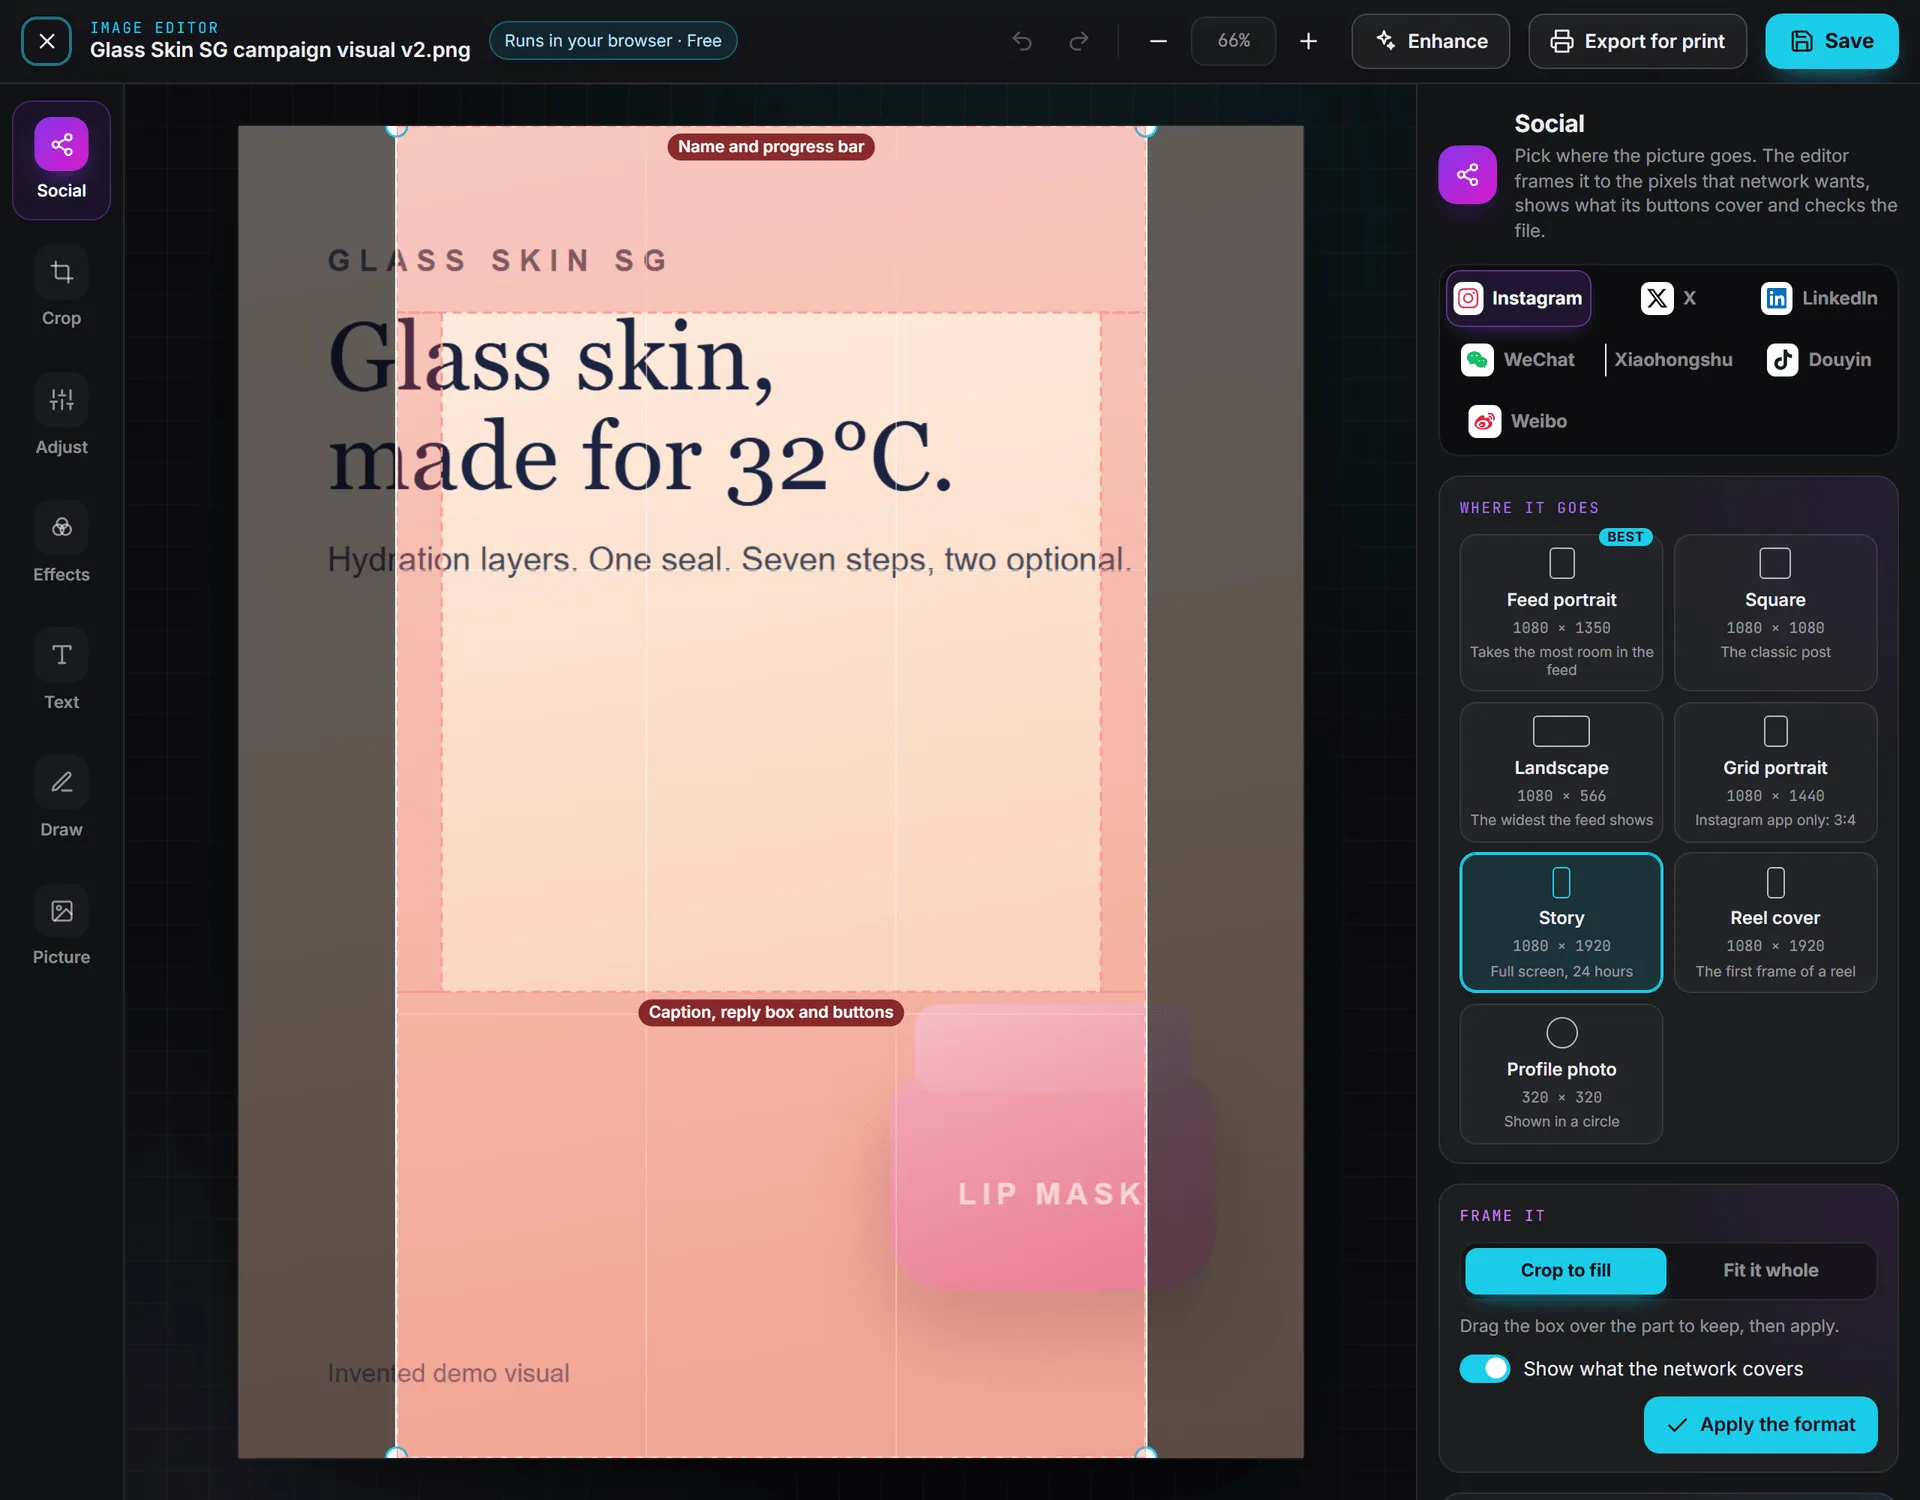
While you frame it, the picture shows what the network does to it:
- Red zones are where the network’s own interface sits: the name and the progress bar at the top of a story, the caption, the reply box and the buttons at the bottom, the profile photo over a banner. Keep words and logos out of them.
- A dashed line marks a crop the network shows somewhere else, such as the middle 3:4 of a post on the Instagram profile grid, or one of two pictures side by side on X.
- A circle shows what’s left of a profile photo.
Turn off Show what the network covers to hide them. They’re never part of the saved file.
How it will show previews the picture as the network presents it: in the feed and on the profile grid, in the timeline and as one of two or four pictures, a banner on a computer and on a phone, a profile photo in its circle.
Checks reads the result as you work, with a tick, a warning sign or a cross on each line: the shape against the placement, the width against what the network shows, the file format, the file’s weight against the network’s limit, anything you added that sits under the network’s interface or outside a crop it makes elsewhere, and how large your words will look on a phone. Good practice on Instagram (or on X, or on LinkedIn) closes the panel with that network’s own advice.
Save the picture
Click Save at the top right. The Save the picture panel opens.
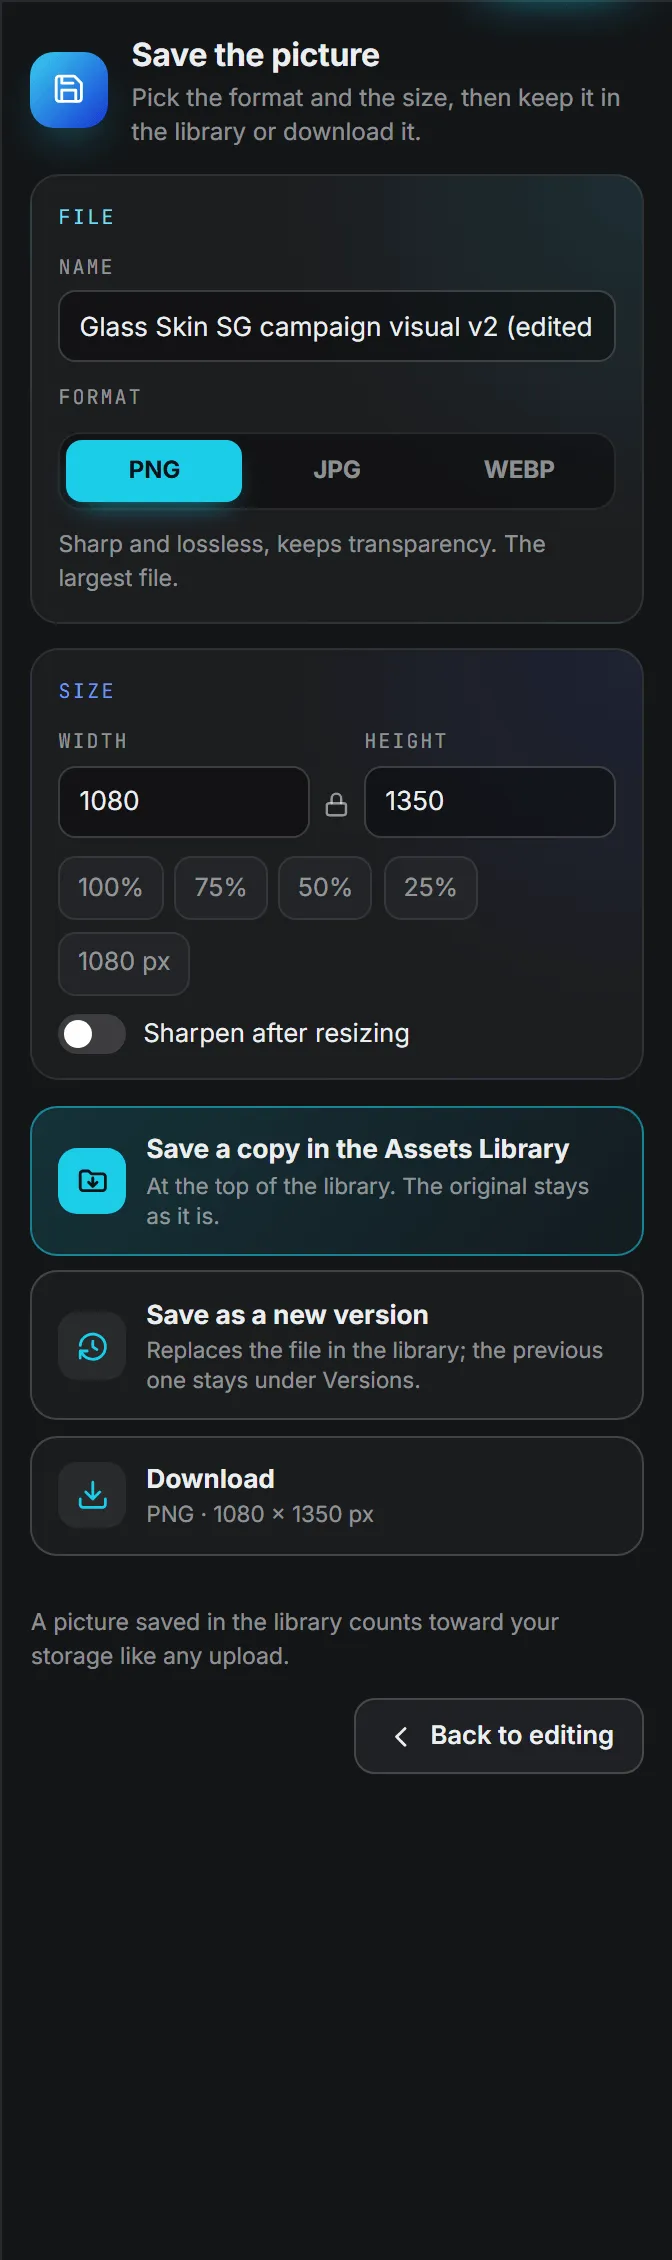
- Check the Name: the original’s, with “(edited)” added. For a picture framed on the Social panel, it’s the network and the size instead, such as
Visual (Instagram 1080x1920). - Pick the Format. PNG is sharp and keeps transparency, but makes the largest file. JPG is the lightest for photos and turns transparent areas white. WEBP is light and keeps transparency. JPG and WebP also have a Quality slider.
- Set the Size: type a Width or a Height (the proportions stay locked), or click 100%, 75%, 50% or 25%. On a large picture, 2048 px and 1080 px set the long side. Sharpen after resizing gives a picture made smaller its crispness back.
- Keep the result:
| Choice | What it does |
|---|---|
| Save a copy in the Assets Library | Adds the edited picture as a new asset, Next to the original when it came from the library, At the top of the library otherwise. The original stays as it is. |
| Save as a new version | Offered only when the picture is an uploaded file. The edited picture becomes its current version, and the one before it stays under Versions. See Versions of an uploaded file. |
| Download | Saves the file to your computer, in the format and size shown. Nothing goes into the library. |
A picture framed for a network opens the panel on a Made for line naming the network and the placement, with a Checks button that goes back to the Social panel. The size is already the placement’s, the format turns to JPG when the one you had isn’t taken by the network, and Sharpen after resizing is on. If you pick a format the network doesn’t take, the panel says so: the app converts it when it publishes, but a file you post yourself should be in the format it names.
Once a picture is in the library, the panel says Saved. with a link to Open it in the Assets Library. Back to editing returns to the picture. A saved picture is an upload like any other: it counts toward the organization’s storage from the next day. See Storage costs.
To leave, click the cross at the top left or press Esc. If some changes aren’t saved yet, the editor asks first: Leave without saving or Keep editing.
Editing a picture of a social post
The pencil on a picture of a post opens the editor with a different first choice: Save and use it in the post. On an X, Instagram or LinkedIn post, it opens on the Social panel, set to that network. The edited copy is saved in the Assets Library, the editor closes, and the copy takes the old picture’s place in the post, on the same slide of a carousel. The original stays in the Assets Library.
Video editor
The Video editor turns a clip into a reel, a TikTok or a story for Instagram, TikTok or Facebook without leaving the app: the upright 9:16 frame, trims and splits, speed, words on screen, captions timed to each word, music, a voiceover, sound effects and a cover. It works on a copy, so the original never changes.
Note: The video is edited and written inside your browser. Nothing is sent anywhere until you save it into the Assets Library, ask for the fast captions, or make a voiceover, music or a sound effect in the Sound panel: those are billed. Everything else is free. Opening a video from the Assets Library in the editor isn’t billed as a download.
Open a video
- Go to Video Editor > Video editor in the left menu. It’s also a tab of the Pictures and videos folder, in the band of the other tools. Its start page also offers Shorts autopilot, for a long video to cut into shorts by itself.
- Drop a video on the box, or click it to choose one from your computer: MP4, MOV or WebM, up to 2 GB.
- Or click From the Assets Library and pick one of your organization’s videos.
Chrome and Edge open the most formats. A phone video in HEVC may not open in every browser: the editor says so, and opening it in Chrome or Edge on a recent computer, or saving it as H.264 first, solves it.
The editor also opens from wherever a video already is:
| From | How |
|---|---|
| The Assets Library | Edit video in the Actions menu of a video, or Edit at the top of its full-size view |
| A video post on Social | The pencil on the post’s clip. See Editing the clip of a social post below. |
| Shorts autopilot | Edit in the Video editor on a finished short |
The preview and the timeline
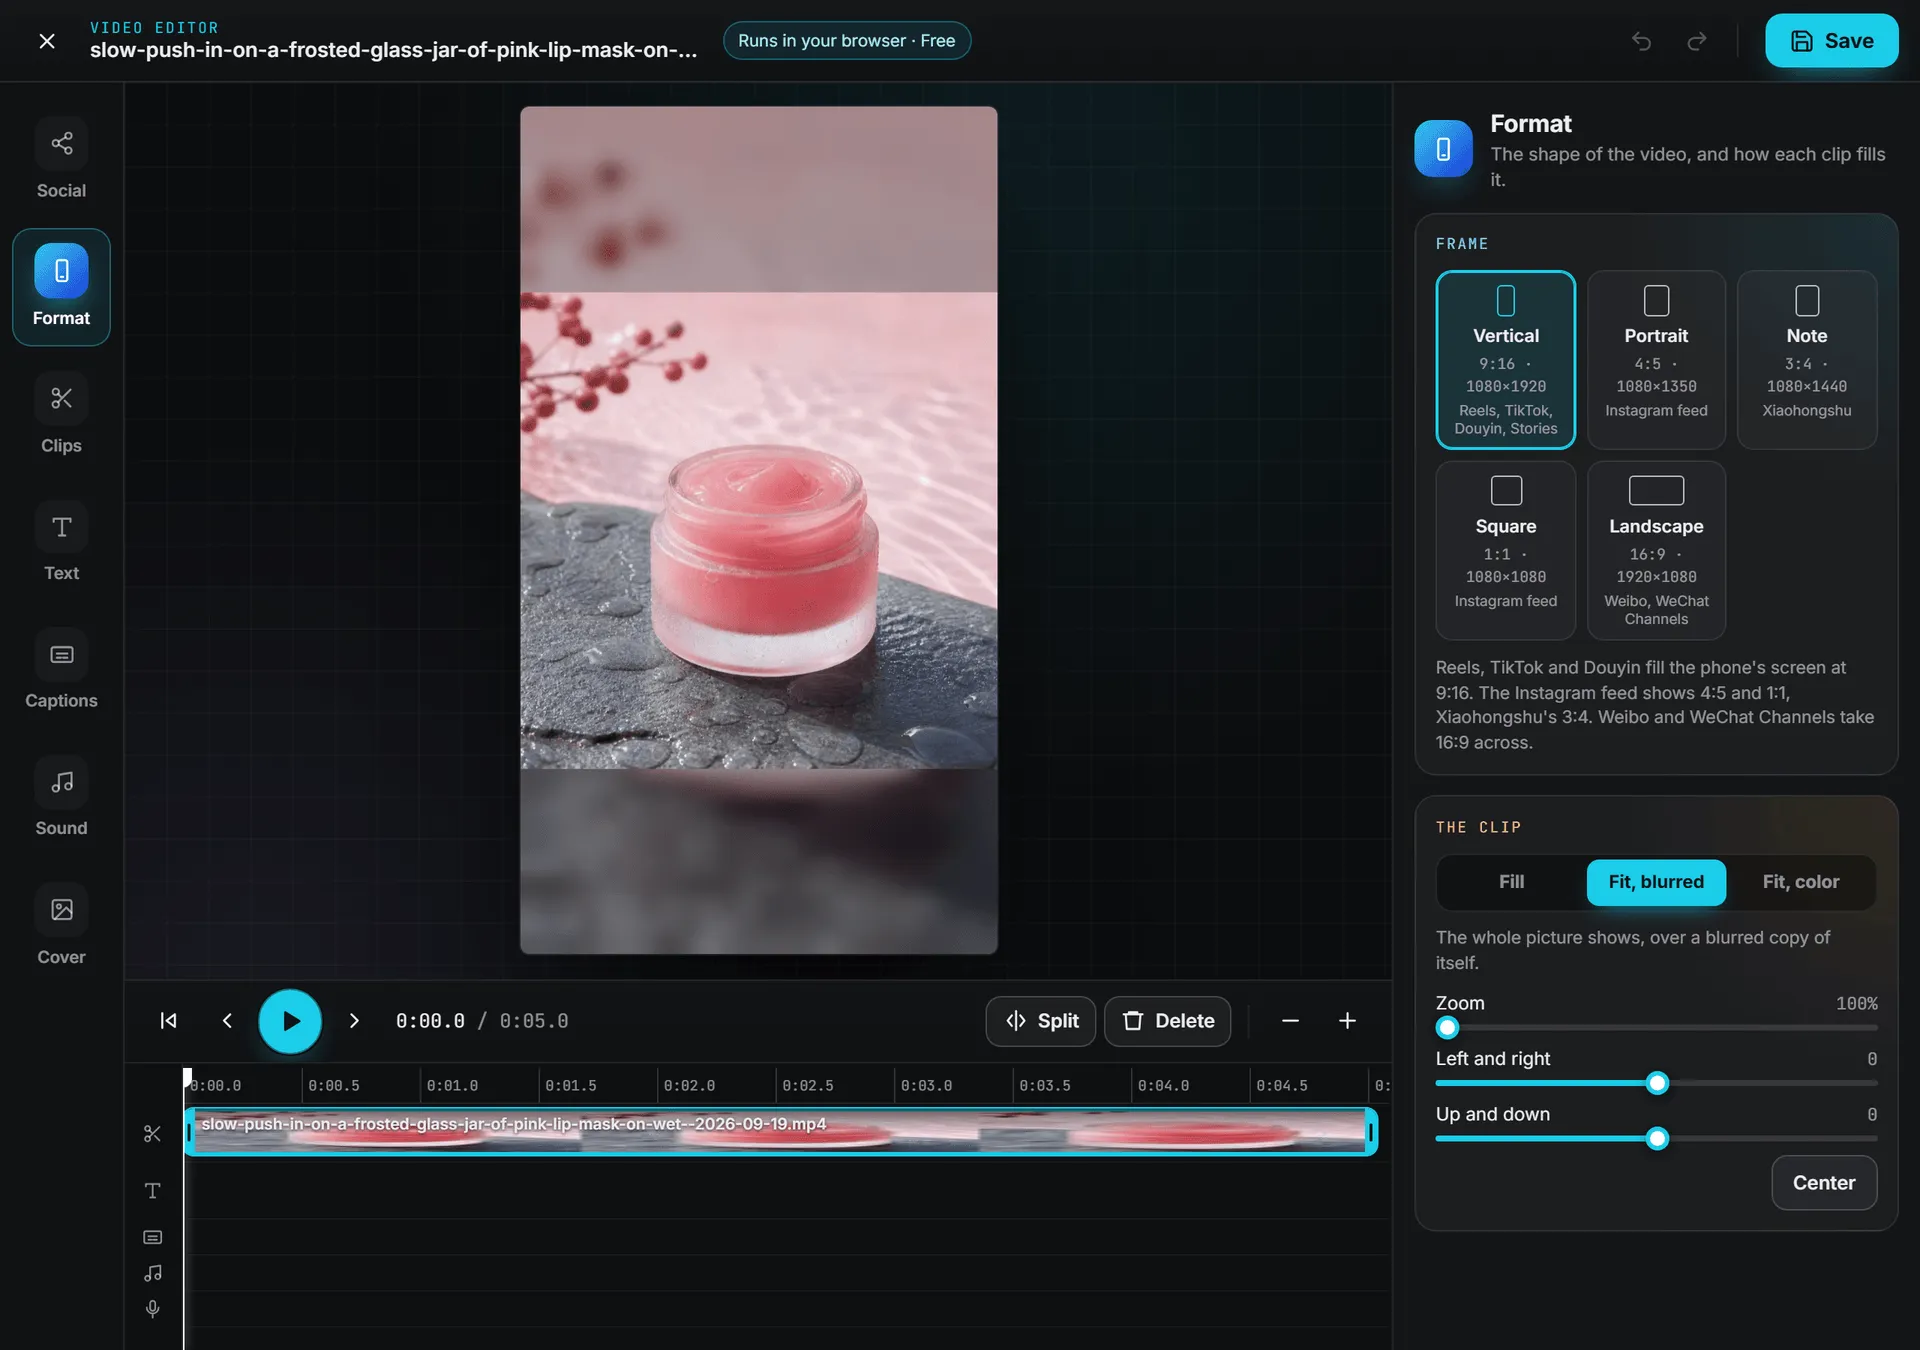
The preview sits in the middle, with the play controls under it: back to the start, one frame back, play, one frame on, and the time. The timeline below has a row each for the clips, the texts, the captions, the music and the voiceovers and effects. Click or drag on it to move the playhead, and use the zoom buttons at the end of the controls, or Ctrl with the mouse wheel, to stretch it. Split cuts the clip under the playhead in two, and Delete removes the selected clip, text or sound.
Undo and Redo, at the top of the screen, go back and forth over up to 60 steps. Once the video has the shape of a placement picked on the Social panel, a Zones switch joins them: On draws what that network’s interface covers over the preview, Off hides it. See Frame a video for a network.
The seven panels
The column on the left holds seven panels. Click one to open its settings on the right. The editor opens on Format, or on Social when you come from an Instagram, TikTok or Facebook post or from a short.
| Panel | What it does |
|---|---|
| Social | Frames the video for a reel, a story or a feed post on Instagram, TikTok or Facebook, shows what the network covers and checks the video. See Frame a video for a network below. |
| Format | The Frame: Vertical (9:16, 1080 × 1920) for Reels, TikTok, Douyin and Stories, Portrait (4:5) or Square (1:1) for the Instagram feed, Note (3:4, 1080 × 1440) for Xiaohongshu, Landscape (16:9, 1920 × 1080) for Weibo and WeChat Channels. Then how the selected clip fills it: Fill crops it (drag the picture on the preview to pick what shows), Fit, blurred shows it whole over a blurred copy of itself, and Fit, color over a plain color. Zoom, Left and right and Up and down fine-tune it, Center puts it back in the middle, and Same framing for every clip copies it to the others. |
| Clips | Every clip in order, plus Add from the computer and Add from the library to put another one at the end. For the selected clip: Starts at and Ends at in seconds of the original (or drag the clip’s edges on the timeline), a Speed from 0.5x to 2x, Its own sound, and buttons to move it earlier or later, split it at the playhead, duplicate it or delete it. |
| Text | Add a text puts words on the video from the playhead, for three seconds. Type them, then pick Box, Outlined or Plain, the font, the size, the color and Bold. Set Appears at and Disappears at, or stretch the text on the timeline, and drag it into place on the preview. |
| Captions | The words said, written for you and timed word by word. See Captions below. |
| Sound | The Level of every clip, a voiceover, music or a sound effect made for the video, sounds laid anywhere on the timeline, and Music from the computer or the library (MP3, M4A, WAV or OGG) with its Music level, Start the song at and Fade out at the end. See Sound below. |
| Cover | The frame shown before the video plays. Move the playhead, click Use the frame under the playhead, then Download it (JPG) or Save it in the library. Instagram and TikTok let you pick the cover when you post: upload this picture there, or pick the same moment. |
A clip whose shape is close to the frame fills it; any other clip starts as Fit, blurred. Speed changes keep the pitch of the voices.
Important: Use only music you have the rights to. TikTok and Instagram mute or block a video whose music they don’t license.
Sound
The Sound panel holds everything heard in the video: the clips’ own sound, the music under them, and voiceovers and sound effects placed where you want them.
Original sound sets the Level of every clip. Each clip’s own level is in Clips.
Make a sound writes a new one with ElevenLabs. Pick what to make at the top:
| Choice | What you give it | Where it lands |
|---|---|---|
| Voiceover | The script the voice reads, its Language (English by default), then the Voice, with the native speakers of that language first and the voices that speak it with an accent below, and the Quality, which lists only the models that speak the language, each with its price for 1,000 characters | On the timeline, at the playhead as it was when you clicked. When the brand chosen in the header has a sonic kit in Voice and Music, its voice and pronunciations apply. |
| Music | A description (genre, mood, tempo, instruments), With vocals if you want singing, and the Length in seconds | It becomes the music bed, from the start of the video. The length is the timeline’s, to the second, unless you change it, from 3 seconds to 5 minutes. If the video already has music, the editor asks before replacing it, and Undo brings the old one back. |
| Sound effect | A description, such as a door slamming in a stone corridor, and its Length, up to 30 seconds | On the timeline, at the playhead |
The line under the form gives the price before anything runs: a voiceover is billed by the character of the script, music and sound effects by the second of sound. Click Make the voiceover, Compose the music or Make the sound effect. The sound is made in the background and shows in your Activity, so you can keep editing meanwhile. Once it’s back, it’s laid on the timeline, the panel shows what it was billed, and a copy is kept in the Assets Library.
On the timeline lists the voiceovers, sound effects and sound files laid on the video. Add a sound file of your own with A sound from the computer or A sound from the library: it starts at the playhead. Pick a sound to set its Level, where it Starts at and Fade out at the end, click Start at the playhead to move it there, or Remove it. You can also drag it along its row of the timeline.
On the Music card, once the video has a voiceover, Lower the music under the voiceover dips the music while the voice speaks.
Every sound is mixed into the video when you save it, as you heard it in the preview.
Frame a video for a network
The Social panel knows the shapes, the lengths and the files Instagram, TikTok, Facebook, Douyin, Xiaohongshu, WeChat Channels and Weibo take, and what each network’s own buttons cover.
- Pick the network at the top: Instagram, TikTok, Facebook, Douyin, Xiaohongshu, WeChat Channels or Weibo.
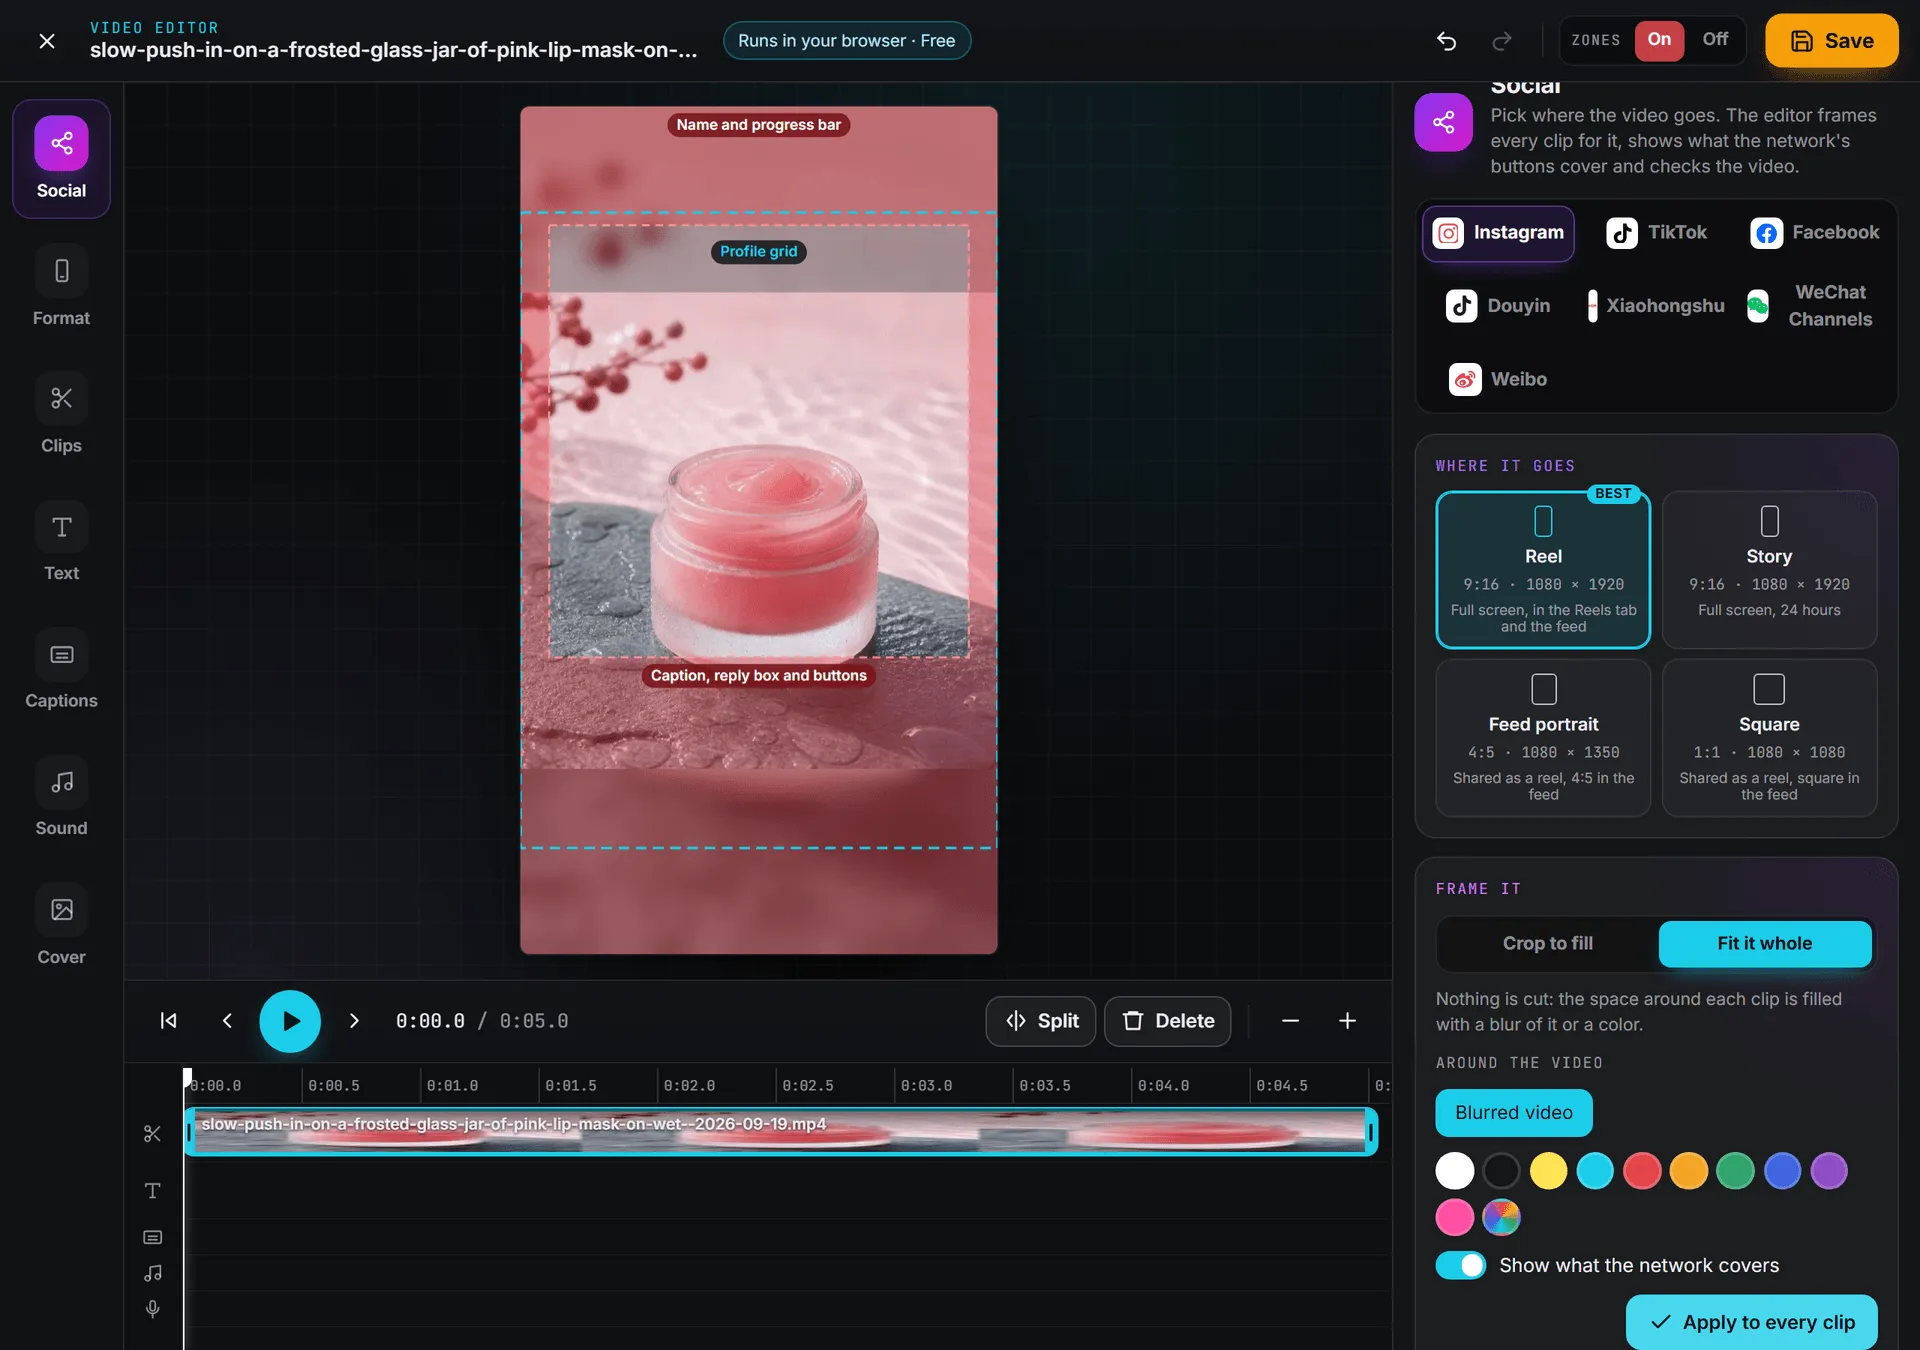
- Under Where it goes, pick the placement. Each card gives its shape, its size in pixels and what it’s for, and Best marks the one the network recommends.
- Under Frame it, choose Crop to fill: every clip fills the frame, and you drag the picture in the preview to choose what shows. Or choose Fit it whole: nothing is cut, and the space around each clip is filled with a Blurred video or a plain color.
- Click Apply the format. Every clip takes the placement’s shape, the quality turns to 1080p, and the video’s name takes the network and the placement. Once the video has that shape, the button reads Apply to every clip.
- Click Save for Instagram (the button names the network) to go on to the Save panel.
| Network | Placements |
|---|---|
| Reel (9:16, 1080 × 1920, marked Best), Story (9:16), Feed portrait (4:5, 1080 × 1350) and Square (1:1, 1080 × 1080). Every video posted to Instagram is shared as a reel. | |
| TikTok | Video (9:16, marked Best) and Square (1:1), which TikTok shows with bands above and below |
| Reel (9:16, marked Best), Story (9:16), Feed portrait (4:5) and Square (1:1) | |
| Douyin | Video (9:16, marked Best, with the zones Douyin covers) and Landscape (16:9) |
| Xiaohongshu | Note (3:4, 1080 × 1440, marked Best: what the two-column feed shows), Vertical (9:16) and Square (1:1) |
| WeChat Channels | Vertical (9:16, marked Best) and Landscape (16:9, 1920 × 1080) |
| Vertical (9:16, marked Best) and Landscape (16:9) |
While you frame it, the preview shows what the network does to the video:
- Red zones are where the network’s own interface sits: the name and the progress bar at the top, the caption, the reply box and the buttons at the bottom, and on TikTok the like, comment and share buttons down the right edge. A dashed red line outlines the safe area between them. Keep words and captions inside it.
- A dashed line in the accent color marks the middle 3:4 that the profile grid shows, on an Instagram reel, an Instagram feed video or a TikTok video.
Show what the network covers, in the panel, and the Zones switch at the top of the screen both turn them on and off. They’re hidden while the Save panel is open, and they’re never written into the video.
How it will show previews the video as the network presents it: full screen, in the story or in the feed, at the frame under the playhead, and on the profile grid, from the cover you set on the Cover panel.
Checks reads the video as you work, with a tick, a warning sign or a cross on each line. When the editor can fix something itself, the line carries a button:
| What it checks | The button offered |
|---|---|
| The shape against the placement | Apply the format |
| The length against what the network takes there: 3 seconds to 15 minutes for an Instagram reel, 3 seconds to 1 minute for an Instagram story, 3 seconds to 10 minutes on TikTok, 1 second to 20 minutes for a Facebook video and 1 second to 3 minutes for a Facebook story. Past 3 minutes, Instagram stops recommending a reel to people who don’t follow you, and not every TikTok account can post it. | Cut it at the limit, such as Cut it at 3 min |
| The picture: 1080p is what the networks show, and 720p looks softer | Write it in 1080p |
| The file’s weight against the network’s limit | None: shorten the video or write it in 720p |
| Captions or words that sit under the network’s interface | Move the captions into the safe area, Move the words into the safe area |
| Words that fall outside the profile grid’s crop when they show on the cover | None |
| How large the smallest words will look on a phone | None: make them bigger |
| Captions, so the video reads with the sound off | Make the captions, which opens the Captions panel |
| Sound, since the networks play videos with it | Add music, which opens the Sound panel |
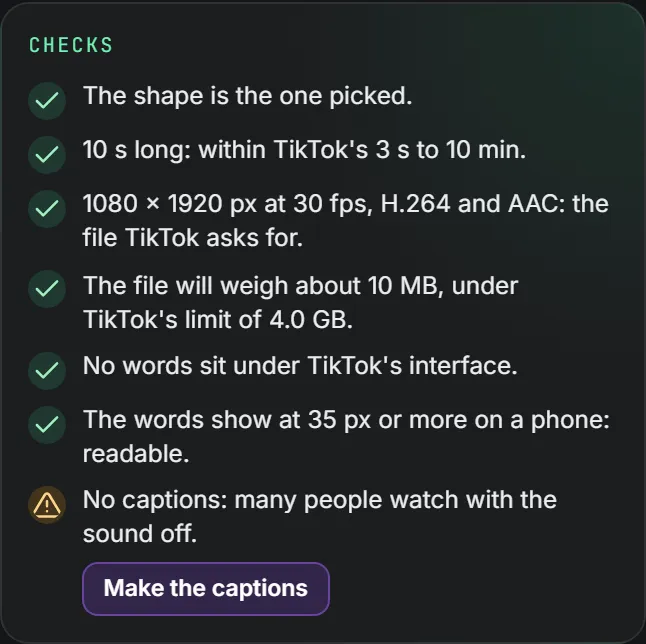
Good practice on Instagram (or on TikTok, or on Facebook) closes the panel with that network’s own advice.
Captions
Most Reels and TikToks carry captions: the words said, on screen as they’re said. The editor writes them for you.
- Open Captions and choose how, under Make the captions:
- Free, in your browser: a speech model runs on your own computer, so nothing is sent and nothing is billed. Pick the Speech model: Quick (about 40 MB), Balanced (about 80 MB) or Accurate (about 250 MB). It downloads the first time, then your browser keeps it. A minute of speech takes from a few seconds to a minute.
- Fast, billed: the sound goes to a speech model and the words come back in moments. Each model shows its price for a minute of sound, the cheapest one is picked when the panel opens, and the line under them gives an estimate for this video. It’s billed by the second of sound, and the cost of the captions shows once they’re made. Scribe v2 (ElevenLabs, 90+ languages) also tells the speakers apart, and spells your organization’s vocabulary and the brand’s terms right.
- Set the Language spoken, or leave it on Detect it.
- Click Make the captions. Only the parts of the clips you kept are transcribed, and the panel then says how many words were captioned.
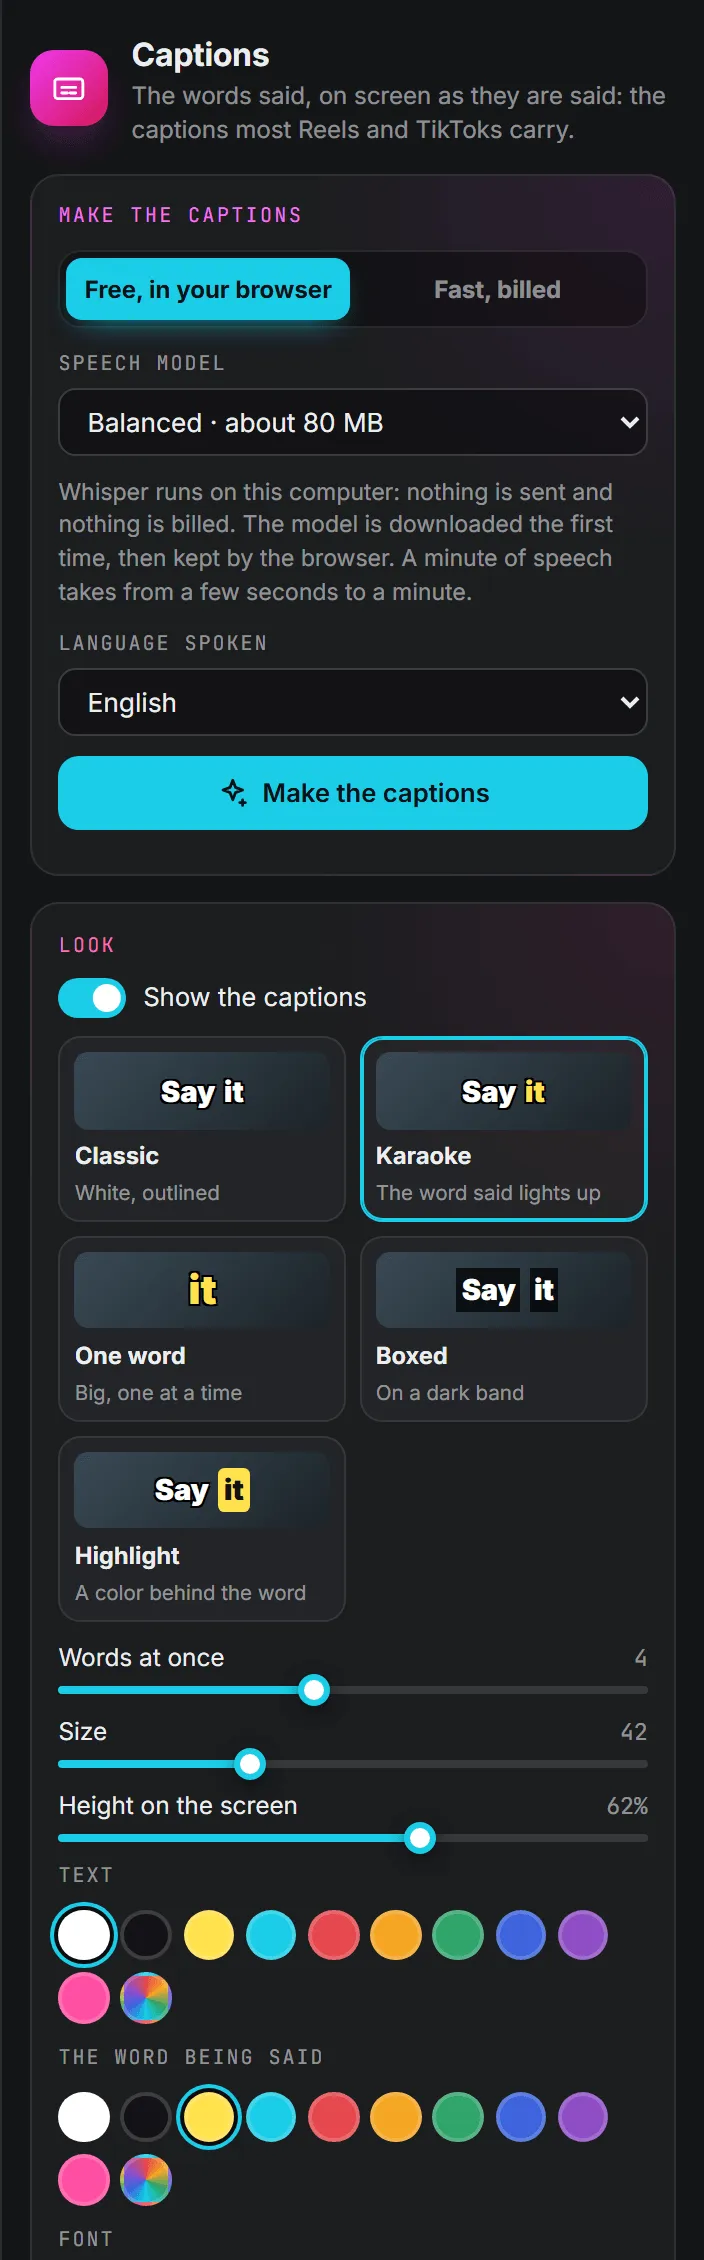
Look sets how they show. Show the captions turns them on or off, and five looks set the style: Classic (white, outlined), Karaoke (the word said lights up), One word (big, one at a time), Boxed (on a dark band) and Highlight (a color behind the word). Words at once, Size, Height on the screen, the color of the Text and of The word being said, the Font and Capital letters finish them. You can also drag the captions up or down on the preview.
Speakers appears when the captions were made by Scribe v2 and more than one person speaks. Each speaker, named Speaker A, Speaker B and so on in the order they first speak, gets a color of their own from the start. Change it with the swatches, and set where their captions sit: Caption height (the captions’ own), Top, Middle or Bottom.
The words lists every line with its time. Correct a line and press Enter, or empty it to remove it. Download as SRT saves the captions as a subtitle file, and Remove them takes them all off (Undo brings them back). Make them again replaces the words and your corrections.
If the free speech model can’t be downloaded, which some networks block, the panel says so: try again, or use the fast captions. If the fast captions aren’t offered, use the free ones.
Save the video
Click Save at the top right. The Save the video panel opens.
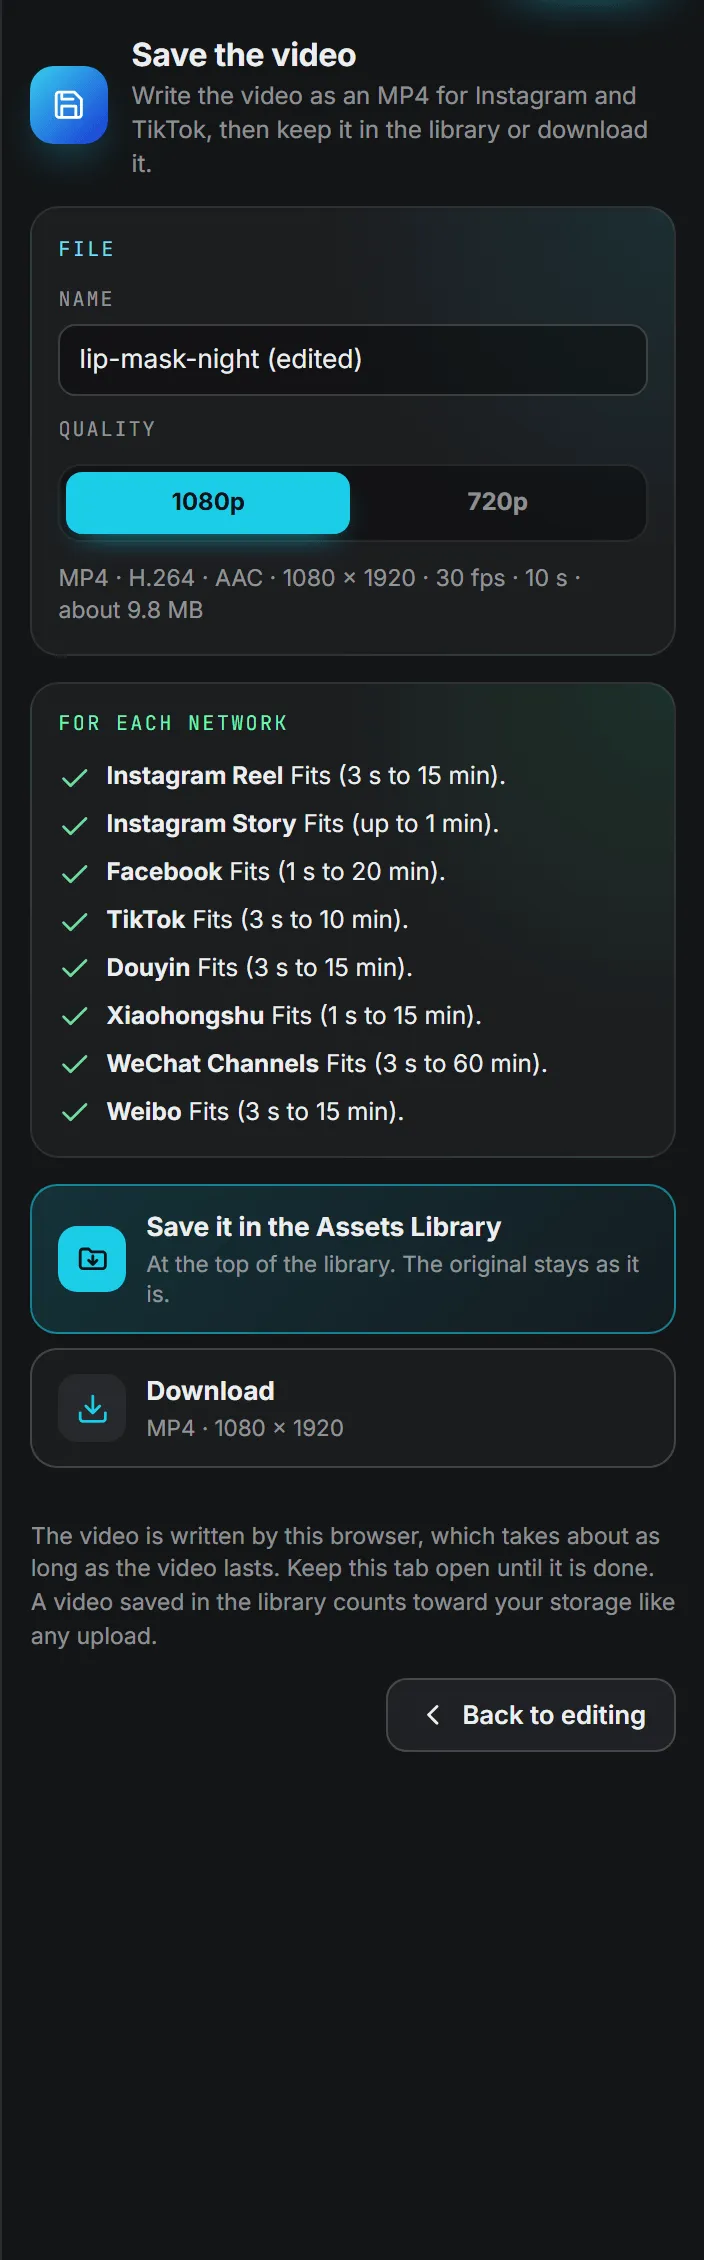
- Check the Name: the original’s, with “(edited)” added. For a video framed on the Social panel, it’s the network and the placement instead, such as
Clip (Instagram Reel). - Pick the Quality: 1080p or 720p. The line under it describes the file: an MP4 with H.264 video and AAC sound, its size in pixels, 30 frames a second, its length and its approximate weight.
- Read For each network: whether the video fits an Instagram Reel (3 seconds to 15 minutes), an Instagram Story (up to 1 minute), Facebook (1 second to 20 minutes) and TikTok (3 seconds to 10 minutes). A video that isn’t 9:16 is flagged for the two Instagram lines and TikTok, which show it full screen.
- Keep it:
| Choice | What it does |
|---|---|
| Save it in the Assets Library | Writes the video and adds it as a new asset, Next to the original when it came from the library, At the top of the library otherwise. The original stays as it is. |
| Download | Writes the video and saves the MP4 to your computer. Nothing goes into the library. |
A video framed on the Social panel opens the panel on a Made for line naming the network and the placement, with a Checks button that goes back to the Social panel.
Your browser writes the video, which takes about as long as the video lasts, so keep the tab open until it’s done. A bar shows the progress and the time left, and Stop writing the video cancels. Once it’s in the library, the panel says Saved. with a link to Open it in the Assets Library. A saved video is an upload like any other: it counts toward the organization’s storage from the next day. See Storage costs.
Writing a video takes a browser that can encode H.264: a recent Chrome, Edge or Safari. Another browser gets a message saying so before anything starts.
To leave, click the cross at the top left or press Esc. If some changes aren’t saved yet, the editor asks first: Leave without saving or Keep editing. Leaving while the video is being written stops it. The keys that work in the editor are listed in Keyboard shortcuts.
Editing the clip of a social post
On a video post, the pencil on the clip opens it in the Video editor with a different first choice: Save and use it in the post. The edited MP4 is saved in the Assets Library, the editor closes, and the new video takes the old clip’s place in the post. The original stays in the Assets Library. On an Instagram, TikTok or Facebook post, the editor opens on the Social panel, on that network’s best placement, with its zones shown from the start.
Image anonymizer
The anonymizer shows you everything hidden inside a picture, then rebuilds it pixel by pixel into a new file that carries none of it. It’s handy before you share a photo straight off a phone, which can carry its GPS location, or a picture made with an AI tool.
Note: Nothing is uploaded and nothing is stored. The whole process runs in your browser, and the clean copy only exists on the page until you download it. It disappears when you leave the page.
Step by step
- Go to Tools > Image anonymizer in the left menu. It’s also a tab of the Pictures and videos folder, in the band of the other tools.
- Choose the Output format: Auto (keep PNG/WebP, otherwise JPG), JPG, PNG or WebP.
- Drop a picture on the box, or click it to choose one. JPG, PNG, WebP and anything else your browser can open. To clean a picture your team already keeps, click From the Assets Library next to the box and pick it there: it’s read as it’s stored, and the library copy never changes. The picker shows 15 pictures a page, newest first, with a search by name or tag and filters for where it came from, the brand, the folder and the date.
- Look over what it found, then click Download clean image.
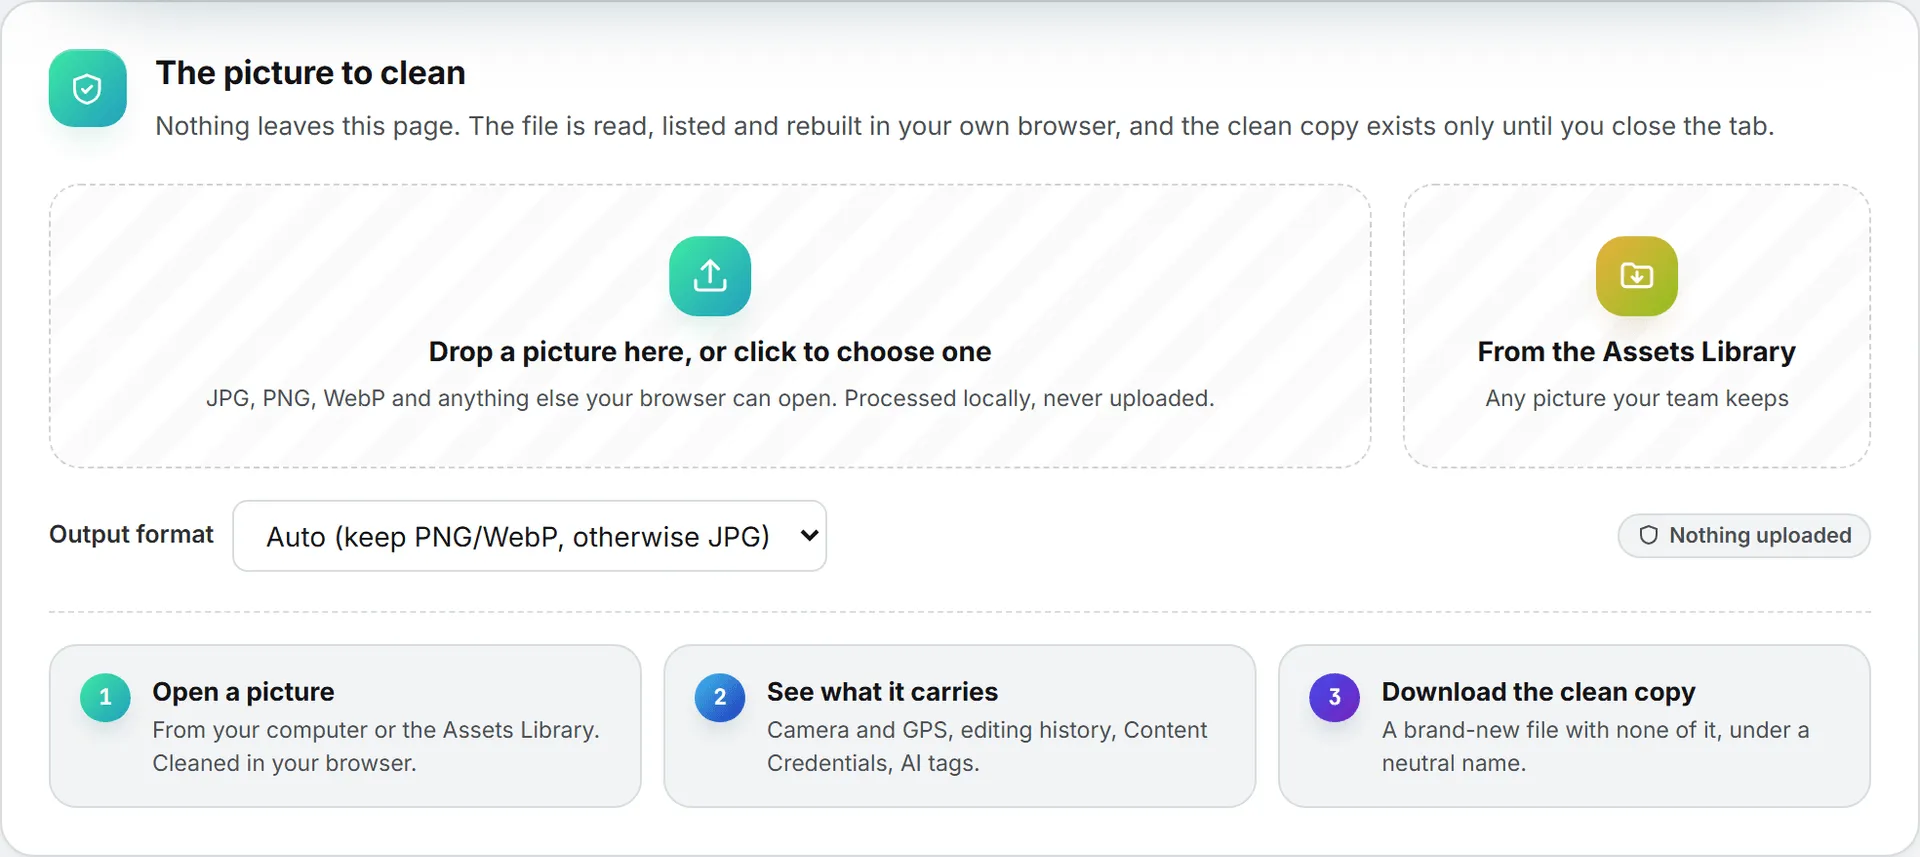
If you change the output format afterward, the same picture is cleaned again in the new format, without dropping it a second time. The tool takes one picture at a time.
What it finds
The first card, “Found in” followed by the file name, lists each block of hidden data. Each one is tagged metadata or AI provenance. Here’s what it looks for:
- EXIF data (camera, date, GPS, software)
- XMP metadata and IPTC / Photoshop metadata
- ICC color profiles
- Embedded comments and other application data blocks
- Text chunks inside PNG files, such as Stable Diffusion generation parameters or a ComfyUI prompt or workflow
- C2PA “Content Credentials”
- AI-generation markers left by tools such as Midjourney, DALL·E, OpenAI, Stable Diffusion, Adobe Firefly or Google Imagen, plus the IPTC “trained algorithmic media” tag and AIGC labels
A phone photo often shows several of these at once, which is normal. If nothing is found, the card says so. The clean copy is still fully rebuilt, so anything the scanner can’t read is dropped too.
The clean copy
The second card shows the new file: a neutral random name (for example image-3fa91c.jpg), its width and height, and its size next to the original’s. The width and height don’t change. A JPG or WebP copy is compressed again at high quality, so its size can differ a little from the original. The original file name is never reused, because a name like “ChatGPT Image” can itself give the source away.
The clean file is scanned again before you download it. You’ll see either “Verified: the clean file contains no metadata blocks and a neutral random filename”, or a warning that some blocks were still detected, with a suggestion to try another output format.
Tip: A JPG can’t be transparent. Clean a transparent picture into JPG and its transparent areas turn white; pick PNG or WebP to keep them. Auto keeps them too when the original is a PNG or WebP.
Limits and cost
The anonymizer removes everything written into the file. It doesn’t repaint the picture, so a watermark hidden in the pixels, visible or invisible, can survive. Only anonymize images you have the rights to use.
It’s free. The work happens in your browser, so no credits are used.
If the page says “This file could not be read as an image by your browser”, the file isn’t an image your browser can open. Convert it to JPG or PNG first.
Pictures made on the image generation page have the same cleaning built in: Download clean copy on a finished render does it in one click.
YouTube downloader
Paste the link to a public YouTube video and the downloader hands you the video as a file. You get picture and sound together in one file, in 360p: YouTube no longer serves higher qualities that way.
Step by step
- Go to Tools > YouTube downloader in the left menu. It’s also a tab of the Pictures and videos folder, in the band of the other tools.
- Paste the address into YouTube video URL, for example
https://www.youtube.com/watch?v=.... - Click Download video. Longer videos can take a moment.
- When the card appears, check the thumbnail, title, author, length and size, then click Save video. Your browser saves the file under the video’s title.
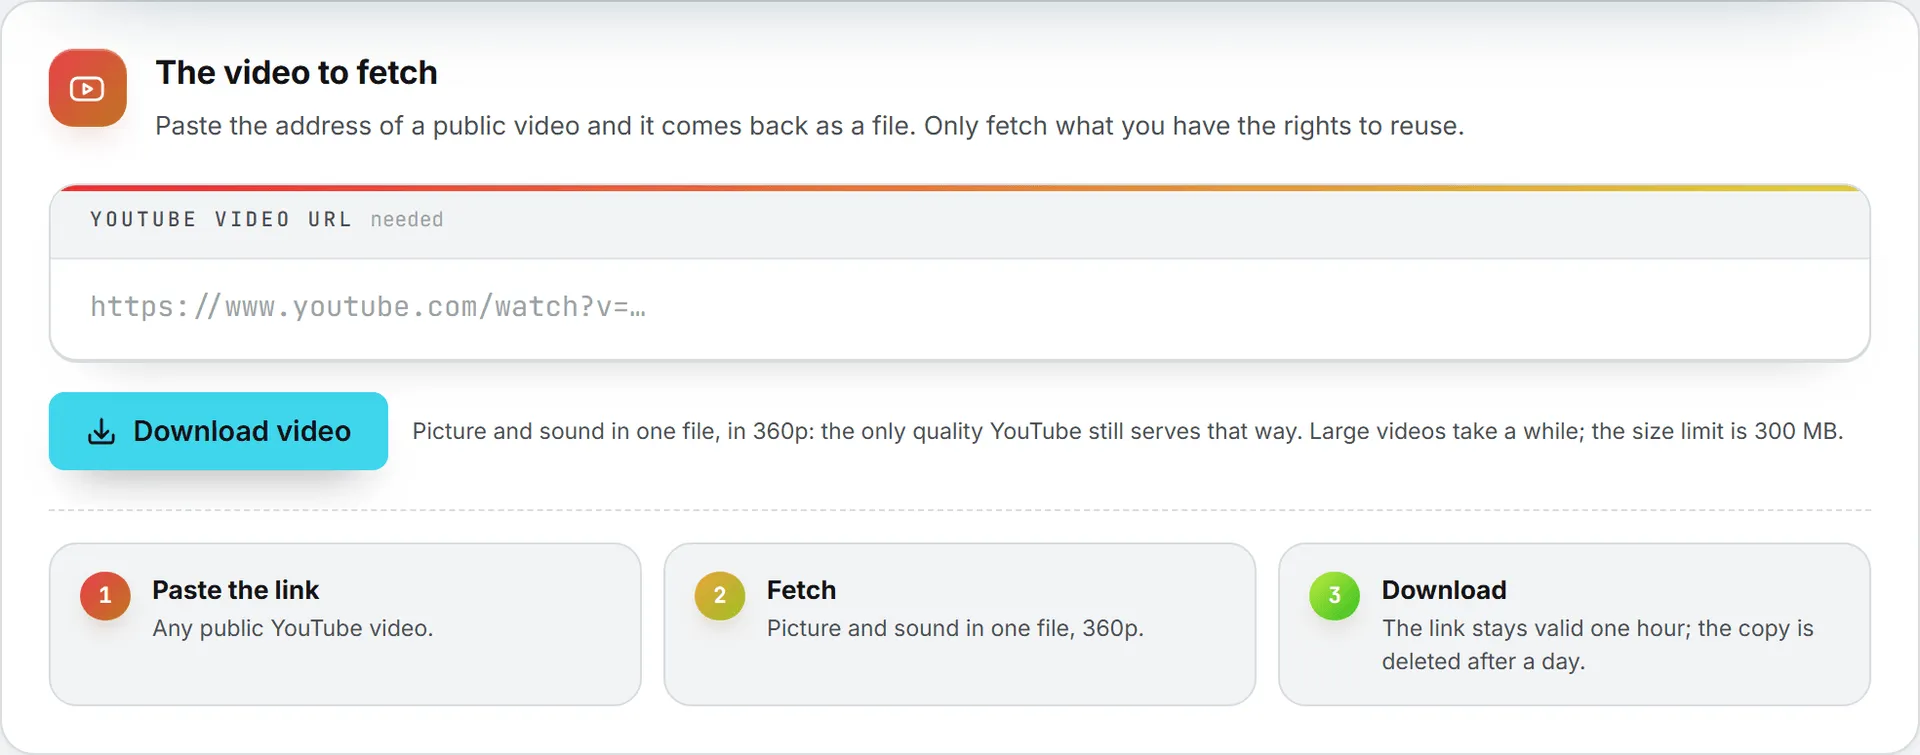
Limits and good to know
The download link is valid for one hour, and the copy kept on the server is deleted automatically after a day, so save the file when you ask for it. Videos over 300 MB are refused.
- The file isn’t added to the Assets Library. To use part of it as a reference clip in video generation, save it, trim it to the length the engine takes, and upload it from the video form.
- There’s no charge for a download.
- It fetches the video file only. There are no transcripts or captions.
Important: Only download videos you have the rights to reuse.
Troubleshooting
- “That does not look like a YouTube video URL.” Paste the full address of a single video, as your browser shows it.
- “Video is too large.” The video is over 300 MB. There’s no lower-quality option; pick a shorter video.
- “No downloadable format found for this video.” YouTube offers no file with sound and picture together for it.
- YouTube blocked the server. YouTube sometimes asks automated requests to prove they aren’t a bot. If you see this message, contact the BearingBridge team.
- “Your role (viewer) is read-only.” Downloading needs the editor role or above.