Users and invitations
Administrators use the Users page to add colleagues or invite them by email, set their role, brands, connections and daily allowance, or close a login.
The Users page is where you manage the people in your organization. You add colleagues or invite them by email, decide their role and what they can reach, and cap how much of the shared credits they may spend. You also close a login there when somebody leaves.
Before you start
- You need the Admin role. Open the Admin menu and pick Users.
- A personal account has no Users page: it holds only its owner.
- A user is never deleted. Only their login closes, and you can reopen it at any time.
- Not sure whether to add someone or invite them? The comparison table below sets out the differences.
What the page shows
The dark band at the top shows five figures: People, Active logins (with a note such as “1 login deactivated”), pending Invitations, Roles and Spent today, which adds up what everyone listed spent today at billed prices. Under your organization’s name, a pill reminds you that a user is never deleted, only their login closes.
On the left, a section index jumps to Overview, Directory and Invitations under People, then Roles and Decided elsewhere under Rights.
The Overview card, titled “How far a person reaches,” spells out the four layers behind what somebody can do. All four have to agree:
- The organization: the sides of the app it bought.
- Their role: what they may do in an area: view, create, update, delete.
- Their brands: the brands they were granted. People below administrator see only those.
- Their own switches: the modules, rights, connected systems left on for them alone.
The Decided elsewhere card links to four pages: Capabilities, Brands, Shared credits and Connections.
The directory
Each person gets one row, and there’s a lot on it. Their name comes first, or their sign-in address if they haven’t set a name, with the address underneath. Then come tags for their role, their organization, their brands (“Every brand of the organization,” “2 of 5 brands”) and their modules (“Every module,” “3 modules”). An amber tag such as “1 module set here” means some of their rights were decided for them alone.
Flags such as You, Partner, Login deactivated or Managed by a super admin sit beside the name. Under it, Last sign-in gives a date and time, or Never signed in for an account nobody has opened yet. On the right, a credit block shows Own credits, Shared pot, Spent today and a bar for the daily allowance.
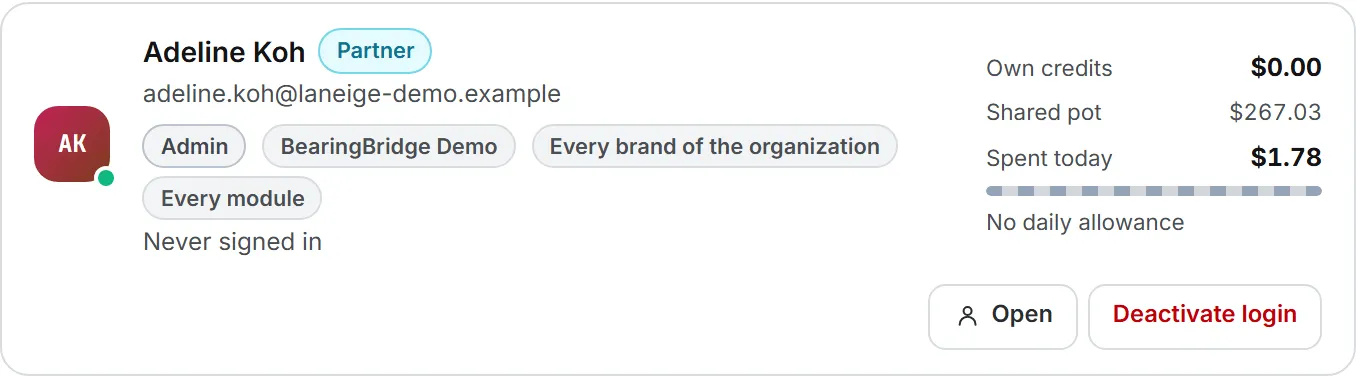
Two buttons sit at the end of the row: Open, which goes to the person’s own page, and Deactivate login (or Reactivate login). Your own row has no deactivate button, so nobody can lock themselves out.
Above the list, a toolbar narrows it down. The search box matches names, addresses, organization and role names. Next to it, a role filter starts on Every role, and a login filter offers Every login, Active only or Deactivated only. The last menu sorts by name or by last sign-in; with Sort by last sign-in, people who never signed in go to the bottom.
Add a person
The drawer is titled Add a person straight away. Use it when you want the account to exist right now, say for a new hire starting Monday.
- In the Directory card, click + Add a person.
- Fill in First name and Last name (optional) and Email (required).
- Leave Password (optional) empty, or click Generate for a 16-character password you can read out to them. It must be at least 8 characters.
- Pick a Role. It starts on Viewer.
- Set the Daily allowance ($). It starts at 0.
- Click Add the person.
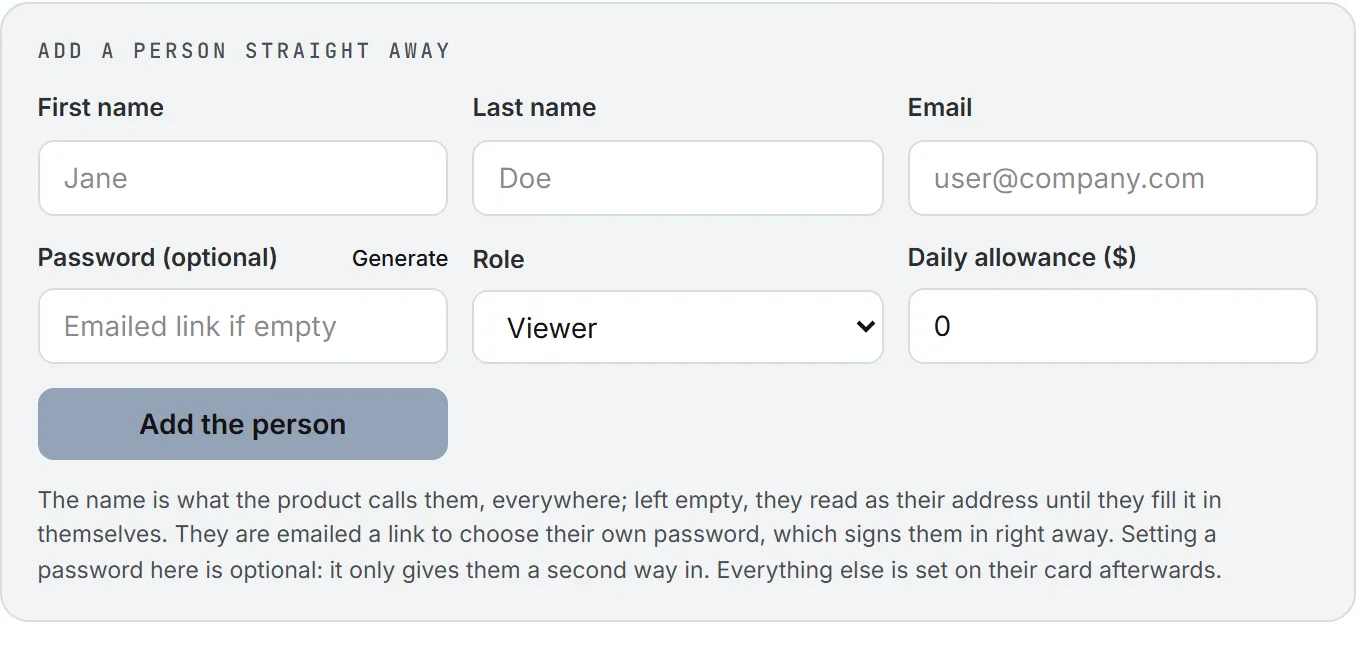
The person receives an email with a link to choose their own password. Using it signs them in, and it works for 24 hours.
Note: A password you set in this form only gives them a second way in. The emailed link still goes out.
If the email can’t be sent, a message says “User created, welcome email not sent.” The account exists anyway. Send them to “Forgot password” on the sign-in page, or set a password on their page.
Invite a colleague
Invitations suit people who’d rather set up their own password, and anyone who already runs a personal account.
- In the Invitations card, click + Invite a colleague.
- Fill in First name, Last name and Email.
- Pick a Role and a Daily allowance ($). They start on Viewer and 0.
- Click Send the invitation.
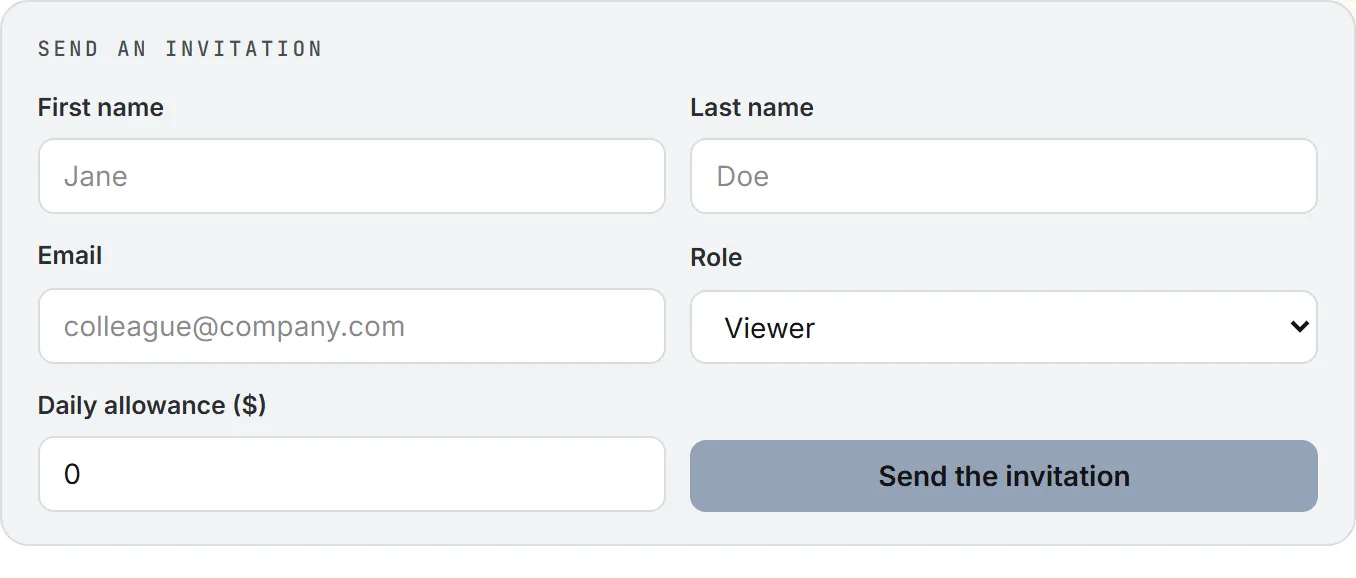
The person gets an email naming you and your organization. Replies go to your address. The link works once and stays valid for a week.
When they open it, they choose a password, accept the Terms of Service and click Join and sign in. They land in your organization with the role you picked. Somebody who already has a personal account clicks Sign in to accept, then Accept the invitation. They keep their account and bring their own brands into your organization, with access to each one.
The Role list holds the built-in roles and your organization’s custom roles, never Super Admin. Brands aren’t chosen here: grant them on the person’s page once they’ve joined.
The invitation is refused when:
- The address is already a member of your organization.
- The address belongs to a member of another organization. Only the BearingBridge team moves people between organizations.
- The address is a temporary mailbox.
Resend or revoke an invitation
Pending invitations are listed with the role, Invited by and Valid until. An expired one shows Expired and drops off the list about a month later.
There is no resend button. To send a fresh link, invite the same address again: the new invitation replaces the old one, and the old link stops working.
To cancel one, click Revoke and confirm. The link stops working, and you can send a new one at any time. Revoking is also the quickest fix when you spot a typo in the address.
Add or invite?
| Add a person | Invite a colleague | |
|---|---|---|
| Account exists | Right away | When they accept |
| Password | Chosen through an emailed link (24 hours), or set by you | Chosen by them on the invitation page |
| Link validity | 24 hours | 7 days, single use |
| Address that already has an account | Refused: invite it instead | A personal account moves in with its brands; a member of another organization is refused |
Open a person’s page
Once someone has joined, most of what you’ll change about them lives on their own page. Click Open on a row to reach the person’s page. It gathers what you decide about them, and one Save changes button at the bottom saves every card at once. The button turns amber when something is unsaved.
The band at the top shows whether the login is active, their address, role and organization. It also holds Back to the directory and Deactivate login.
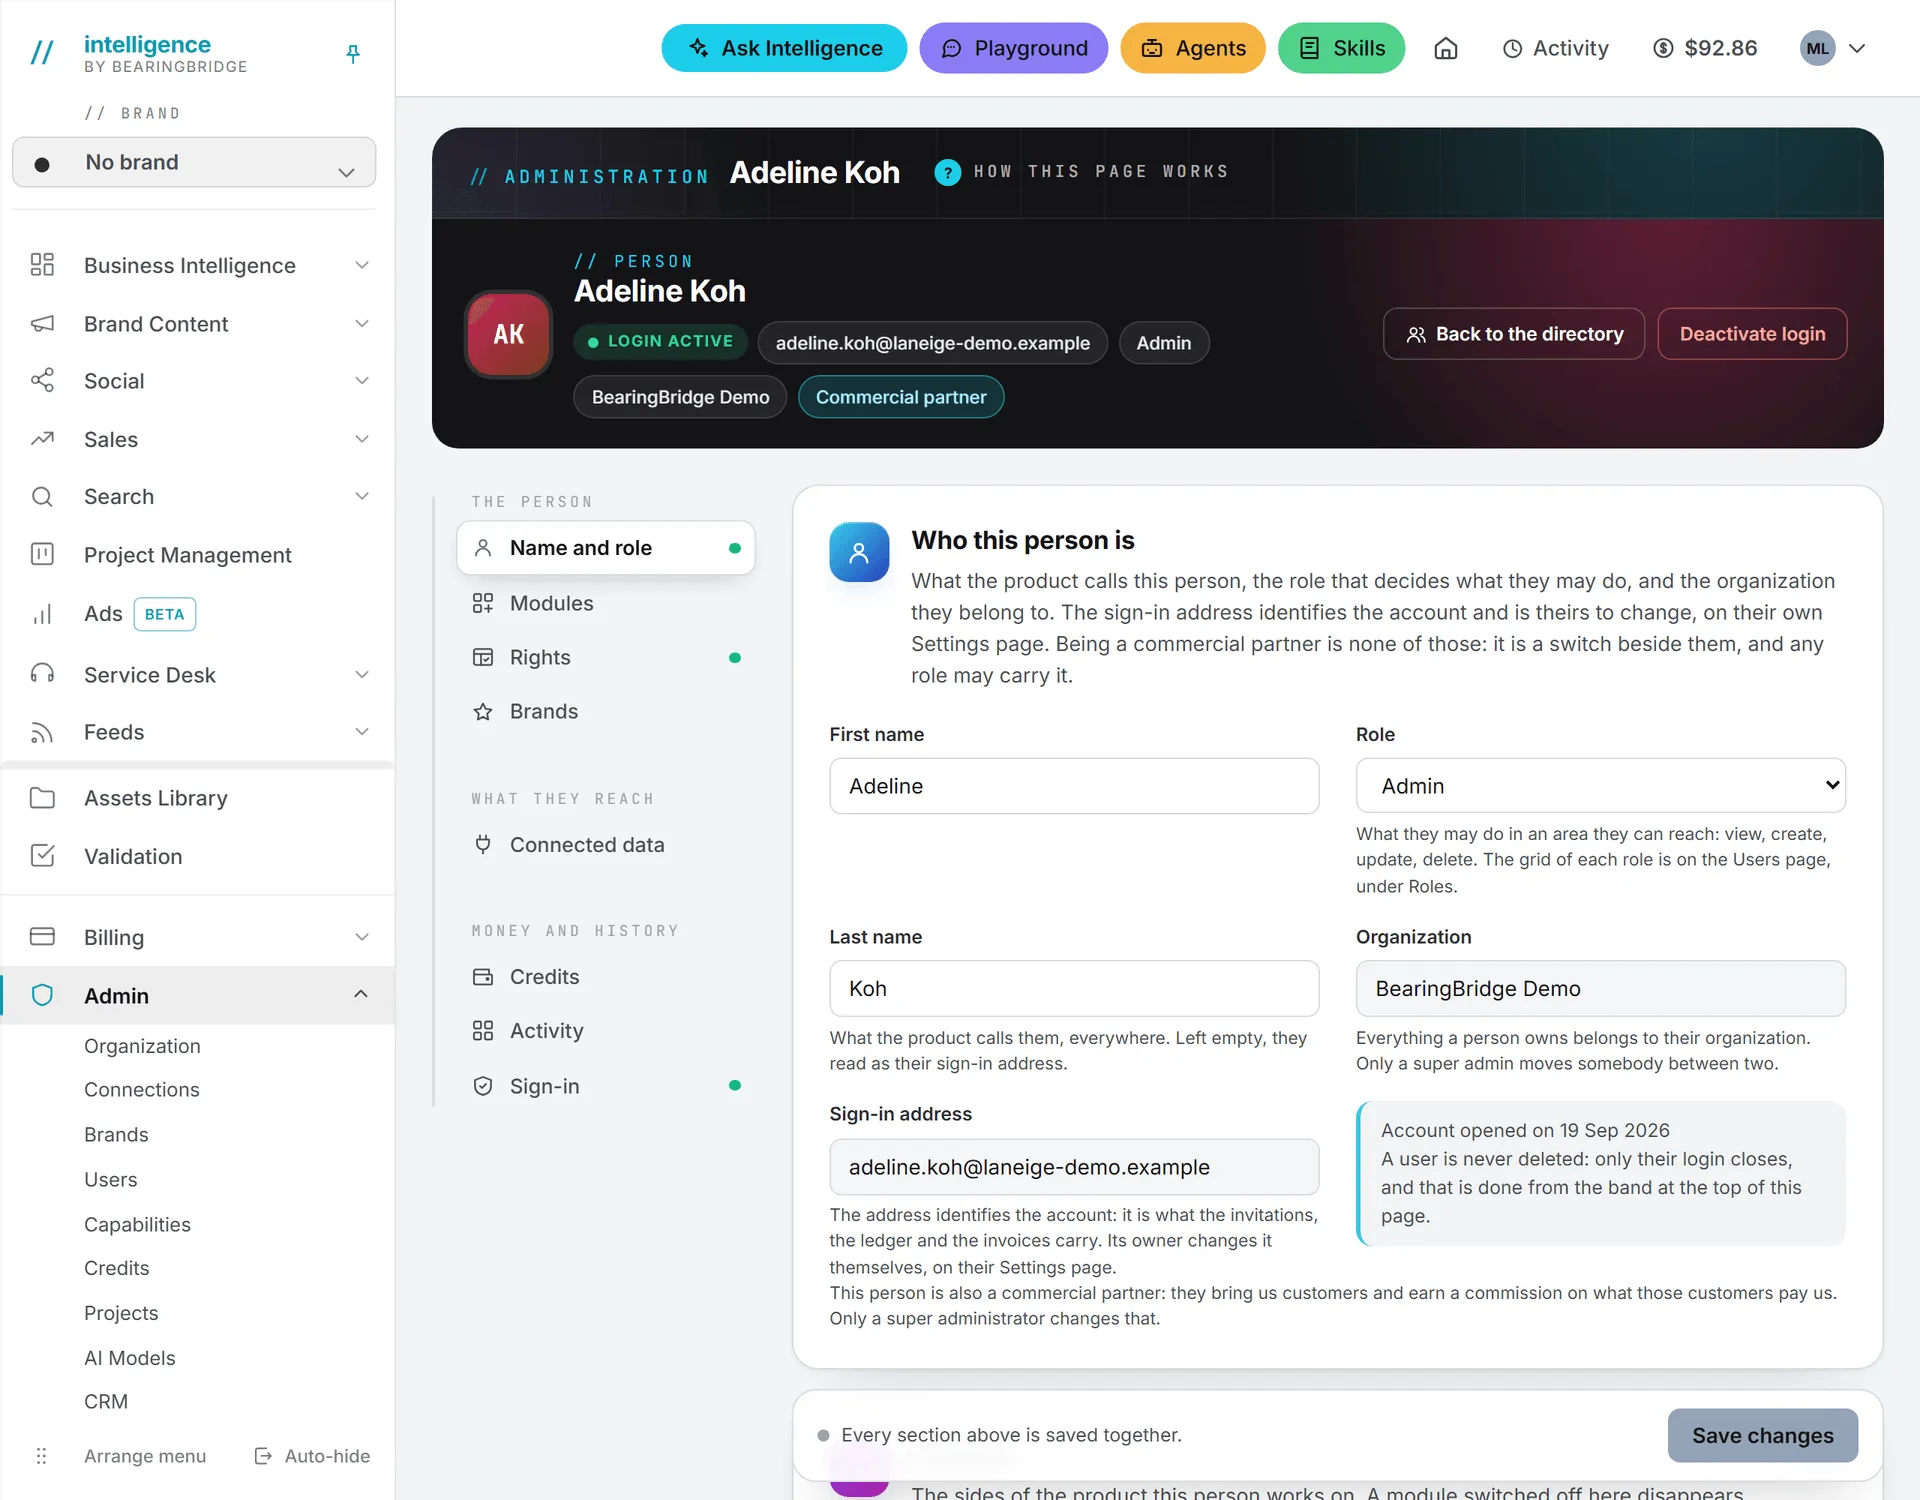
The cards, in order:
| Card | What you set or read |
|---|---|
| Who this person is | First name, last name, role. The organization and sign-in address are read-only. |
| Modules | Which capabilities they work on |
| Rights, module by module | Their own rights, when they should differ from their role |
| Brands | Which brands they see |
| Connected data | Which connected systems they may read |
| Credits and spending | Their daily allowance, balances and last credit movements |
| Activity | Their last paid actions, at the price billed, with a link to the full usage log |
| Sign-in and security | A new password, last sign-ins and trusted browsers |
The sign-in address belongs to the person. They change it themselves in their Settings.
Assign a role
Pick the role in the Role field of the first card and click Save changes. The list holds the built-in roles and your organization’s custom roles. Super Admin is never offered.
You can’t change your own role. The field shows “You cannot change your own role.” The Rights card follows the role you pick, even before you save. The roles themselves are graded in Roles and rights.
Choose modules
The Modules card lists every capability with a switch. Turn one off and it disappears for this person entirely, menu and pages. Turning one on can’t give them anything the organization doesn’t own (Capabilities explains the three levels).
Grant brands
Brand managers, editors and viewers see only the brands switched on in the Brands card. Administrators see every brand of the organization, so the card has nothing to grant them. You can also staff a brand from its Team button on the Brands page.
Grant connected data
This card lists the external systems connected to your organization, marked “MCP server” or “REST API,” and “paused” when switched off. Switch on the ones this person may read through Ask Intelligence and the agents, then save.
Administrators read every connected system, so the card just lists them for reference. Only administrators connect a system, on the Connections page.
Set a daily allowance
The allowance limits what a person may take from the organization’s shared credits each day, in billed prices. Think of it as a safety net for the shared pot. The day runs on UTC, so a team in New York sees it reset in the evening.
| Value | Meaning |
|---|---|
| 0 | Nothing from the shared pot. Everyone starts here. |
| A number, such as 5 | Up to that amount per day. After that they keep working on their own credits, if they have any, until midnight UTC. |
| Empty | No allowance: they may use the whole shared balance in one day. |
Credits a person buys for themselves are their own money and are never capped. Alongside the field, the card shows Own credits, Left in the shared pot, Spent today, Spent this month and a gauge for “Taken from the shared credits today.” The organization’s monthly cap is set on Shared credits.
Set a password
In Sign-in and security, type a New password or click Generate, then Save changes. It replaces theirs the moment you save, and nobody tells them, so pass it on yourself. You can also leave it empty and let them use “Forgot password.”
The same card lists their Last sign-ins (signed in, refused, signed out, sent a code and more, with the IP address) and their Trusted browsers. Click Stop trusting on one, or Stop trusting all, and their next sign-in from that browser asks for an emailed code again.
Deactivate or reactivate a login
When somebody leaves, this is the one step that matters on their last day.
- Click Deactivate login on the person’s row or in the band of their page.
- Confirm.
They are signed out at once and can’t log in. Their row shows Login deactivated and the Active logins figure drops by one. Their account, settings and history stay intact. They get an email saying their access is closed, with your address to answer.
To undo it, click Reactivate login and confirm. They can sign in again immediately, and an email tells them so. If either email fails, a message tells you to let them know yourself.
You can’t deactivate your own login. Another administrator has to do it.
Who can do what
| Action | As an administrator |
|---|---|
| Add or invite people into your organization | Yes |
| Set roles, modules, rights, brands, connections and allowances | Yes, for people in your organization |
| Give the Super Admin role | No |
| Edit a member of the BearingBridge team | No: the row reads “Managed by a super admin” and has no buttons |
| Move a person to another organization | No: ask the BearingBridge team |
| Change your own role, rights or login | No |
Access to the page also follows the Users rights in the roles table. Administrators hold them by default.
What it costs
Managing people costs nothing. The amounts on this page are what people already spent, at the price billed. To see what a given action costs before anyone runs it, read What costs credits. The month-by-month detail per person is in the usage log.
Troubleshooting
You need to remove somebody for good. The app never deletes a user. Deactivate their login, and if you have a legal reason to erase the account, contact support.
“This person already belongs to another organization.” Only the BearingBridge team moves people between organizations.
Adding a person fails for an address that already has an account. Every login is unique. Invite the address instead: a personal account moves into your organization when its owner accepts, and a member of another organization needs the BearingBridge team.
“Invitation saved, email not sent.” The invitation exists but the email didn’t leave. Revoke it and send a new one a few minutes later.
A new colleague can’t run anything on the shared credits. New people start with a daily allowance of 0, by design. Set one in the Credits and spending card on their page.