Writing posts
Social studios share one editor: brief the post, draft it with AI or write it yourself, then edit, version, illustrate and check it before publishing.
Every network in Social has a post studio built the same way: one form that holds the brief, the copy, the pictures and the publishing of one post. This article is for editors, and it covers the parts every studio shares. The network articles (LinkedIn, Instagram, Facebook, TikTok and X) cover what’s different on each.
The short version
- Open the network under Social and check the brand in the header.
- Write the brief and click Draft with AI, or click Write it myself.
- Edit the copy. It saves itself as you type.
- Add a picture or a video on the pictures step, if the post needs one.
- Check the voice, send it for validation if needed, then publish.
The rest of this page goes through each step in detail.
Open a studio
Pick a network under Social in the left menu: LinkedIn, Instagram, Facebook, TikTok or X. Make sure the header is on the right brand first.
The dark band at the top of the studio holds:
- the post list button, which shows the open post’s title (or All posts) and how many posts the brand has
- How this page works, a short note about the network
- New post, for editors, which clears the form for a fresh post
- the steps of the post as tiles. On an open post each tile is a tab. The tile shows the step’s state: done, in progress, to do or not needed.
On LinkedIn, Facebook and X the steps are 00 The brief, 01 The copy, 02 The pictures and 03 Publishing. On Instagram and TikTok they’re 01 the picture or the video, 02 The caption and 03 Publishing.
Find a post
Click the post list button to open a panel over the page with every post of the brand. In the No brand workspace, you only see your own posts and the ones colleagues shared.
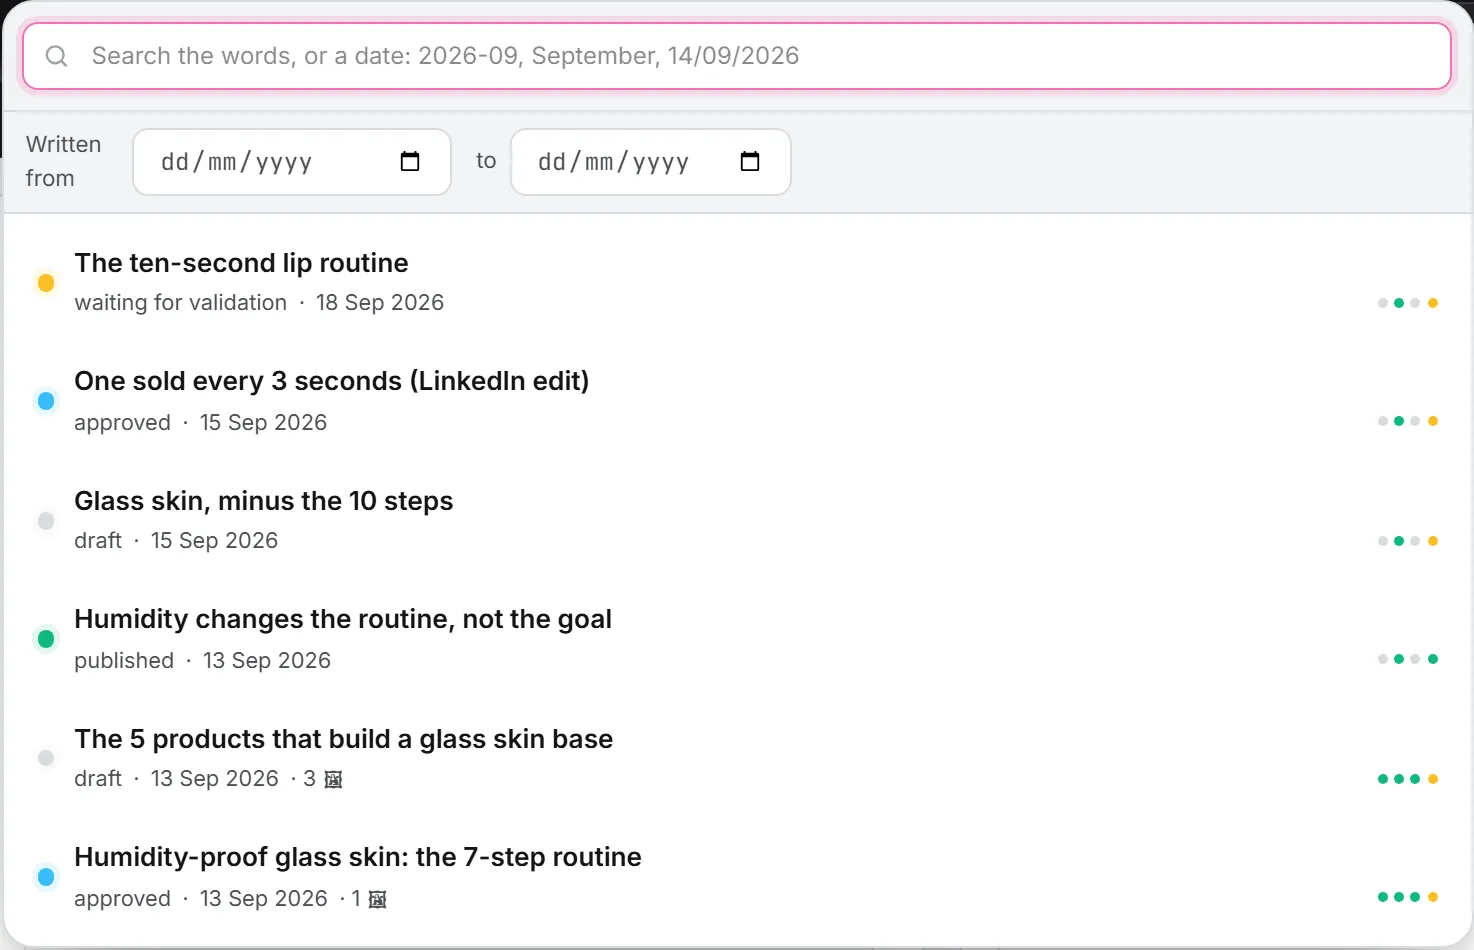
- Type in the search box to match words in the title or copy, the status, or a date written the way you’d write it (2026-09, September, 14/09/2026).
- Use Written from and to to keep posts written between two days. Clear the dates drops them.
- Each row shows the status, the day it was written, the number of pictures, whether it’s queued and a dot per step.
Click a row to open that post. The panel closes when you click elsewhere or press Escape.
Write the brief
A LinkedIn, Facebook or X post starts with a brief. The form asks for the frame first, and the words after.
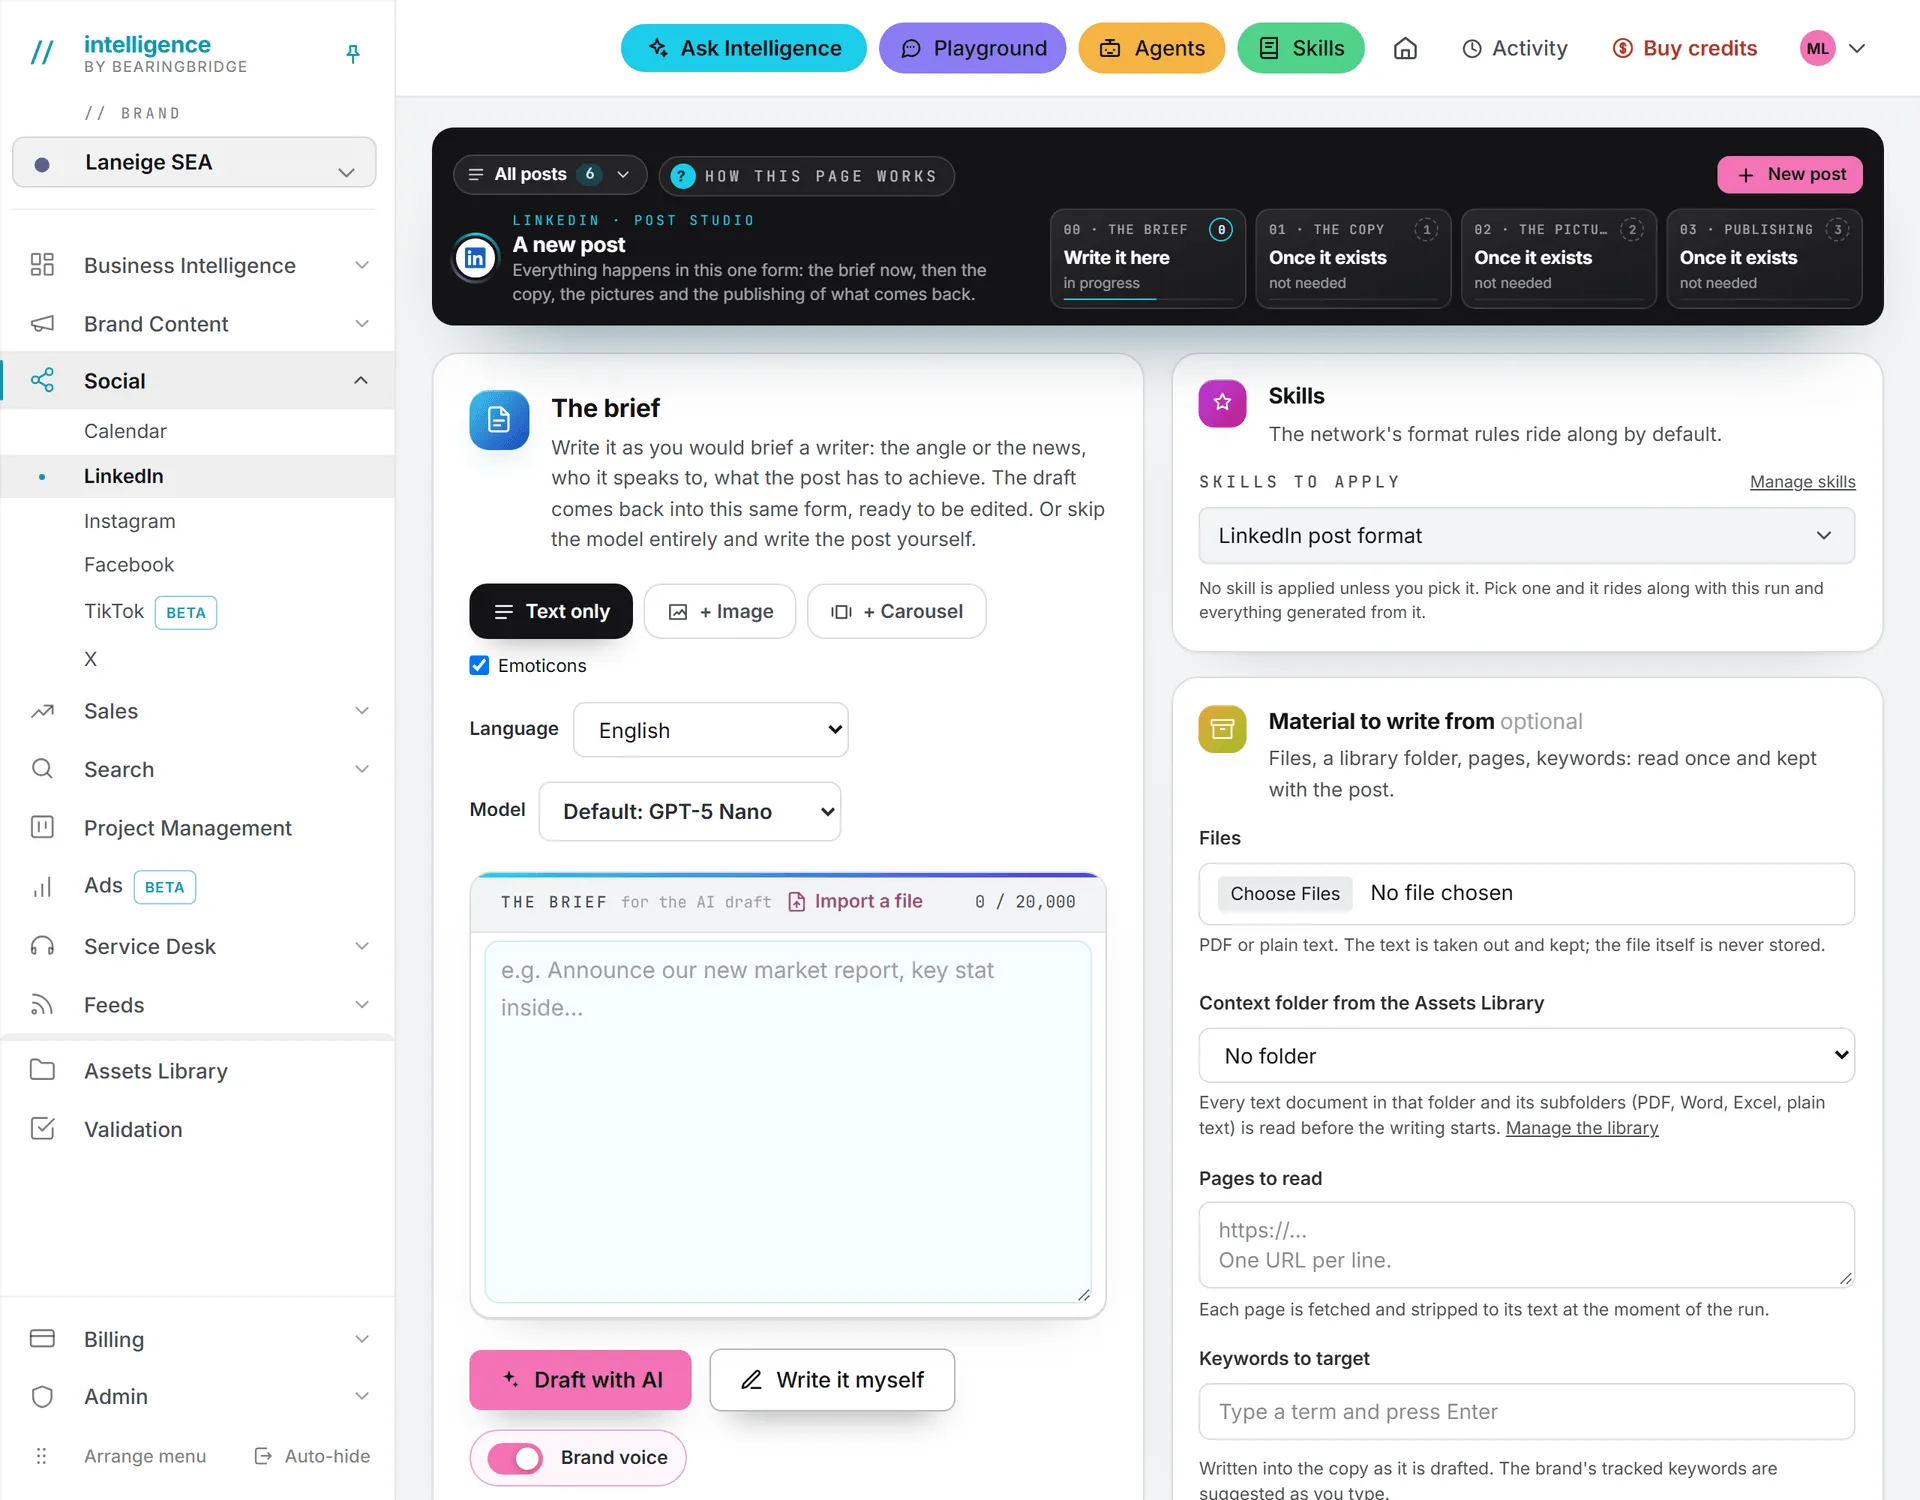
- Pick the shape: Text only, + Image or + Carousel. Facebook also offers Video. On X the several-picture shape is + 2 to 4 pictures.
- Decide on emoticons. Emoticons is ticked by default, which asks for 3 to 6 emoji spread through the post. Untick it and the copy comes back without a single one.
- Pick the language. The brand’s own languages come first in the list.
- Pick the model. The list shows what each model costs per million tokens read and written. Your admins decide which models each network offers (see AI models), and the app remembers your pick for next time. Leave it on the first option to use the default.
- Write the brief the way you’d brief a writer: the angle or the news, who it speaks to and what the post has to achieve. The box holds 20,000 characters, and the counter above it turns amber near the end.
- Leave Brand voice on to write with the brand guidelines, or its learned voice, and score the draft against them. Turn it off to write without them.
- Click Draft with AI.
Import a file next to the brief reads a .txt or .md file in your browser and adds its text after what’s already in the box. The file isn’t stored. Front matter is dropped and blank lines are evened out. Files over 2 MB are refused, and a file that would overflow the box is cut at the limit.
X adds its own settings to the brief (shape, hashtags, mentions, a link). See X.
Tip: Don’t need AI? Write it myself opens the editor with whatever is already in the brief box as the first text. No model is called and nothing is billed. The button only shows for a new post.
Material to write from
Material is optional. Whatever you add in the side column is read once and kept with the post.
| Field | What it takes |
|---|---|
| Files | Up to 5 PDF or plain-text files (.pdf, .txt, .md, .csv, .json). The text is taken out and kept, the file itself is never stored. A file that’s too large is skipped and named under Could not read. |
| Context folder from the Assets Library | Every text document in that folder and its subfolders (PDF, Word, Excel, plain text) is read before writing starts. Manage the library opens it in a new tab. |
| Pages to read | Up to 5 web addresses, one per line. Each page is fetched and stripped to its text when you draft. |
| Keywords to target | Type a term and press Enter, up to 25. They’re worked into the copy as it’s drafted, and the brand’s tracked keywords are suggested as you type. |
Skills
The Skills card is the same skills picker you’ll find elsewhere in the app, and the network’s own format skill is already picked: LinkedIn post format, X post format, Facebook post format, Instagram caption format or TikTok script format. It carries the network’s posting rules.
With the LinkedIn or X format skill picked, the draft is checked against the rules after it’s written. Anything broken goes back to the model once to be fixed. Unpick the format skill to draft free-form, with no checks. You can add your own skills too, and Manage skills opens them in a new tab to read or edit. See skills.
One case skips this card. A post re-purposed from another network is drafted with the target network’s format skill alone, since there’s no form to pick skills in. See publishing.
After you click Draft with AI
The draft opens on the copy step. A line under the brief says Drafted with what it cost, plus two warnings when they apply:
- Could not read: a file or page from the material that failed.
- Still off the rules: a rule the fix pass couldn’t land.
The copy is saved as version 1, a copy goes to the Assets Library as a text, and, with Brand voice on, the post gets a voice score. If the model sends back no working title, the post is named after its first line. The brief box empties, ready for the next post. The run also shows in the Activity panel, so you can leave the page while it works.
Edit the copy
The copy step has a single editor, with a working title on top and the copy under it. Whatever sits in that box is what goes out.
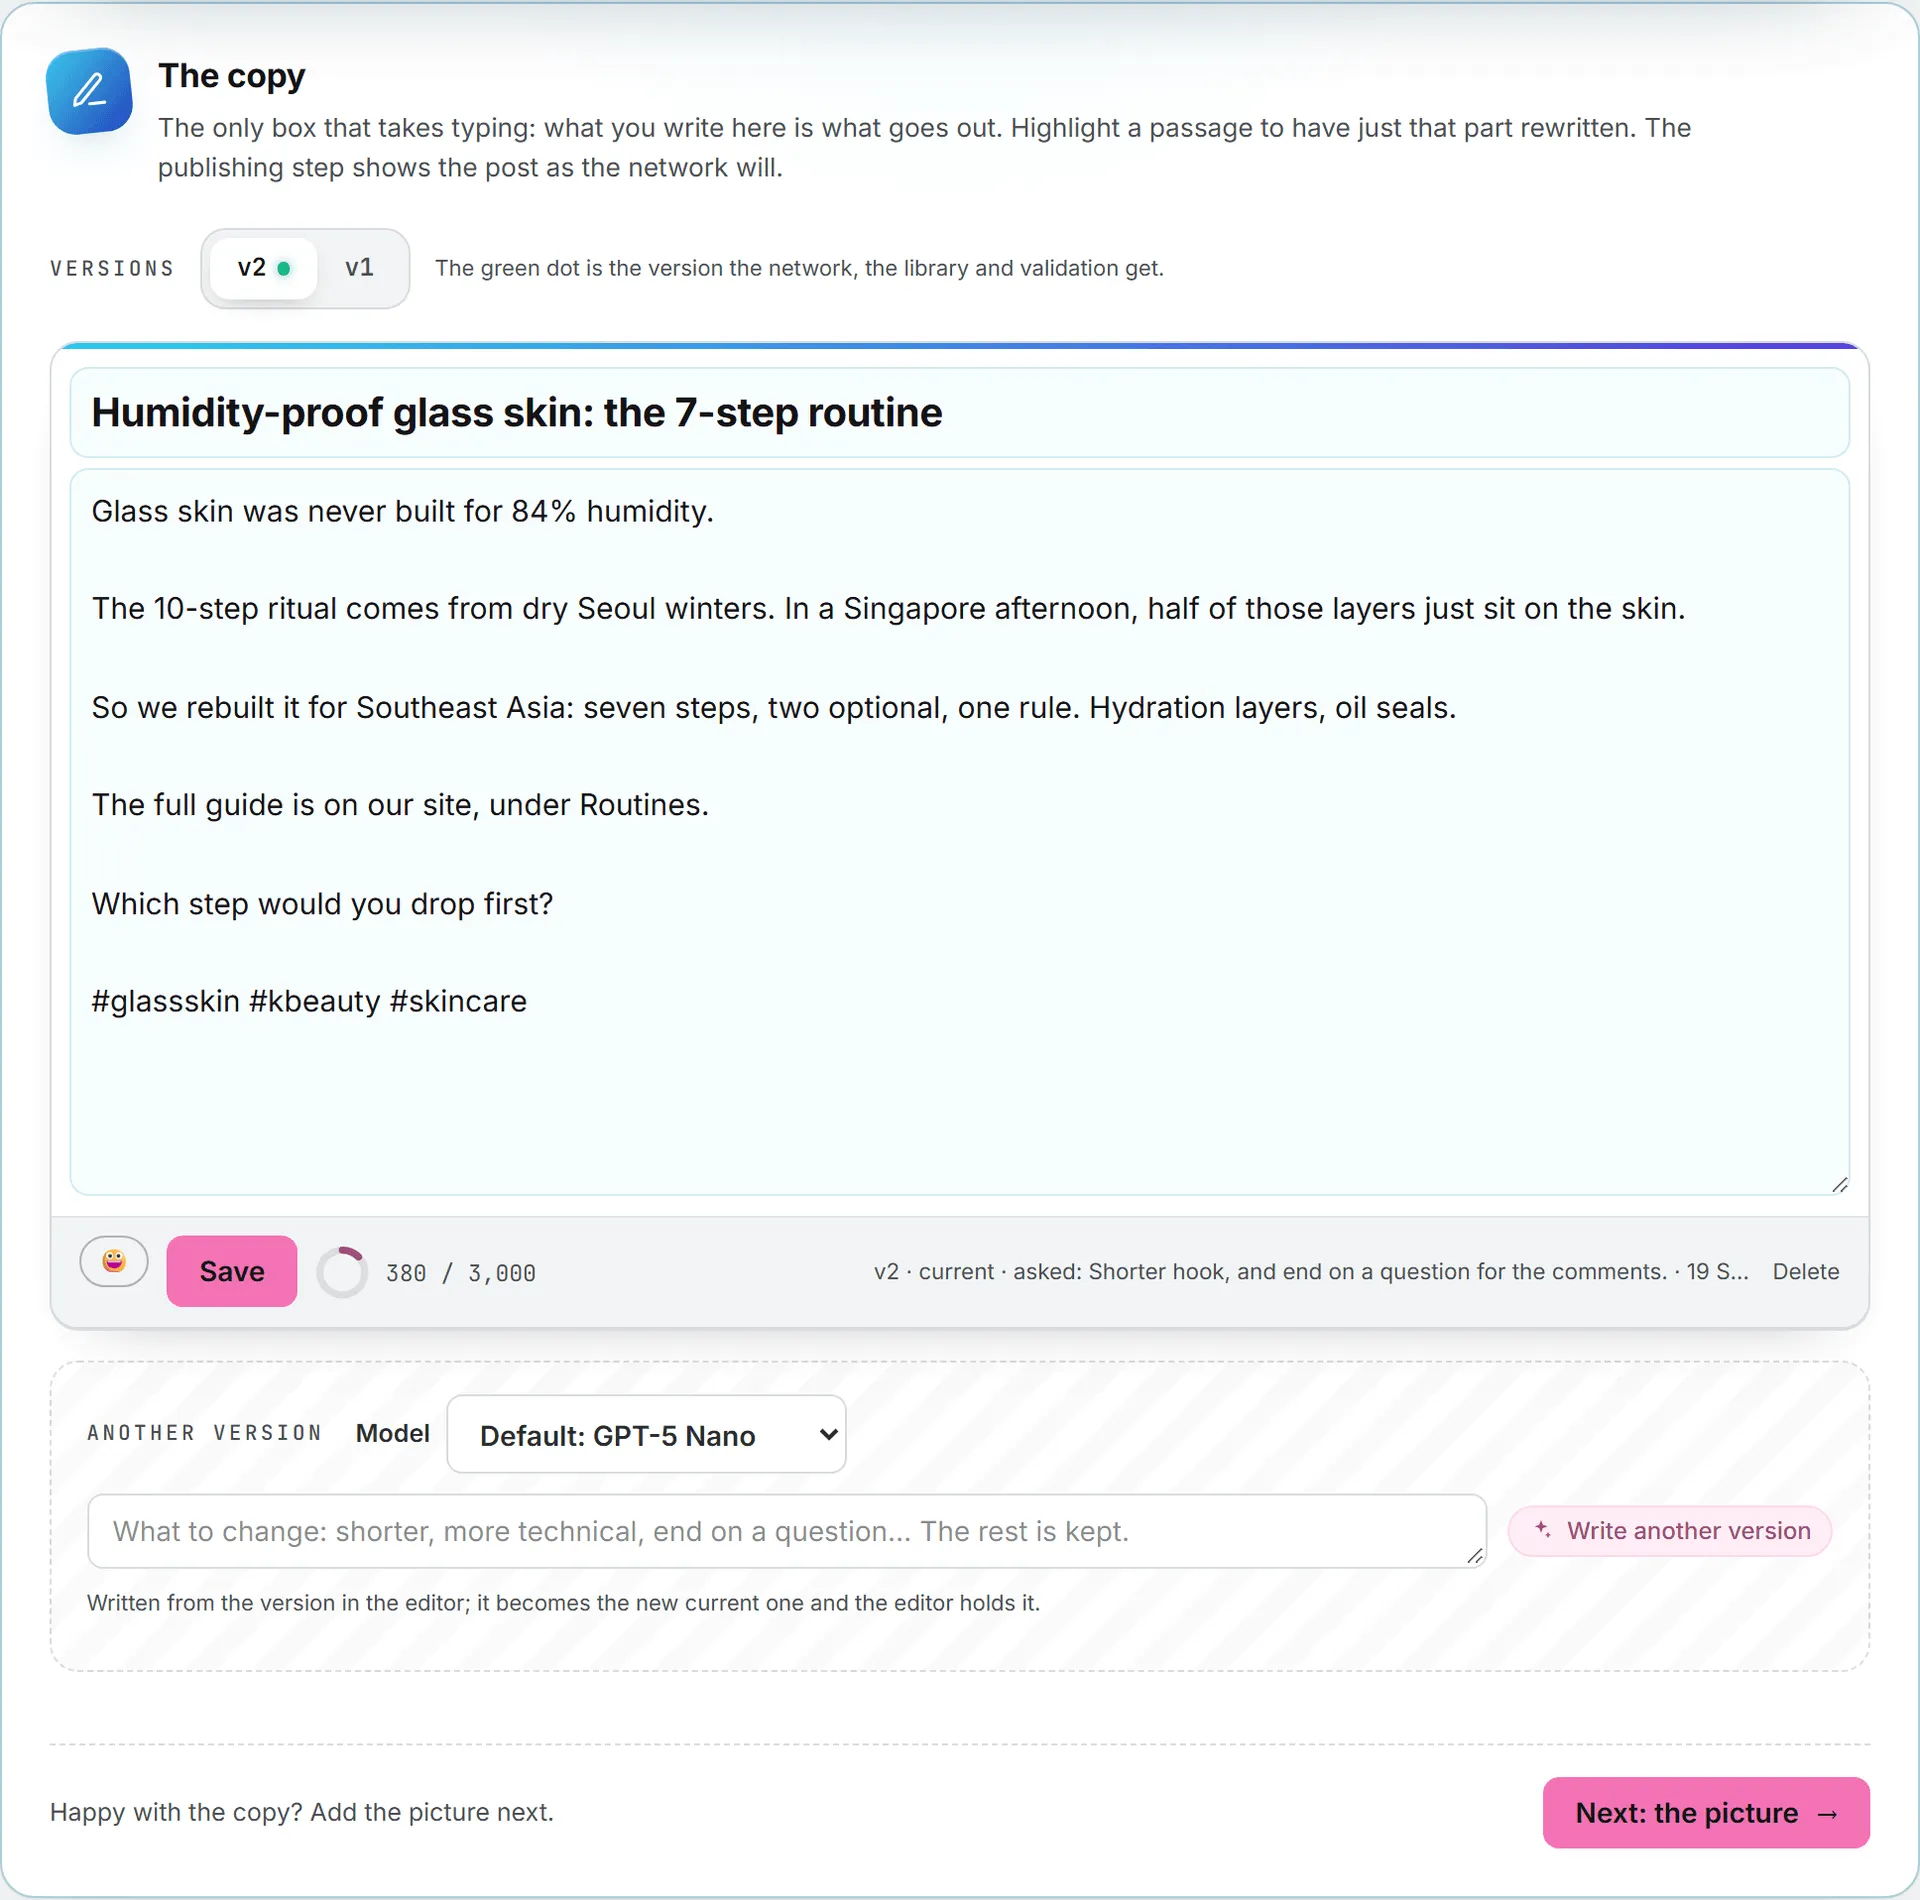
- The counter under the editor shows how much room the network leaves. LinkedIn counts to 3,000 characters and X counts each post of a thread in weighted characters. The other networks show the character count.
- Add an emoticon opens an emoji picker.
- Save forces a save.
On the publishing step, you can edit the preview of the post as well. Type straight on it, and what you type goes into the same copy, with the same autosave.
Autosave
You rarely need Save. The post saves itself about a second after you stop typing, as soon as you leave the field, and when you hide or close the tab. A line next to Save says Saving…, Saved or Not saved: with the reason. If a save fails, your text stays on screen and the next keystroke tries again. Opening a post never writes anything.
Save earns its place after a big change. It saves and then reloads the post, so the counter and the version list catch up with you.
Versions
A post keeps every version of its copy, numbered v1, v2 and so on. Once there are two or more, a Versions switch appears above the editor. The green dot marks the current version: the one the network, the library and validation get.
- Click a version to load it into the editor.
- Use this version makes the one on screen current.
- Delete removes the version on screen. The others keep their numbers. It only shows when the post has more than one version.
When the wording is close but not there, type what to change under Another version (“shorter”, “more technical”, “end on a question”), pick a model and click Write another version. The rest of the post is kept, and the new version becomes current.
Rewrite one passage
Highlight a passage in the editor or in the preview, and a Rewrite with AI button appears next to it. Right-clicking the passage opens the same menu. Pick a quick edit (Shorter, Longer, Plainer, More concrete, Fix the writing, More emoticons or Fewer emoticons) or type your own instruction. Only that passage is rewritten, and the result is saved as a new version.
Draft again from the brief
On LinkedIn, Facebook and X the brief stays a step of the post. Click the 00 The brief tile and the boxes come back filled with what the post was written from. Change what needs changing, say a sharper angle or another language, and click Draft again. The copy that comes back is a new version of the same post, and the old one is kept. That’s the move to make when the angle itself was off.
Files, pages and folders aren’t put back in the boxes, because only their text was kept. If you attach nothing new, the text read the first time is used again.
Add pictures or a video
Once the words are settled, the post may still need something to look at. The pictures step starts with the shape. You can change it at any time, and it’s saved as soon as you pick it. Pictures already on the post stay until you take them off.
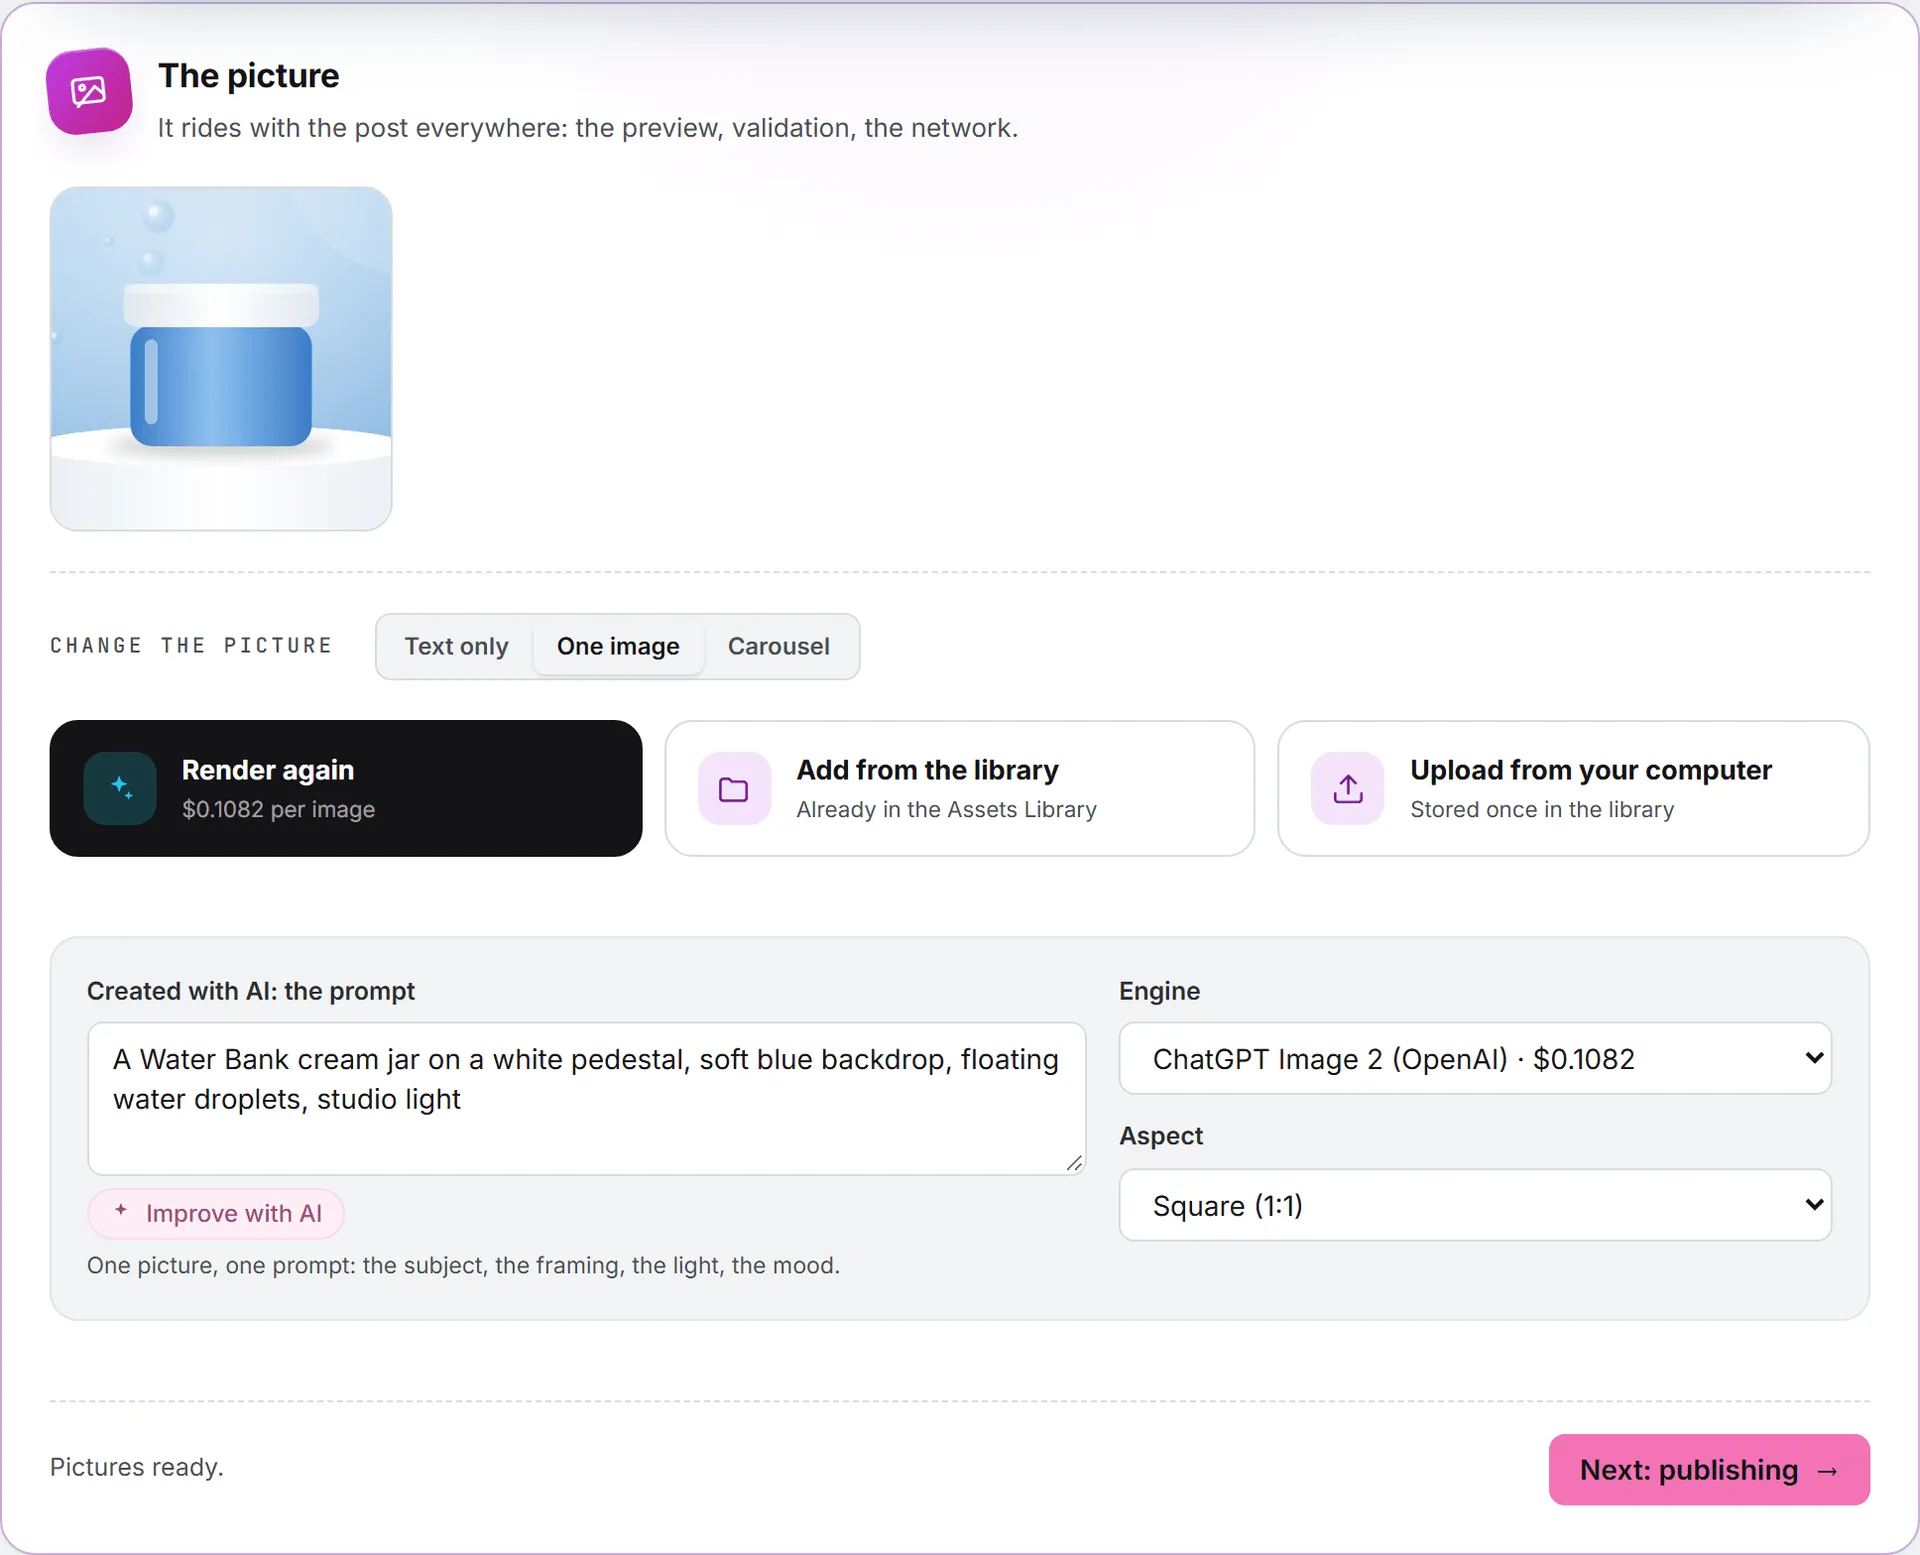
Then pick one of three ways in:
- Render with AI (Render again once there’s a picture). The price sits on the button: per image, per render for a carousel, or for the chosen seconds of a clip.
- Pick from the library (Add from the library on a carousel that already has pictures). Use a picture or clip already in the Assets Library.
- Upload from your computer. The file goes into the Assets Library under the post’s brand and onto the post. Pictures can be PNG, JPEG, WebP, GIF or AVIF, and a carousel takes several at once. A clip has to be a type the network publishes, and it’s checked before a byte is uploaded.
Under the three buttons sit the render settings:
- Created with AI: the prompt. Describe what the picture shows. For a carousel, write one block per slide (“Slide 1: headline”, then the prompt). Left empty, the prompt is written from the brief and the post when you render.
- Improve with AI writes the prompt for you from the brief and the post. It’s billed, and the cost shows next to it. Edit the result freely before rendering.
- Engine and Aspect. Each engine shows its price in the list.
- For a clip, Length, Resolution and With sound, when the engine offers them.
- For a carousel, Slides: 2 to 8, or 2 to 4 pictures on X.
Expect a minute or two for a picture. A clip takes a few minutes, so feel free to leave the page: the run shows in Activity and the post keeps the result. When it’s done, the line under the buttons says Done with the cost.
A single picture replaces the one on the post. On a carousel, new pictures are added at the end, up to 8 (4 on X). Click a picture to open it large. The × on a picture takes it off the post, and it stays in the Assets Library.
On Instagram and TikTok this step comes first, before any copy exists. See Instagram and TikTok.
Checks and status before publishing
The publishing step opens with two checks. Check voice scores the post against the brand guidelines, or against the learned voice when there are no guidelines. The score shows on the band as voice and a number, green from 80, amber from 60 and red below, and hovering it shows the most useful fix. It’s a paid check.
Send for validation hands the post to a colleague to sign off. Until they decide, the post is locked, and nothing on it can be changed or deleted. The validation article covers the other side of the request.
The rest of the step is covered in publishing: the two publishing tabs, the schedule, the queue, Where it stands for setting the status and the published address by hand, and Re-purpose for other networks, which turns this post into posts for the other networks.
Share or delete a post
A post in a brand is seen by everyone who has that brand. A post in the No brand workspace is its author’s alone until they click Who sees it on the band and pick Only me, Everyone in the organization or Chosen brands.
Delete on the band removes the post for good, after a confirmation. Admins can delete any post. Authors can delete their own No brand post while it’s still Only me. Nobody can delete a post while it’s waiting for validation.
Other ways to start a post
- From Feeds, now a module of its own in the left menu, Create from this post on an article opens a studio with a brief written from what you were reading. See feeds.
- A link from the calendar, the Assets Library or an email opens a post directly, on the right step.
Who can do what
Viewers can open the studios and read posts. Briefing, drafting, editing, rendering and sending for validation need the editor role or higher. Your admin can adjust the Social Content area for you on your user page, as roles and rights explains. See brands.
What it costs
These actions are billed, and each one shows its cost where it ran: Draft with AI, Draft again, Write another version, a rewritten passage, Improve with AI and a render. Check voice is billed too, but its price isn’t printed next to the score. Look for it in the usage log. When the LinkedIn or X check sends a draft back for fixing, the price shown covers both passes. What a draft costs depends on the model and on how much it reads and writes. The model list shows each model’s price per million tokens before you pick. Write it myself and typing in the editor are free. Uploaded files are stored in the Assets Library and count toward storage. See what costs credits.
Troubleshooting
“Write the brief first.” The brief box is empty. Write at least one line on the angle, the audience and the goal.
“The draft ran past the length the model can answer in and came back cut off.” Shorten the brief, or ask for a shorter post, and try again.
“No draft came back.” Rephrase the brief and try again.
“Nothing to score against yet.” The brand has no guidelines and no learned voice. Write the guidelines in brand foundation first.
“Not saved:” next to Save. The autosave failed, and the reason follows. Your text is still on screen, and the next keystroke tries again. If it keeps failing, copy your text somewhere safe and reload.
“The draft came back over … limit twice.” The LinkedIn or X check couldn’t bring the draft under the network’s hard limit. Tighten the brief and try again. See LinkedIn or X.
“Pictures only: pick a PNG, JPEG, WebP, GIF or AVIF file.” You uploaded something that isn’t a picture on a picture post. Switch the shape to a video if the network offers one, or pick an image.
Nothing can be edited. The post is waiting for validation. Open Validation from the note on the band.