Roles and rights
Roles decide what people may view, create, update and delete in each feature. Administrators create custom roles and give one person rights of their own.
A role decides what the people holding it may do in each feature: view it, create in it, update it, delete from it. The roles table sits on the Users page. When one person needs something different from their role, you set their rights on their own page.
How roles fit with the other layers
What a person can reach is decided in four layers, and each one has to allow it: what the organization owns, their role, the brands they were granted and their own switches. Roles are the second layer. A role never opens a side of the app the organization doesn’t own. For the idea behind the layers, read how roles and rights work.
Where to find the roles table
Open Admin, then Users, and scroll to the Roles card, or click Roles in the section index. The old Roles page address now brings you to this card.
The built-in roles
Five roles come with the app: Super Admin, Admin, Brand Manager, Editor and Viewer. You can’t rename them or change their level. The five built-in roles says what each one covers and where it sits on the authority ladder.
Viewer is the default when you add or invite somebody, so a new colleague starts read-only until you pick more.
As an organization administrator, you can read the built-in roles but not change them. The editor says so: “This role belongs to the product or to another organization. You can read it, not change it.” The Super Admin role always holds every right.
Want the Editor role to work a little differently in your organization? You can’t edit it, but you can copy it: create a custom role from Editor’s rights, adjust the grid, and give that role to your editors instead. Open any built-in role to see exactly what its grid grants.
Read a role’s grid
On the left you’ll find every role you can see, the most powerful first. Each card shows the role name, its key, how many users hold it, whether it is Built-in or Custom, its scope (“Every organization” or your organization’s name) and its authority level.
Built-in roles read “Every organization” because every organization shares them. Your custom roles carry your organization’s name.
Click a role to open it on the right. You’ll see:
- Name and Authority level, locked for built-in roles.
- What this role is for, a short description.
- The grid: one row per feature, four columns (View, Create, Update, Delete).
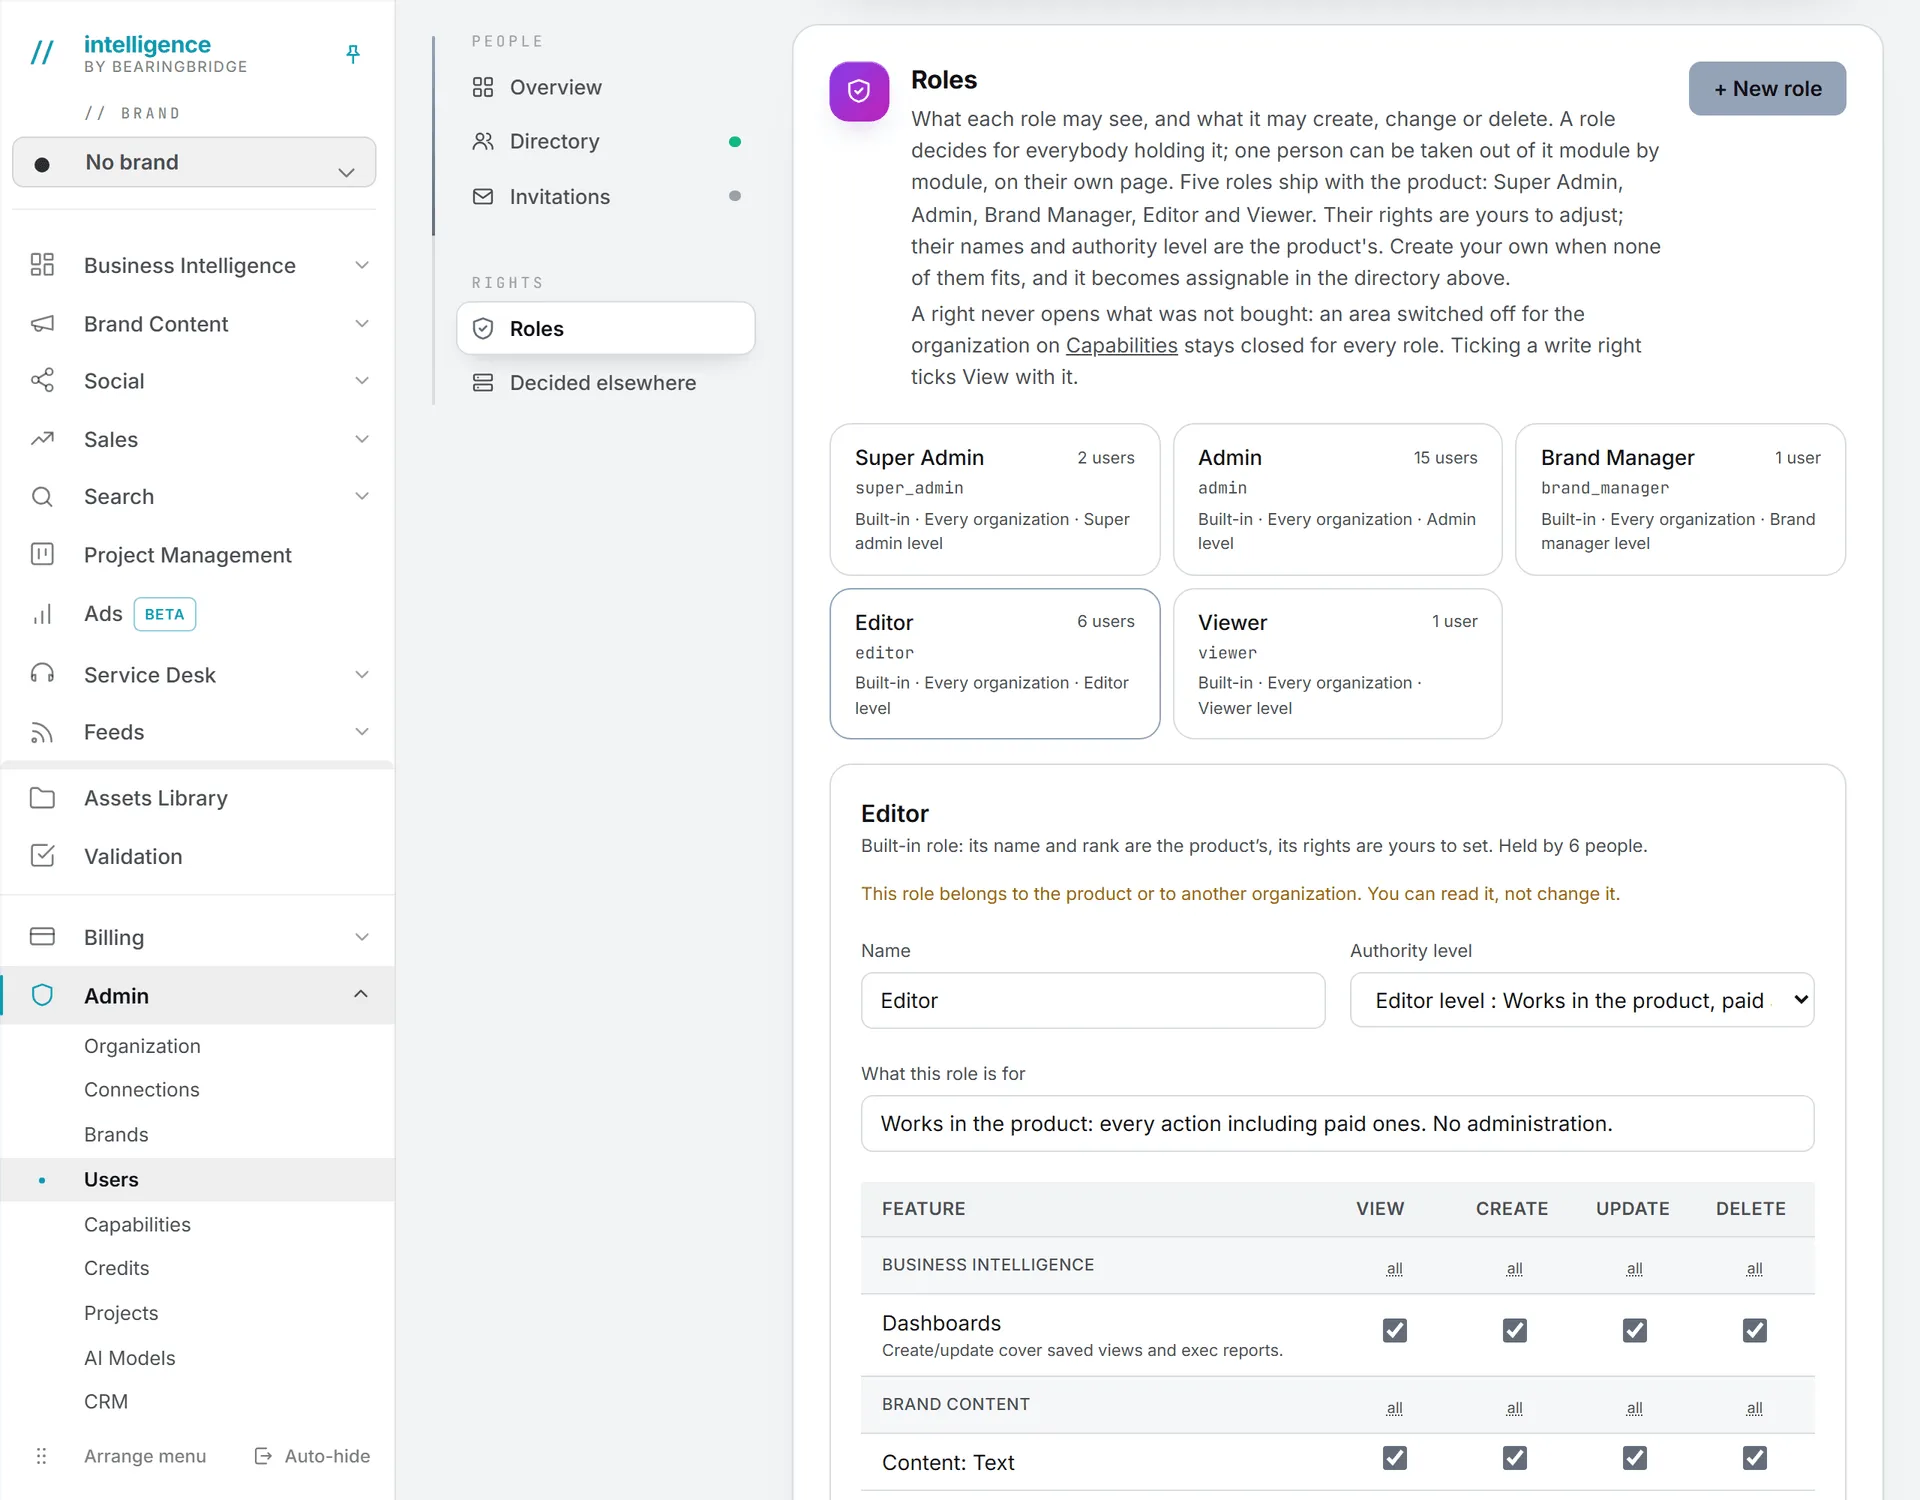
Features are grouped. Each group header has an all link above each column that fills the column for that group, and a second click clears it.
Note: Ticking Create, Update or Delete ticks View with it. Unticking View clears the other three.
The features in the grid
| Group | Features |
|---|---|
| Business Intelligence | Dashboards |
| Brand Content | Content: Text, Content Reports, Content: Image, Content: Video, Market Monitor |
| Social | Social Calendar, Social Content, Social Reporting |
| Sales | CRM, Revenue Follow Up |
| Search | Google Search (SEO), AI Search |
| Project Management | Project Management |
| Ads | Google Ads, LinkedIn Ads |
| Service | Service Desk |
| Shared | AI Agents, Skills, Playground |
| Administration | Brands, Users, Organization settings, Shared AI credits, Usage log, Super Admin (platform) |
Leave the Super Admin (platform) row unticked on your custom roles. The platform area belongs to the BearingBridge team.
Some rows carry a hint. Read it before you tick:
- Revenue Follow Up: View alone already exposes the numbers.
- Project Management: Delete removes a task for the whole organization.
- Users: Delete means deactivating a login. Users are never deleted.
- Shared AI credits: everyone can always fund their own wallet, whatever this row says.
- Usage log: covers other people’s activity and cost. Everyone always sees their own.
- AI Agents: which scopes a person may configure (organization, brand or personal) sits outside the grid. Role alone decides it.
The administration rows also guard the admin pages. View opens a page, and Create, Update and Delete allow adding, changing and removing on it. The Users page follows Users, the Organization page follows Organization settings, and the Brands and Capabilities pages follow Brands.
Create a custom role
Create your own role when none of the built-in ones fits: a freelance writer who should draft content but never open the CRM, for example.
- In the Roles card, click + New role.
- Type a Name, such as “Campaign manager.”
- Pick an Authority level. The list shows every level up to Admin, but an Admin can only create roles below Admin level.
- Under Copy the rights of, pick a role to start from, or Nothing (start empty). Editor is preselected.
- Click Create role.
- Adjust the grid and click Save.
The new role belongs to your organization only, and it can be picked in the Role field of a person’s page, and in the add and invite forms, as soon as it exists.
The authority level decides how far the role reaches where the app still asks how senior somebody is: whose brands, whose organization. A role at Admin level sees every brand of the organization, while lower levels see only the brands granted to them.
You can only create a role below your own authority. As an Admin, that means Viewer, Editor or Brand manager level. Picking Admin level returns “You cannot create a role with your own authority or above.”
Edit or delete a custom role
Open the role, change its name, level, description or grid, and click Save. The button stays amber until you do.
Saving writes every row as it appears on screen. That matters for a feature the role was never graded on, such as one added to the app later: it shows unticked, and saving stores it unticked.
To delete a custom role, open it and click Delete. Only a role nobody holds can be deleted: move its holders to another role first. Users keep their accounts either way.
Rights for one person
Roles cover most people. This section is for the exceptions.
Say one editor also needs to delete CRM contacts, and nobody else on the Editor role should. You don’t need a new role for that; you set it on their page.
- On the Users page, click Open on the person’s row.
- Go to the Rights, module by module card.
- Tick or untick boxes on the rows you want to change.
- Click Save changes at the bottom of the page.
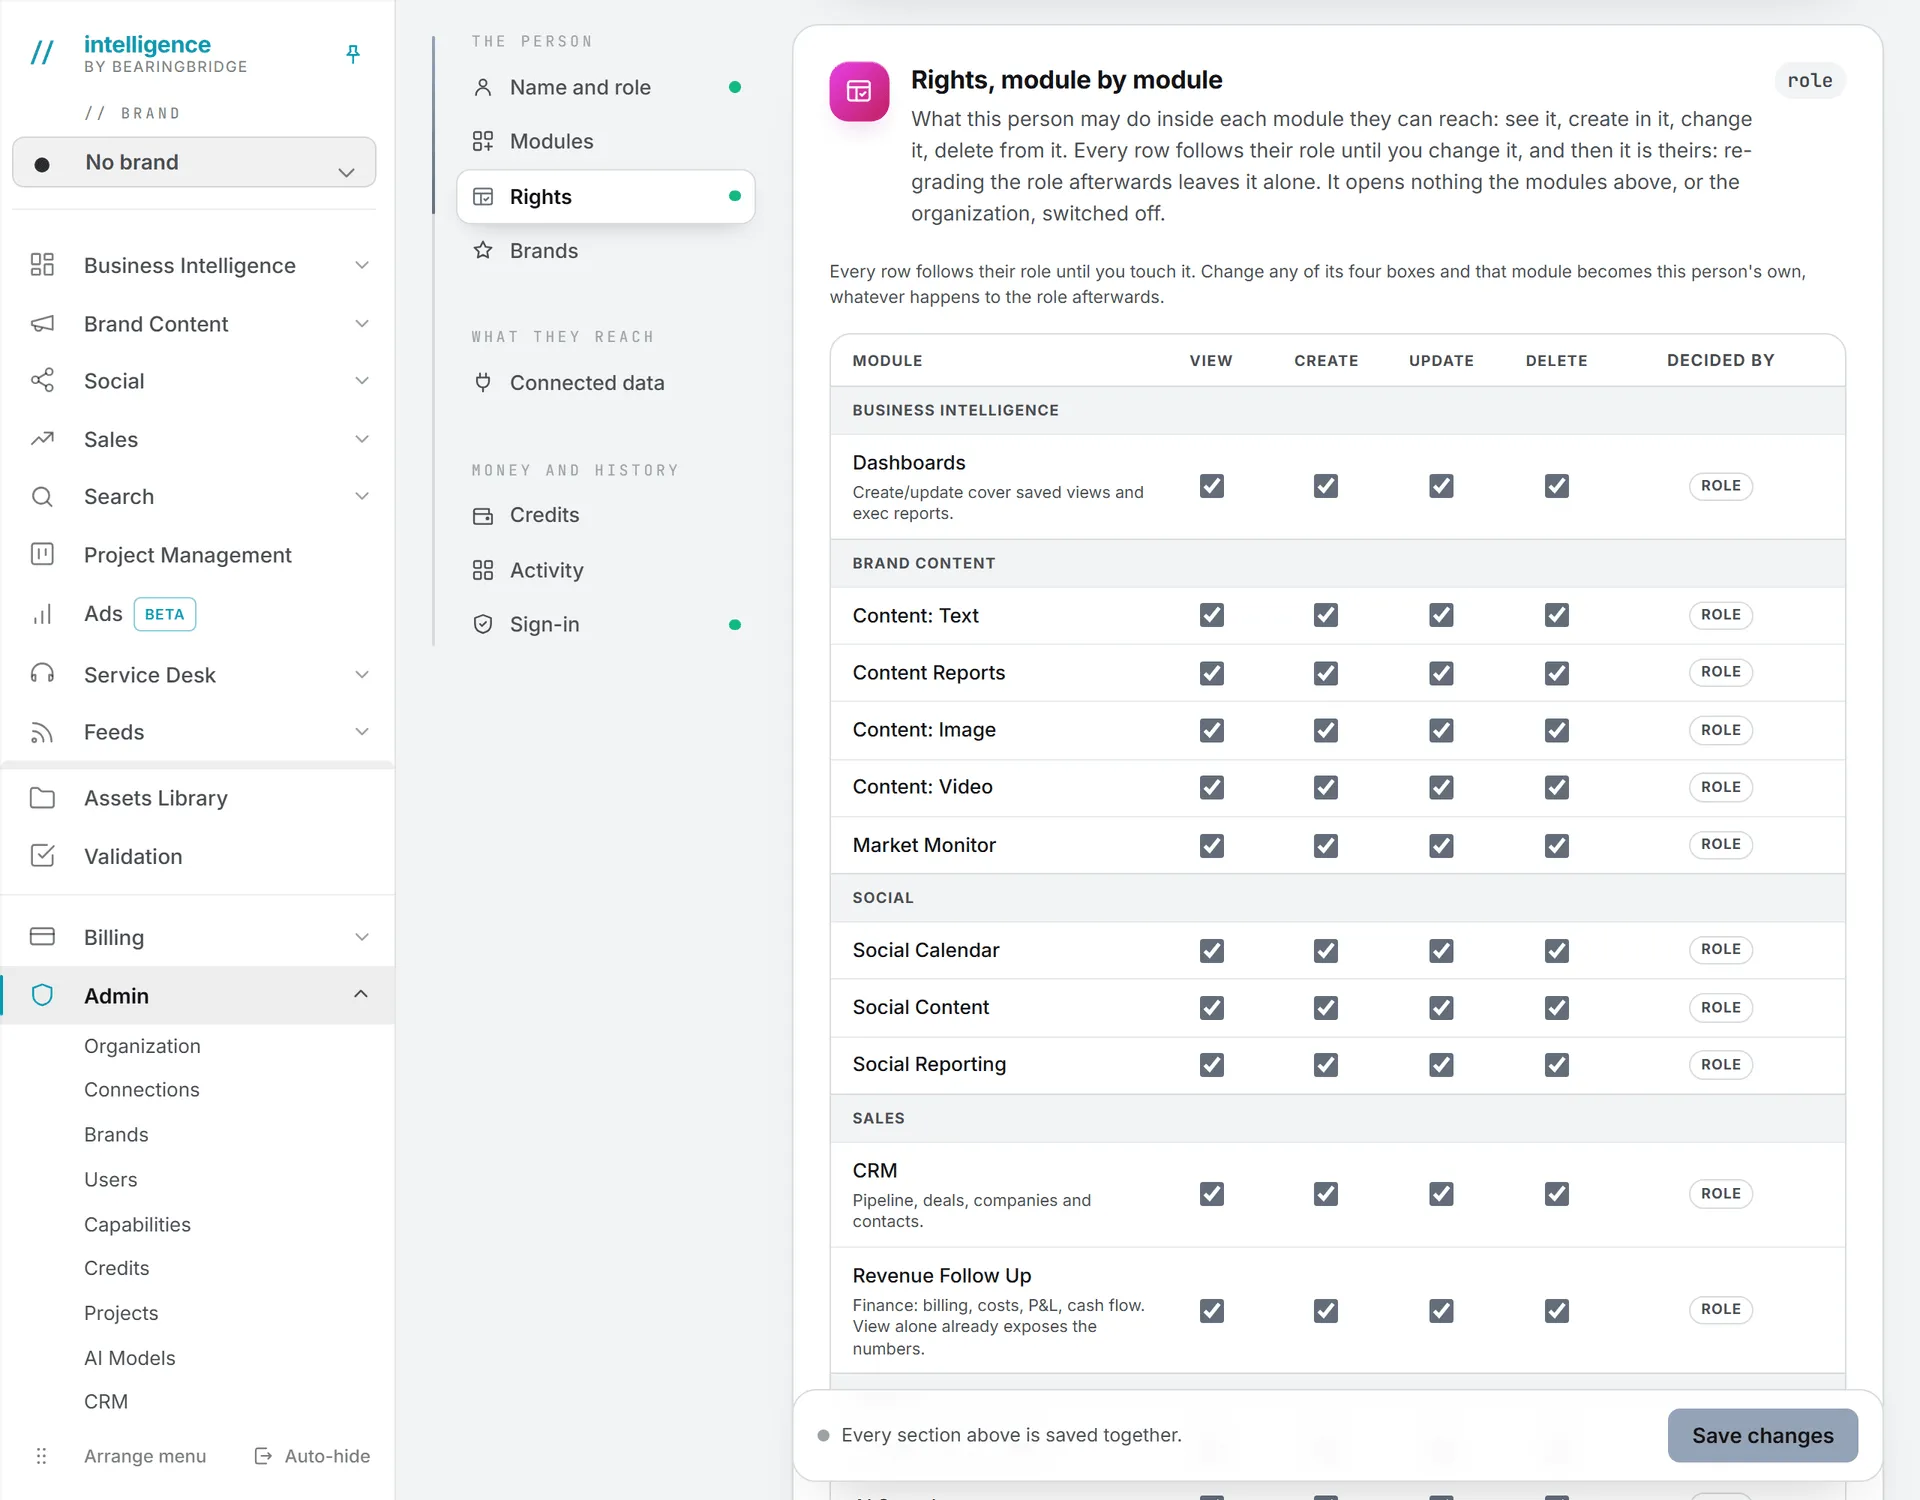
Each row shows its source in the Decided by column. A row tagged Role follows their role. As soon as you change one of its boxes, the row becomes the person’s own. From then on, re-grading their role leaves that row alone.
To hand a row back, click Follow the role on it. Once at least one row is the person’s own, a Follow the role everywhere button appears at the top of the card and hands back every row at once.
If you pick a different role in the Role field on the same page, the rows that follow the role show what the new role gives before you even save.
In the directory, a person with rights of their own carries an amber tag such as “2 modules set here.” The card’s counter shows “2 own,” or “role” when everything follows the role.
What per-person rights can’t do
- They never open what was not bought. A capability the organization doesn’t own stays closed, and so does one switched off in the person’s Modules card. In the second case the row says Module off above.
- You can’t give a right your own role doesn’t hold. The error names the action and the feature.
- You can’t change your own rights.
- The Super Admin (platform) row is hidden from you. Only the BearingBridge team grants it.
Good to know
Being a commercial partner is not a role. It’s a separate flag the BearingBridge team switches on: it adds the Partner menu and leaves the person’s rights as they were. A person’s role itself changes on their page, in the Role field (how to assign a role).
Changing roles and rights is free. What people then run inside the app can cost credits, and What costs credits lists it.
Troubleshooting
“This role ranks at or above your own.” You can only edit custom roles below your authority.
“2 user(s) still hold this role. Move them to another role first.” Change those people’s role on their pages, then delete the role.
“You cannot grant update on CRM: your own role does not hold it.” You tried to give somebody a right your own role lacks. Ask an administrator whose role holds it, or leave that box as it is.
Somebody still can’t open a feature they have rights on. Check the organization’s capabilities on the Capabilities page, then the person’s Modules card. A right never reopens a closed capability.